Friday, December 31, 2010

Save Some Bucks Mug - Starbucks at Home Joke


So, I just had to do this!  My sister-in-law loves Starbucks, but this past year they purchased a LOVELY home so I doubt she'll be making as many trips there - you know how it is ladies!  *LOL*

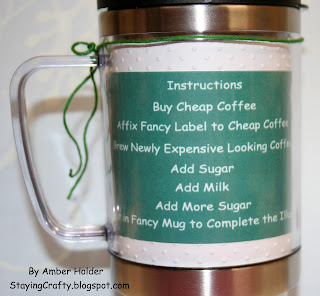
I ordered a nice quality mug that a photo can be inserted into to do this project.  Remember I ONLY did this for personal use and I did not sell it or profit from it in any way.  I took the Starbucks logo, took out the Star part and wrote in "Save Some" so now it says "Save Some Bucks Coffee"  *LOL*  C'mon - I thought it was funny!


I printed that out and cut around it.  Then I made instructions to go along with it.  The most important part of these instructions is... ADD SUGAR :)  I cut out a piece of white cardstock the right size to fit the mug and I embossed it with the Cuttlebug folder Swiss Dots.  I attached my printed pieces to this and slipped it in the mug.
 
I made a charm using a hero arts stamp of a coffee and a piece of Bright White Shrinky Dink.  I attached this with some green embroidery thread, and WAH LAH!  


Thursday, December 30, 2010

Crocheted Clutch Purse


This is what I made for my best friend this year.  I crocheted the purse using a pattern from a book.  The ribbon is from Stampin' Up.  I created a little charm that is hanging from the purse, but she could also remove it and use it for something else.

I sewed a liner for the inside and I wanted it to be a really fun pop of color... so I really used some fun fabric!

Wednesday, December 29, 2010

Thank You Card


There are 2 awesome things about this card, it's super flat for mailing and you can easily mass produce it since it's all stamping in the same color ink.  I made 4 of these cards total in a very short amount of time to send off to family.

To create this gorgeous card I used Stampin' Up Craft Ink in Whisper White and stamps from SP & Company.

I started by stamping the corners using the stamp set Stitchery Doo.  That set is mainly stitching lines - which I LOVE, but this wonderful design is on there too.  Doing the corners first will help everything else line up easier. 

After the corners were in place I wanted to stamp the sentiment to create a sort of border effect.  The sentiment is very elegant and swirly, it's from Ultimate Sentiments I.  I stamped it so that it is upright at both the top and the bottom of the card.  On the sides I had it face inward.

The last step was stamping the flourish in the middle.  I saved this for last because I thought it was easier to see where to place it with the border elements all in place.  If you didn't want such a flat card this center flourish would be lovely heat embossed or layered onto a scalloped circle and popped up.  The flourish is from the set called Flourishee. 

Tuesday, December 28, 2010

Shrinky Dink Photo Keychain


This was another handmade gift for this year.  I made this for my stepmother who LOVES photos.  These are all her grandchildren :)

I used the inkjet printable Shrinky Dinks to accomplish this.  I believe I printed the photos around 2 by 3, and I did lighten them in a photo editing program as the instructions suggest.  I punched holes in them with the larger hole setting on my Crop a Dile.

After I created all the shrunken photos I attached them to chains with a clasp at the top so she can clip this in her purse.  I also added a leaf charm that I thought was pretty.

Monday, December 27, 2010

Etched Mirror


This is a gift I gave to my aunt this year.  I bought the mirror from a local craft store and used Armour Etch cream to do the etching.  I used vinyl to create the stencils. I cut the vinyl in my Cricut.  The lacy edge was from the Easter Seasonal cartridge, and I added another circle inside to make it just a border.  The M is from Tie the Knot.

Wednesday, December 22, 2010

Stockings Banner


 This is my 2nd post of the day - earlier I posted a video on how to make an embossed acetate pocket card with a window.  You may want to check it out - it's a cool technique.

This is my last project for Tracy, Miss Craft Junkie Too herself.  It was SUCH an honor to be chosen to participate in her blog and share these projects with her and her lovely followers.  I am so blessed and grateful for the opportunity!  When someone who's work you admire so much notices you like that it is an awesome feeling.  Thank you Tracy!!!!  Everyone, be sure and head on over to her blog today to check out the other designers final projects!

 Banners seem to be all the rage these days.  I have the perfect fireplace to hang one, and I thought why not make it look like stockings - the traditional thing to hang from your fireplace this time of year?

So, I found a stocking cut on Christmas Cheer.  It already included a loop as part of the cut that is perfect for slipping something through to hang the stocking.

You can click to see the details, but make sure and use your back button.

I cut out 6 of the stockings (you'll cut out however many you need to spell out your last name - or another word of your choosing) at 9 inches.  Cutting them at this size I was able to get 2 out of a 12 by 12 sheet.  I did do this on my Gypsy, so I'm not sure if it would cut both using the Cricut directly.  I used a DCWV patterned paper on the front, and some old cardstock layered behind for added stability. I actually went through my stash and picked some cardstock I'd gotten in stacks that I didn't really care for. This was a great way to use it up without wasting it or having to try and work with the patterns I didn't care for.

I cut out the matching layers for the white parts of the stocking.  There is a little nail as part of that cut, I used the hide contour feature to avoid cutting this portion.  After they were all cut out I ran them through the Cuttlebug Spots and Dots folder for a fun texture.


You can click to see the details, but make sure and use your back button.
I cut out all the letters to spell out my last name at 2.25 inches using the Storybook cartridge. 

I used some hemp, that I purchased in the Jewelry making section of Wal- Mart, to hang these.  You could use a variety of things like twine, thin ribbon, etc.

This was a pretty simple project.  It took only a short time to assemble it all and would be super easy for you to duplicate with just a couple hours to cut and assemble - so even at this late date you could whip one up for the holidays!

Embossed Acetate Glitter Pocket with Video


Hello everyone.  This is the last of my holiday themed cards to share with you.

In the video I will show you some various techniques, creating the frame on the front with a paper trimmer, cutting a window out of a card, doing some masking and of course making the embossed acetate pocket.  It did not photograph too well - it's very pretty snowflakes on the front.  It did show up pretty well while filming though - so you'll get a better look in the video.

Here's the inside of the card - I used masking to create the effect of dimension.

 The stamp set I used to create the trees you see inside the card is Ornamental Trees by SP & Company.

So, onto the video....

Tuesday, December 21, 2010

Elegant Winter Bird Card


I wanted to create something with a girlie and elegant feel to it for a special friend of mine.  I used a DCWV paper and did stitching lines all around it with a Chocolate Chip marker from Stampin' Up.  The sentiment was also stamped in Chocolate Chip and is from the Ultimate Sentiments I set from SP & Company stamps.

The Cricut cuts are from Winter Woodland.  The bird is cut at 1/5 inches, and the branch at 2 inches.  I used some Frosted Lace Stickles on top of the snow cuts. 

Thanks for stopping by today :)

Monday, December 20, 2010

Happy Holidays Bird Card


I know this is one heck of a busy week for all of us.  I'll be sharing my last few holiday cards.  I'll be back next week to share my handmade gifts for this year.

I used the Stampin' Up set called Always for the bird and the branches.  I embossed with Stamp N Stuff Embossing Powder in Red Tinsel, and Green Tinsel.  I just can't get enough of those.  They have such a beautiful sparkle to them - perfect for holiday cards.  

The sentiment along the bottom is from SP & Company stamps the Ultimate Sentiments I.  I used Real Red ink from Stampin' Up.  The papers are by DCWV.  The stitching lines were done with a Real Red marker from Stampin up, and the ribbon is just from a local craft store.  I used a Stampin' Up scallop edge border punch as well.

In my mad rush to complete the last of my cards I didn't get the sizing details written down.  I believe the square is 3 by 3.  I think the piece on the right is about 1 and 1/2 inches wide.  I don't remember at all about the layers the bird is on.  Sorry about that!  Of course I really did cut that layer to fit the image anyways, so it would likely change if you used a different stamp.

Have a crafty day!

Friday, December 17, 2010

Traditional Holiday Card

I made this for Samantha's blog.  If you want to see all the details check out the post on her blog by clicking here.

Simple Graduation Card


I needed a quick graduation card.  I didn't have many ideas in my head for it, so I decided to do something similar to another card I just made.  I made a 5 inch square card.  I rounded two of the corners on a 1/2 inch setting.  I added a lacy shape from Just Because Cards, cut at 5 inches.

I added the graduation cap from Everyday Paper Dolls & the Congrats from Gypsy Wanderings.  I have no idea what sizes.  Sorry, I was in a hurry.  I used Black Diamond Stickles to outline the cap and the crease in it.  I used Waterfall Stickles on the dangling part of the cap (I'm sure that has a name!  *LOL*) and the word.  The star I did with silver Stickles.  The papers are from the We R Memory Keepers stack called Tiffany's.

Doing the Stickles was the only part that took much time at all.  I did do some decorating on the inside - but didn't bother to take a pic.  I was pretty rushed on this one.  I created a simple pocket to slip the gift card into and such.  Nothing too original.

Have a fabulous, and very crafty Friday! :)


Thursday, December 16, 2010

Stamped Gingerbread Charm Bracelet


Yes, ANOTHER post - I've been creating a lot, what can I say.

I made this charm bracelet and little charm for Samantha over at Scrapmaster's Paradise.  She's become a good friend and I wanted to make her something for the holidays.  This was made using her own stamp set called Cutest Gingerbread. 

I tried this first with the bright white Shrinky Dinks and Copics.  I DO NOT recommend that.  At all!!!  I was so frustrated trying to make that work I nearly cried.  So, I went back to the store and bought the Frosted Rough and Ready Shrinky Dinks instead.  Those recommend colored pencils - so that's what I used.  This worked MUCH better!

Charm next to a quarter for a size comparison.

I stamped the gingerbreads with Staz on in Timber Brown.  Then I colored them with the pencils - punched holes, cut, & baked them.  Then all I had to do was turn them into jewelry.  As a finishing touch I covered the front with clear nail polish to help seal in the color.  This kind of Shrinky Dink is AWESOME because you can see the design from both sides.

If you would like a more informative post about Shrinky Dinks I will direct you to a project I did not too long ago.  Now... for that project I used the Shrinky Dinks that are designed to work with Ink Jet Printers, but everything else is the same.  So you can see more photos of the process of cutting and baking - where I placed the holes, etc.  Check out that project by clicking here.

Honestly they are pretty easy to use.  Like I said, the other project has a better tutorial talking about baking and such.  The coloring of these was simple. 

Samantha took some photos of how I packaged it, and wearing the bracelet.  You can see her post by clicking here.

Thanks so much for visiting!  Have a fabulous, and very crafty day :)

Sweet Memories Layout

Click the photo for detail, just remember to use your back button.
Here's a layout that I did.  I actually mounted it on chipboard and am giving it as a gift to be hung up.  This is one of the few gifts I can share in advance because I'm confident the recipient will never visit my blog.  My mother in law adores gingerbread.  I made her some gingerbread felt ornaments last year and she seems to really enjoy them.  I figured this page she could add photos of her decor or maybe photos of her making the traditional family cookie recipe.

All the papers are from the Peppermint Forest stack from Joanns.  The snow on the bottom was just cut from another page.  The photo spaces are 5 and 1/2 by4 and 1/2 so they will create a 1/4 inch border on all sides of the photos.  
The adorable gingerbread person is from SP & Company's Cutest Gingerbread Set.   I chose to do one of the girlie gingerbreads that has eyelashes.  So cute!  I colored her with the Copic marker E35 Chamois.  I colored her buttons black and then used Glossy Acccents to make them shiny.  I used Liquid Applique on her frosted parts.  I also added some fruit punch Stickles to her face.

The title is cut from Winter Frolic at 1.82 inches.  Sorry for the weird size - I used my Gypsy.   The houses all along the bottom are by Jolee's Boutique.  The die cuts are by Doodlebug Designs.  I added a bit to the store bought die cuts by adding Fruit Punch Stickles in various areas and a little bit of red Stickles on some hearts.  I had a bit of ric rack in my stash that I thought looked cute next to my little gingerbread.
This came together pretty quickly.  Sometimes I really love using store bought embellishments and then just adding a couple touches with stamps or my Cricut.  This is one of those times I think I got an adorable result without having to spend a really long time working on it.

Thanks for stopping by!


Wednesday, December 15, 2010

 I made this card for a color challenge over at My Pink Stamper.  The challenge is to use 2 pinks, 2 blues, and black.  I had fun putting it together.

I cut the phone at 3 inches using the From my Kitchen cartridge.  It can be found on page 28.  I used some Glossy Accents all over it to make it shiny. 

The lacy edge shape is from Just Because Cards on Page on page 62.  I cut it at 5 inches.

The patterned papers are from the W R Memory Keepers stack called Tiffany's.  

The card is 5 and 1/2 inches sqaure and the mat is 5 inches even.  I used my corner rounder on a 1/2 inch setting on all the corners.

I finished off with a satin bow in the top right corner.

Seasons Greetings Card - With a Video


I had such fun making this card!

Here's a few of the basic supplies if you don't have time to watch the video:
SP & Company Stamps, Stitchery Doo & Ultimate Sentiments I
Winter Frolic Cricut Cartridge
From my Kitchen Cricut Cartridge
Martha Stewart Arctic Snowflake Punch
Liquid Applique

The rest of the details are all on the video.


Tuesday, December 14, 2010

Winter Fun Penguin Card

 Today's card is a quick little something I whipped together. 

The sentiment is from the Winter Frolic Cricut Cartridge.  I used the Chomas Creations Gel Pen Holder and on of her pens.  So quick and easy.  I can't imagine trying to cut this sentiment that tiny.
I used the Cuttlebug Ice Crystals embossing folder for the background.  This folder is a bit harder to find in the US, but I was able to order mine from Custom Crops.
The ribbon was given to me in an assortment bundle - and it reminded me of icicles.
The penguin and snowflakes are from a stamp set called Penguin Love by There She Goes Clear Stamps.
I used the Nestabilities Labels One to cut out the penguin image.  
The snowballs are covered in Frosted Lace Stickles.  I like this color for snow because the sparkle is more subtle - it looks more like snow to me then say - the Diamond color.


Monday, December 13, 2010

Card Set

I made this card set to send to a very special family.  They are a military family who has made a lot of sacrifices, such as moving a lot.  They are the sweetest people.  There are 4 children in the family, 3 girls and a boy.  So, I made these cards especially for the kids.  
 
I tried to make them similar, but each unique.  I used the Winter Frolic Cricut Cartridge for all of these, and they are the standard 4 and 1/4 by 5 and 1/2 inch size.  The paper is from the Peppermint Forest stack.  I added little googly eyes to all  of them, and some various Stickles as well.  On the penguin card I actually have ribbon with little penguins that says "Happy Holidays" on it - what a cute match :)

These are so cute I may have to make more similar ones.  I think the beaver has to be my favorite.  Thanks so much for stopping by today.  I love to hear your comments, and frequently visit those that leave comments for me.  Have a fabulous, and very crafty day :)

Friday, December 10, 2010

Thank You Card Gift Set

I wanted to do something really special this year for our realtor.  She sends out a ton of cards, so I thought a set of cards would be a lovely gift.  I really wanted them to be special and have some fun details - so I set to work on a set of 15 of these.
 
 
Holy cow.  Hours and hours of work, but I think it paid off in the end.  "Thanks" is from Gypsy Wanderings.  The button is a Martha Stewart punch.  The vase and flower are from Serenade.  The vase is cut from acetate, and I inked the edges with white Staz On. I attached the stem to the acetate, and the acetate to the card with a little Glossy Accents in the part of the vase that would have water.  It's a really fun little detail, and a practical one too since adhering acetate is a challenge.  The flower is on a pop dot, and I used some Stickles for that extra special touch. 
 
 
I wanted to package them in a special way.  I didn't have any of the nice card boxes or anything.  So I used a large freezer sized ziplock bag.  It was big enough to fit the cards side by side.  I added 15 high quality envelopes to the package as well.  I had to alternate the cards rightside up and upside down because of the depth of the pop dotted flower.  I also slipped a strip of cardstock in the middle of the bag to keep the 2 piles of cards separate.  Otherwise they would start to overlap and look less pretty. I added a card I had made earlier, and a sentiment from Winter Frolic - along with more Stickles.  I only attached the back of the bag to the flap, using Sticky Strip.  This way she can just lift the front of the flap and open the bag without having to tear it up.  
 
Thanks for visiting!  Have a fabulous, and very crafty day :)

Thursday, December 9, 2010

Make a Wish Birthday Card


I made this card for a challenge over at My Pink Stamper to make a birthday item. 

I don't have all the specific sizes today, but I'll give you the basics.  The card is a 6 inch square.  The strip along the bottom is 1 inch wide, and is actually from a Christmas stack.  The girl is from Forever Young.  Everything else is from the Sweet Treats cartridge.  The platter is a mirrored silver cardstock - it looks a little strange in the photo, but is very silver in person.  I added some Stickles in Waterfall and Diamond colors.

Thanks for visiting! 

Wednesday, December 8, 2010

Handmade Holiday Organizer

This week my design assignment for Miss Craft Junkie Too was to give a holiday organization tip.  I went ahead and did a project that will help keep me organized for all my handmade gift giving and cardmaking for many holiday seasons to come. 

This is a 6 inch cube sized box.  I'll discuss and show you the inside first, where the organization is - and then show you how I made the outside cute.

Inside I placed a cardboard divider in the box.  I wanted to be able to put cards in the front of the box, and have file folders in the back.  To keep everything from sliding around too much I figured this divider would help.  

The dividers in the back are really simple.  I just cut cute double sided papers that I would say are a medium thickness, then I scored them in half.  They are from a K & Company holiday stack.  To cut the tabs along the top I used the Cricut and the From My Kitchen cartridge.  Then I drew some stitching lines and wrote names on the tabs with one of my Stampin' Write markers from Stampin' Up. 
One of the tabs is labeled "cards" so I can keep a list of who I have made cards for, or sent cards too.  The other tabs are all names, and each family only has one folder.  So, for example - my husband's sister is named Becca, and the folder just has her name on it, but it will also include the gift lists for her kids.

My plan is to put any gift ideas in the appropriate folder.  Also, if I decide I know I want to make a certain project I can write a supply list, and also record where the pattern is if it's something that requires one.  


I decorated the outside to look like a present.  I used a couple die cuts from Doodlebug Designs with some Stickles and Buttons.  I covered the whole thing with some DCWV patterned paper and finished off with some high quality grosgrain ribbon.  I tied a bow, knowing that my family cannot replicate it - so I'll know if someone has peeked!  *LOL*

Peeking Puppy Card w/ a Window - Video tutorial


I did various fun techniques on this video.  Using a circle cutter to create a window - and I found a way that helped me get the placement just right.  Watercoloring a stamped image with ink pads and an Aqua painter.  I also used my Xyron machine to help me adhere loose glitter.  You can check out the whole process in the video below.

The stamp set I used is called Christmas Emma


Tuesday, December 7, 2010

Wobbling Hula Girl on Dashboard Card w/ a Video

Hello everyone.  Taking a break from thinking about snow and winter projects I've created this fun and very large card that is meant to look like a hula girl on a car's dashboard - and she moves!

To see me put this fun and unique card together check out the video below.  These Action Wobbles are way cool!  


Sunday, December 5, 2010

Little Penguin Favor Box


Here's a simple and cute little penguin box I made for a challenge over at Momo's blog.  If you don't know Momo, you're missing out!  She makes tons of fun videos and has regular challenges on her blog.  I just get behind and miss out on most of them!  *LOL*  At least I made something in time for this one :)

Everything was done with my Cricut.  The penguin is from Winter Frolic.  I used Liquid Applique on the white parts of his hat so they are puffed up.  I used various colors of Stickles to do some outlining on him.  The box itself is a favor box from the Sweet Treats cartridge, made with paper from the Peppermint Forest stack.  On the other side of the box is another penguin, but I flipped him so the box is more symetrical.  
 
I did weld the penguin shapes to my box on my Gypsy before cutting so there are more layers of stability. 

Thanks for visiting!  I had fun with this sweet little projects as penguins are one of my most favorite things in the whole world! 

Thursday, December 2, 2010

Peace Card Using the Chomas Creations Gel Pen Holder


I made a video tutorial for ya'll showing you how I used my Gypsy and the Chomas Creations gel pen holder.  I was able to write in 2 colors, and cut.  You also get to see my pretty new Plum Expression in the video.  Oh I am so in love with it.

Be sure and visit Chomas Creations to see Amy's great products, and also be inspired by all the fabulous projects she does. 

If you aren't able to watch the video I've included a few pictures of the Gypsy screen that will help you see how I did the layering - just scroll down below the video :)


For those that aren't able to watch the video here's a few shots of the Gypsy set up to do this project.
Blue Gel Pen Layer


Silver Gel Pen Layer

Cutting Layer


To finish off the card I used some Waterfall & Silver Stickles, my I Rock with mirror gems, Marina Mist ribbon from Stampin Up, & some DCWV patterned paper.

Thanks so much for stopping by today!


Wednesday, December 1, 2010

Trio of Tags

Holiday tags can be such a fun project.  They are quick and easy to make, and can be used as a way of getting rid of scraps leftover from other holiday projects.  Today I have created 3 simple tags to share with you.

Supplies Used On All Tags

Tags - I cut mine from the Sweet Treats Cricut Cartridge

Ribbon - Mine is Stampin' Up's Satin Ribbon

Buttons

Papers - Mine are from the DCWV Holiday Stack - I purchased it last year, 180 sheets for $20, but they are thin so I made sure and backed them with a plain brown cardstock for stability.


1st Tag:
 
Versa Mark Ink covered with Stamp N Stuff Embossing Powder in Green Tinsel - Stampendous makes it, and I purchased it at Michael's. This is the most awesome heat embossing powder because it has glitter in it!!!  You'll need a heat tool to do the embossing.

SP & Company Stamps, the Stitchery Doo set.  This was used  for the faux stitching to make a quilt effect. It was stamped in Real Red Classic ink from Stampin Up.

2nd Tag:

Stampin' Up Classic Inks in Regal Rose and Real Red

3rd Tag:

Versa Mark Ink covered with Stamp N Stuff Embossing Powder in Green Tinsel. 

EK Success Open Scallop Border Punch
Bling for the center of the flower - although I would have preferred a pearl.  I learned how to make the flower from this tutorial on Youtube. 


Monday, November 29, 2010

Fruit Necklace

 This was my first time ever using Shrinky Dinks.  They make some that work with your Inkjet printer that I've been wanting to try, and that's how I made these :)  

The adorable images are from Digi Crafts.  I had purchased a some cute images from her, the Kawaii Ice Cream, and made some cards.  When I shared them with her she asked my permission to put them up in her Etsy shop.  I said yes, and as a thank you she sent me these great fruit images.  I had to do something really special with them.  So, if you bop on over to her shop you'll see a little of my work in her listings.  Cool, huh?

For those of you that haven't made jewelry before or worked with Shrinky Dinks I'm doing a walk through type tutorial with some photos so you can get a feel for the process I went through to see if it's something you'd enjoy.  Here goes!


With the instructions for the Shrinky Dinks it tells you that you need to lighten your images before printing them.  When they shrink the image will get much darker, so they recommend lightening the image about 50%.  If you skip this step your images will be too dark and may not dry properly.  Luckily with the images I was using she includes each image individually, as well as a collage of them, including cut lines.  I used the sheet with all of them, so I just had to adjust the one photo and print it.  Super easy!


Next I had to make holes and cut around the images.  I separated the images from each other with a very rough cut, and then punched the holes before I cut the images out nicely.  I used my Crop A Dile on the larger punch setting - and it's a good thing too, because those holes shrink WAY down!  I followed the provided guidelines on my image as cut lines, except for where I added the hole I had to eyeball it.  Make sure you think about how you want the images to hang before adding the holes.  I placed holes near the stems in a couple of the images. For the cherries I did not cut out the center portion of the cut, I figured this would help keep them more sturdy.  

The next step was baking, which I did in my toaster oven.  The package tells you the recommended temps, but I was so nervous doing it!  *LOL*  The images curled up A LOT while they were baking and the orange nearly got stuck together.  The package says sometimes they will actually stick together and you have to stick something in there to separate it from itself if that happens.  Luckily I didn't have to.  The images curled up a lot, and then started to flatten out some.

After I removed the images I was not able to get them very flat, I even tried individually baking one a little longer and then re-flattening it.  No luck.  So, I decided to use my heat embossing gun and a smooth piece of cardboard to flatten them.  I did this carefully one piece at a time - heating it until it was pliable, and then smushing it gently under the cardboard.  It worked great! 

When the images were all flattened the last step was turning these pieces into jewelry.  I used a chain, a clasp, and some jump rings.  The only tool I needed was a couple tiny pairs of jewelry pliers, which are inexpensive.  I laid out all the pieces in a row to determine placement, and decided not to use the orange.  I wanted the banana to be the center because it was bigger than the others, and then I had 3 pieces on each side of it.  

I let my daughter play with the extra orange piece, and it was ruined pretty easily.  I am going to seal up the necklace with some clear nail polish, I just haven't done it yet.  The package recommends a couple brands that they tested so I know it will be safe :)  Here's a photo of the piece with a quarter so you can see how tiny and cute these came out.  Thanks for stopping by and have a fabulous & very crafty day.   


Friday, November 26, 2010

Milk and Cookies Box

I just love this little box.  I created the box itself using my Ultimate Crafter's Companion.  One of the features it has is that it has a section for boxes.  It automatically makes the lid slightly bigger than the base with NO MEASURING required!  Yeah, I love that!  When people start talking about measurements like 16ths I get pretty confused easily.  I was never good at that stuff.  The paper is from a DCWV Pack.

To decorate the box I cut a heart with my Cricut at 6 inches, this one is from Create a Critter.  The milk is also from Create a Critter cut at 3.25 inches.  I wanted to make it extra special so I cut it in some thin acetate - which was just cheap transparency sheets I bought at the local office supply store, they were like 10 cents.  

I inked around the edges with white Staz On because it was just too clear - I actually lost it on my desk for about 10 minutes!  *LOL*  I added some red lines to the straw using a Stampin' Write Marker from Stampin' Up.  To attach the milk to the jar I was concerned with not wanting something to look gunky, so I tried using Diamond Glaze all over the milk.  I figured if I just used it on some spots it would be more obvious. I think it actually gave a nice liquid effect and I'm happy with it - although the acetate did warp a little as it dried, but it's SO thin so that didn't really surprise me.


The gingerbread is from SP & Company stamps form the set called Cutest Gingerbread Man.  You get to pick the face for your gingerbread :)  I chose a winking one with eyelashes to be more girlie.  I filled in some areas with my white gel pen so I could color them.  I colored the cheeks and mouth pink and the buttons green - with small brown dots for buttonholes.  I used some Liquid Applique for the frosting.  It's my first time using it and I had so much fun - after it dries you heat it and it puffs up!  I haven't seen it locally but I ordered it online from Joanns. 

The & symbol is from a sheet of cuts from Doodlebug Designs from their Happy Holidays Collection - of course you could easily die cut your own for a similar look.

Winners!

I am announcing the 2 winners for this week.
For the blog hop candy, the winner of the Scripty Scrips set is Stephanie.  She said 
"Your card is so cute. You did a great job of showcasing the glitter markers"
 The winner of the Winter Lace cartridge is Monica.  She made a cute snowman for the challenge.
I have left comments on both of your blogs ladies!  Please get back to me so you can get your goodies :)

Tuesday, November 23, 2010

Kicking of Christmas Blog Hop Project

The comments for this post are now closed.

 Welcome everyone!  We are having fun and blog hopping away to celebrate the holiday season with fun and fabulous projects :)  I am the second stop on this hop - you should start here at Amy's Blog.  Then you can come right back here and make sure to enter for the fabulous give-a-way!

After you finish up checking out my project & commenting for your chance to win an awesome prize, head on over to Donna's Blog.

For today's project I made a card to slip a hot cocoa packet inside.  The card measures 5 inches by 6 and 1/2 inches when folded.  I needed this larger size to accommodate the cocoa packet I plan on slipping inside.  The paper is from K & Company.

The craft cardstock is cut at 4 and 1/2 inches square.  I used the fantastic gel pen holder and some of the pens from the glitter assortment all from Chomas Creations.    

I used the Plantin Schoolbook Cricut cartridge to draw a green square that is 4 and 1/4 inches to create a border.  I used 3 different font features from Plantin Schoolbook to give each word a unique look.  The letters are all close to a 1 inch setting.  "You" is in blue, "warm" is in pink, and "my" is in silver.  The beautiful sparkle of the glitter in the writing is really stunning in person.

The adorable snowman is from SP & Company's set called Falling Snow.  The snowman is normally holding a candy cane, but I simply cut it out of the design and used a chipboard glittered heart in it's place.  I colored him in with Stampin' Write markers - creating stripes on the scarf for a little added flair.  I used Diamond Stickles for some fun bling.

The die cut in the top right corner is by Doodlebug Designs from their Happy Holidays collection on their Cute Cuts die cut sheet.  I simply added more of the Diamond Stickles and a snowflake.  The snowflakes are by Jolee's Boutique.

Aren't you lucky!  Samantha from SP & Company stamps, who I'm proud to be the design team leader for, has decided to donate a great prize to a lucky winner!  To win be a follower of my blog, and comment on this post.  Please include an e-mail, blog link, or some other way I can get in touch with you if you're the winner.

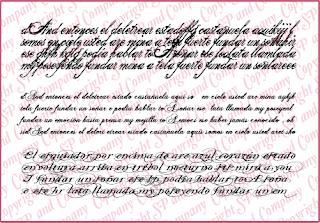
She has donated the Scripty Scrips set!  Here's what it looks like.  Imagine all the wonderful things you could create with this diverse set.  

Some of the other blogs have awesome candy too - and there is a $25 gift card to Custom Crops.  The winner will be chosen at random from one of the blogs - so leave a comment on all the blogs for the best shot at winning that fun prize :)

Even if you don't win a free prize, there's still goodies to be had since both Amy and Samantha are having pre Black Friday sales!

When you've entered to win on this post, head on over to Donna's blog to continue the fun and inspiration!

Just because I am awesome, I'm going to include a full lineup of all the blogs in case you get lost along the way or run into a broken link.  Happy hopping :)

Amber - That's ME!