Showing posts with label sp and company stamps. Show all posts

Tuesday, June 17, 2014

Father's Day Card


I just wanted to quickly share a simple Father's Day card. 

The Snoopy stamp is by Stampabilities.

The sentiment was built using some retired SP & Company stamps.

The embossing was done with the Cuttlebug Swiss Dots folder.

Unfortunately I lost the post it note I wrote all the details on, and the card was given so I can't give you all the measurements.

Thanks for stopping by!

Amber

Thursday, May 8, 2014

Rain or Shine


I just love cards that have a bit of a scene going on.

I saw a card with a similar layout in one of my papercrafting magazines and decided to put my spin on it.

The papers are from the Dear Lizzy Lucky Charm 6 by 6 pad and the Simple Stories Vintage Bliss 6 by 6 pad.

I used the stamp set Heart-2-Heart # 6 from Papertrey Ink for the clouds and sun.  I used Summer Sun and Bashful Blue inks from Stampin' Up.

The stamp set Rain Boots from SP & Company provided the boots and the sentiment.  The boots were stamped with Regal Rose.  I used my Copics to color over the patterned paper. It toned down the effect of the pattern a little bit and gave them a tiny bit of the illusion of depth.

The grass was made using a Martha Stewart punch.  After I punched it out I inked it with Weathered Wood distress ink.  The sentiment was stamped onto the punched grass with Versamark ink and then I used some Stampendous embossing powder.

The butterfly is an EK success sticker and I used a white Gelly Roll pen to create the line behind it.

I used a Copic Multiliner to create tiny dots all around the gray layer of the card.

Thanks for visiting!

Amber


Tuesday, January 14, 2014

Love Ya Card


I thought this was a fun Valentine.  Not traditional at all with a more graphic feel and funky colors.

The background paper was just white cardstock that I stamped my own background onto.  The stamp I used is by SP & Company from their Vintage October Line. It's called Chevron Chase.

I cut the Polaroid frame shape out using my Silhoutte, but of course you could do it with a paper trimmer as well.  There is a layer of vellum behind the frame and it's up on pop dots.  I used the vellum to soften the design behind my balloons without completely covering it.  The effect came out even better than I'd hoped.

The heart balloons were all stamped using SP & Company's Artsy Heartsy.  I used the ink colors marina Mist from Stampin Up, Taffy from Close to My Heart, and Lovely Lilac from Stampin Up.  The outlines were all stamped separately using Memento Tuxedo Black.  After the hearts were all stamped I carefully cut them out and then covered all the hearts with Crystal Effects.  It didn't really show in the photo but the hearts are all super shiny.  I had to let them dry completely before completing the next steps.  I flipped them over and taped string to the backs of them to turn them into balloons.  The hearts are attached with some glue dots - thicker ones that add some depth.  I fed the string down in between the frame and the vellum layer.  Then I tied a tiny bow where the strings are ending.

The frame is stamped with a sentiment from that same Artsy Heartsy set and Memento Ink.

I hope you enjoyed my project today :)  I'm really trying to think outside the box and try some new things and I wanted to experiment with the Valentine's Day theme.

Have a wonderful and very crafty day!

Amber

Monday, January 13, 2014

Thanks a Bunch Card WIth a Tag


This fun little card features a pocket on the front to hold a tag.  When you pull the tag out this is what you see.


I just love that!  Who couldn't smile when reading such a sweet thing :)

The patterned paper is from the Dear Lizzy 5th and Frolic 6 by 6 pad.  I inked the edges of the main layer with some Regal Rose ink by Stampin Up.

I did all my die cutting using my Cricut.  The pocket that holds the tag was cut using a shape from Fabulous Finds and altered it in Cricut Craft room by getting rid of a window it had in the center and stretching it out.

The label shape came from Ashyln's Alphabet.  I stamped on that label using a sentiment from SP & Company's Mini Card Creations 2 and the same Regal Rose ink I did the edges with.  The gems are all from Irock and the label is up on foam adhesive.

The tag was cut using Platin Schoolbook.  I ended up welding 2 of the same tag together so that I could get a longer tag without drastically altering the shape at the top. I put a touch of twine from The Twinery along the top.  I used a Gelly Roll Pen to do some stitching lines and write "Pull Here."  The stamp is from the Inkadinkado set Friendly Advice.  I stamped it in Versamark and then used some Stampendous brand embossing powder in White.

The ribbon is Pleated Satin Ribbon from Stampin' Up.

Monday, January 6, 2014

Love You Card


I thought I'd put something together that would work well for Valentine's Day.

All of the papers i used are from the Dear Lizzy 6 by 6 paper pad Lucky Charm.

The card is a standard A2 size, so 4 and 1/4 by 5 and 1/2.

The notebook layer is 3 and 3/4 by 5.

The kraft colored layer is 3 by 4 and 1/4.

The strip along the bottom is 1/2 inch wide.

The wooden element is from Studio Calico.  I stamped on it in Night of Navy Ink by Stampin' Up.  I used the SP & Company set Mini Card Creations 1.

The heart was cut with my Silhouette.  I put it up on pop dots and went around the edge with Cotton Candy Stickles.

The last embellishment was just a strip of washi tape.

This was pretty quick to put together and I love the eclectic mix of patterns.  What a fun paper pad to work with, it's got a whole lot of different things in it!

Thanks for visiting!

Amber

Tuesday, December 31, 2013

Gingerbread Card


This adorable gingerbread was stamped from SP & Company's Cutest Gingerbread man set.  I colored her with Copics.  Her cheeks have some Stickles and I used Liquid Pearls on her mouth and frosting.  I used real buttons to cover her stamped ones.

The sentiment came from the Hero Arts set called Sending Holiday Cheer.

To make the card more fun I added a couple of little rolling pins I'd gotten in a pack of holiday shaped buttons.  Then I finished off with a whole bunch of sequins

This is the very last holiday card I have to share!  So, now I can move on to more current projects :)

Thanks as always for visiting me :)

Amber

Thursday, September 5, 2013

Goldilocks


I just LOVE this sweet image from Kraftin' Kimmie.  Her name is Goldilocks.  She's colored with Copics and popped up on a layer of foam tape.

For the background I wanted to create a quilt with paper.  I thought it would go well with the image.  I used the My Mind's Eye Blush 6 by 6 pad and cut 1 inch squares.  I glued them all together and then stamped some stitching with SP & Company's Stitchery Doo set using Hero Arts Chalk Ink in Latte.

I did a little trick to make the kraft border even.  My card is actually 4 and 1/4 by 5 and 1/4.  That way I could work with simple 1 inch squares and still have a nice even border.  No one would really notice unless they set it next to a 4 and 1/4 by 5 and 1/2 inch card, and even so - who cares.  It can easily be put in a regular A2 envelope.  Sometimes a simple solution is best.  Just go with what works and don't over-complicate it :)

I can't wait to send this little sweetheart to someone who needs a hug!

Hope you are well dear visitor.

Amber

Monday, August 12, 2013

Happiest Wishes On Your Birthday Card


Here's a fun little card I put together for a young girl.  I wanted something bright and fun with some sparkle.

The image is from Saturated Canary, her name is Starla.  She's a digital image.  I'm not sure if she's also available in a rubber stamp or not.

I liked the image, but she is originally holding a wand with a mustache on the end and I didn't care for that so I changed it to a star.  I did this by cutting off the mustache and stamping a separate star from Sp & Company's Lucky Day set.  When  I glued my girl to the patterned paper I attached the star too.

She is colored using Copics, but I apologize I didn't write down the colors when I worked on her.  I used Yellow Stickles on the wand and Diamond Stickles all over the stars on her face and shirt as well as the polka dots on her leg warmers.  I spent a considerable amount of time fussy cutting her so that the patterned paper would show around her.

The patterned paper is from Bo Bunny's Ambrosia 6 by 6 pad.  I cut it to 4 by 5 and 1/4 and mounted it on the vanilla card base.

The metal row of embellishments is by Mark Richards and is called Nailheads.

The sentiment comes from Stampin' Up's Happiest Birthday Wishes.  After I stamped it I trimmed the cardstock to fit it perfectly, then rounded the corners, and finished off with Diamond Stickles all around it.

That's it!  Most of the time was spent coloring and cutting so everything else was quick and simple to show off the image.  I'm still not confident about my coloring, but I do enjoy it very, very much.  I find that since I enjoy fussy cutting that really helps because I can have color bleed outside the lines and then just cut the evidence of that away without having to try and push the color back into the image.

Thanks so much for stopping by friends!  

I'm feeling well and getting my crafty mojo back.  Fingers crossed that continues.  I've been on a very restrictive diet for about a month and I think it's made a big difference for my health .  I believe that I have food sensitivities contributing to all my health issues.  So, I paid for some testing and have been working with a dietician and think I am really seeing results.  Yay for that!  I'm going to try to start posting regularly again, and if I'm still feeling well in a few weeks I figure it would be safe to start some new video series stuff I've been planning :)  *Fingers crossed*

Friday, May 3, 2013

For My Wonderful Mother-in-Law


This is the last of my Mother's Day cards.

The paper is from the Bo Bunny 6 by 6 pad Garden Girl.  The only exceptions are the layer the sentiment is on with the soft pink, and some vanilla cardstock in the flower center and for the card base.

The ribbon is from Celebrate it by Michael's.

The flower was cut from my Silhouette and I spent some time jazzing it up.  I used a stylus to make veins in the leaf, did lots of inking on all the layers in different colors, and then curled the petals up.  It has so much dimension.  Even my husband seemed impressed when I showed him (and that is hard to do, believe me.)


The sentiment was built using a couple SP & Company Mix N Match Sets: Kids, and Family.  The inks used were Close to Cocoa and Rich Razzleberry from Stampin' Up.

Hopefully she likes it.  I really do have the best mother-in-law so I wanted her card to be really nice too.    She doesn't read my blog at all so she will be surprised, and luckily I don't have to mail it.  Honestly if I did that it would completely ruin the flower!

I'm glad to be done with all 3 of my Mother's Day cards for this year.

Thanks for looking :)

Amber


Thursday, May 2, 2013

Flower Themed Mother's Day Card


To start off for the background I used a white piece of cardstock the standard A2 size 4 and 1/4 by 5 and 1/2.  I used Tempting Turquiose and Green Galore Stampin' Up inks.  I took the ink pads directly to the paper and made sweeping motions.  After the whole base was covered with ink I sprayed it with Glimmer Mist in Blue Skies.

To create the flowers I used the Stampin' Up embossed folder Manhatten Flower.  I used an ink blending tool to add the Stampin' Up inks Pretty in Pink and Regal Rose.  Once the flowers were colored I cut them out.  Before attaching them to the back layer I sprayed them with Marshmallow Glimmer Mist.

For the sentiment I cut out a vanilla colored layer with my Nestabilities.  The ink colores are Close to Cocoa, Regal Rose, and Tempting Turquoise.  I used 3 sets from SP & Company's Mix N Match collection: Occasions, Friends, & Holidays.  The bling was just from the $1 section of Michael's.

 The stitching lines on the vanilla piece is from the Gelly Roll pen Green Star.  The stitching lines around the rest of the card are from the Gelly Roll pen Pink Star.

In person this has lots of fun sparkle and shine.  I've given up on ever getting the perfect photo of that sort of thing.

I'm really pleased with the way this came out.  I don't think it looks like anything I've ever done before and it was lots of fun.  I really love this embossing folder and I have been wanting to do something special with it.

Thanks for visiting!

Amber


Wednesday, May 1, 2013

Shimmery Butterfly Card


For this card I started off with a white piece of cardstock cut at 4 inches by 5 and 1/4 inches.  I stamped various butterflies from the Stampendous set called butterflies using Memento Tuxedo Black ink.  After I stamped all the butterflies I colored them in with Copics.

I attached the white piece to a black base fo 4 and 1/4 by 5 and 1/2 inches.  At this point I sprayed both of these layers very liberally with Marshmallow Glimmer Mist.  As usual these details are difficult to photograph but the sparkle in person is pretty awesome.  I especially love it on the black section.

I outlined around the white layer with some Black Diamond Stickles.

The banner was cut from light grey cardstock using the Spellbinders Ribbon Banners set.

The sentiment was stamped in Stampin' Up's Taken With Teal ink.  I used SP & Company sets Mix N Match Basics, and Mix N Match Holidays.  I went around the banner with a pink marker to make stitching lines.  I wasn't satisfied with the look so I covered those with Diamond Stickles.  The pink showed through the glitter and it actually came out pretty neat.

I'll be sharing 2 more Mother's Day cards very soon so stay tuned if you need ideas for those this year :)

Amber

Friday, April 12, 2013

5 Birthday Card


First I need to tell you that this card is a pretty close copy of a card done by the very talented Jessica Witty!  Please see this post on her blog for her gorgeous creation that I used as a guideline for my card today.

To do the stitching I used my sewing machine with no thread to make the evenly spaced holes and then used 3 strands of embroidery floss and hand stitched it in.

I used my Silhouette to die cut out the 5.  I layered some My Mind's Eye Lime Twist Happy Go Lucky paper behind it.  I also did some faux stitching with a white gel pen.  My card does not have the 5 inside when the card is opened like the inspiration card, it's just a layer behind the kraft.

For the banner I used SP & Company's Happy Banners.  I stamped the solid banner in a soft blue and then cut it out with a small white border.

The little heart is from Close to My Heart's set Treasures. 

For the sentiment I used My Pink Stamper's Everyday Occasions.  Originally it said Happy Happy Birthday and I just cut it into 3 separate stamps which made placement on this banner very easy.

There you have it.  Usually I try not to copy the original work of others, but sometimes I just love something so very much I can't help myself and this was one of those occasions.  I figure as long as I give proper credit the occasional scraplift is permissible :)

Amber


Wednesday, April 10, 2013

Happy Birthday It's Party Time Card


I did a lot of stamping for this one!  Just for giggles I counted, and I stamped 41 times to create this card.  So, there are a few mistakes. When you stamp (at least when I stamp) that many times it's bound to happen once or twice.

All the stamps are from SP & Company. 

The sentiment above the banner was spelled out using their Fashionista Alphabet set. 

The banner was created using the Tiny Build a Banner set.  That's also where the little heart in the sentiment came from.  I used Stampin' Up's Rich Razzleberry and Taken With Teal as well as Close to My Heart's Smoothie.  I added some Liquid Pearls to the little hearts on the banner.

The sentiment along the bottom is from Happy Banners.  I just stamped it 3 times to cover the bottom of the card.

Normally I just eyeball my faux stitching when I do it close to the edge of the cardstock.  This time I actually used the edge of a piece of cardstock since I worked farther away from a paper edge than usual.  It really helped in this case.

Thanks for visiting!

I am slowly starting to feel better.  Today marks 2 weeks and I'm still struggling with an awful illness.  Bleh.  It felt great to create something!  Sorry I went MIA.  I was SO proud to be catching up and had all this stuff lined up and then POOF, life happened and the best laid plans went bye bye :) 

Amber


Monday, April 1, 2013

You Are Turtle-y Cute


Here's a very clean and simple card.


I used SP & Company's Turtle-y Awesome set for the image and sentiment.

The paper is from BasicGrey's 6 by 6 pad Kioshi.

I stamped the turtle on green first.  The eye has a little white gel pen and some Glossy Accents.  The toes were colored with a Copic marker and then accented with some Stickles.

I stamped on purple for the scallops and a black polka dot paper for the shell.  After cutting them I adhered them with pop dots and then added some Stickles.

The ovals were cut with my Nestabilities.

Faux stitching done with a Stampin' Up marker.

I actually made this card last week but got very sick Wednesday evening and have felt too crappy to even come down to my craft room and post the photo.  Bleh.  Sort of funny the day I post a get well card I get super sick!  *LOL*  I'm slowly recovering and felt just well enough to come down and post quickly.

Wishing you all an awesome day! 


Wednesday, March 27, 2013

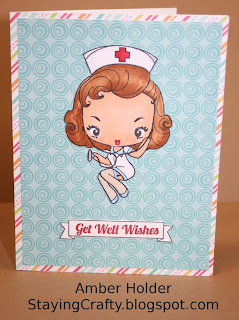
Get Well Wishes


I've really been on a kick with my Copics lately.  Too much fun!  Although I desperately want some colors so I can try blonde hair too.  Until then all my characters will be brunette.  *LOL*


The adorable little character is by The Greeting Farm her name is Cheeky Nurse.  She colored with my Copics and there is a tiny bit of Stickles on her eyelids.  To get the red mouth I inked her up normally.  Then I used a baby wipe to remove the dark ink from her lips.   I used a Stampin' Up marker over them to give them their lovely red color and stamped.

The banner outline and sentiment are from SP & Company's Happy Banners set. 

The papers are from the Echo Park 6 by 6 pad Summer Days. 

Thanks for visiting!

Monday, March 25, 2013

You're My Sunshine


Just a clean and simple feeling card, but it was a surprising amount of work!  *LOL*


The sentiment is from SP & Company's Rain Boots.  I stamped it in Memento's Tuxedo Black and then added a little Irock gem to do the i.  

The cool chevron is from their set Chevron Chase.  This was the tricky part.  The stamp is a decent size and I wanted small sections so I could do this rainbow effect. I cut a couple masks and started trying to do this, and I was having tons of trouble.  Even though it's a clear stamp when it was inked up I was having a hard time seeing through the extra inked lines and I kept stamping very close, but not close enough to avoid parts of my lines getting cut off by the masks.  With each line so close together it's tricky stuff.

So, I decided to be REALLY brave and very carefully cut the stamp so that I could work with 4 rows at a time.  It worked!  When I cut it I went VERY slowly because I was cutting each little jagged spot.

I used the Stampin' Up ink colors: Real Red, Only Orange, Yo Yo Yello, Glorious Green, Brilliant Blue, and Perfect Plum.

Thanks for visiting!

Amber


Sunday, March 24, 2013

Hello Easel Card


This is just a simple easel card in a standard 4 and 1/4 by 5 and 1/2 size card front.

The adorable image is from The Greeting Farm and she's from the Cheeky Cherry Collection.  Her name is Cheeky Chat, isn't she cute?!  I colored her using my Copics and then added some Stickles to her hair barettes, shoes, eyeshadow, and the heart on the phone.  Then I added Glossy Accents to the phone.


I took this other shot of the card to try to show off the Glossy Accents details a little bit more.


The super cute papers are from the My Mind's Eye Lime Twist Happy Go Lucky 6 by 6 pad.  I have been hoarding this paper with the hello chat bubbles and I knew this was the perfect card to use it for.

For the sentiment I used a chat bubble from SP & Company's Turtle-y Awesome set.  The sentiment is from the Hero Art's Mi Casa set and is stamped in SU's Rich Razzleberry.

I made it for the challenge over at The Greeting Farm Blog.  This is for their Farm Fresh Friday Easel Card Challenge.

I am also linking up over at Docerela Stamps for their Pastel Colors Challenge.

Thanks for looking!

Monday, February 25, 2013

Elegant Love Card


I made this card to use for a wedding or anniversary.  I wanted something elegant and not too complicated.

Instead of using patterned paper I created the background with the Dainty Flourish stamp from SP & Company.  I stamped it repeatedly using Memento Tuxedo Black ink.  That patterned layer is 4 by 5 and 1/4.

The teal ribbon is from Celebrate It by Michael's.

The tag shapes were cut from my Silhouette Cameo.  The bling is from the $1 section.

The love sentiment is from SP & Company's I Love Love set, stamped in Taken With Teal ink by Stampin Up.
You can see the sparkle a little better in this photo if you enlarge it.
I also used lots of Star Dust Stickles around the edges of the patterned layer and also the white area of the tag.  It really didn't photograph well, but adds an awful lot to the card in person.

Thanks for visiting!  I'm glad to be getting back to crafting :)

Friday, February 1, 2013

Winter Banner Card


I was inspired to make this card after seeing a card that Kristina Werner made.  Here is the original card that inspired me!

I just loved what she did with it and I had been wanting to play along in the Whimsical Designs challenge to use a snowflake and bling. 

I started with a kraft base.  The top 2 corners are rounded at a 1/2 inch.

I used a Gelly Roll pen to do the faux stitching.  

The papers are from the Echo Park 6 by 6 pad Winter Park.

The bling is just from the $1 bin at Michael's.

The stamps are all from SP & Company.
Snowflakes from Falling Snow stamped using Marina Mist ink from Stampin' Up.
Sentiment from Ultimate Sentiments 1.  Same ink.
The bottom is Circletastic stamped with Versamark and then heat embossed using some white embossing powder.

This came together SO quickly since I was using Kristina's sketch.  Normally I spend hours on a card so it was nice to have one come together so quickly.

I'll be entering this over at Whimsical Designs for their Winter Wonderland challenge.

Thursday, January 19, 2012

Patterned Hearts Card


All the patterns used are from the My Mind's Eye Lime Twist Happy Go Lucky 6 by 6 pad.

I cut 3 hearts in each pattern from the Plantin Schoolbook Cricut cartridge.

I wanted to make them as even as possible so I used some strips of paper adhered with removable adhesive around the edges to help keep things as even as I could.  It's still not perfect, but far better than I think I would have done without some guidelines.

After I had all the hearts in place I started drawing the lines with my Sakura Gelly Roll pen.  I wanted to create a kind of frame.  When I was done drawing the lines I didn't like the way the corners looked, so I added some pink dew drops.

The sentiment on the bottom is from SP & Company's set I Love Love.  I stamped it in Versa Mark and then embossed it using white embossing powder.

I rounded the top 2 corners on a 1/2 inch setting on my corner chomper.  

As a finishing touch I decided to add Diamond Stickles to the pink hearts.