Hello all.
Thanks to everyone who checks out my blog. I have so much fun with it.
I won't be posting for a week or so, not too long, just a short break.
My cousin's wife died the morning of Christmas Eve after a long battle with Cancer. It was expected, but still of course very hard! She left behind her husband (my cousin) and her two teenage daughters. Funeral arrangements have not been made yet, but will be soon.
On a happier note my mother is in town, the timing could not be better, as the family should be together right now. I haven't seen her in a little over 2 years, so I want to spend as much time with her as possible.
So, I will be focusing on my family in the coming week or so, and then return to blogging frequently. I just wanted to let everyone know what was going on, and I have already shot some really fun videos, but I do need to edit them before I can share, so be looking forward to some really fun stuff! I'll be in touch soon :)
Saturday, December 26, 2009
Wednesday, December 23, 2009
Yet Another Felt Ornament

This is the last one I'll show. It's my personal favorite of the set. There are 2 more, but I feel like I've shown enough pictures of them for you to get the point! *LOL*
I purchased stocking kits for both my kids that are a similar technique, but I just wasn't able to get them done this year. So... look forward to seeing them for next holiday season. They are absolutely breathtaking. I will be working away at them all throughout the year.
Monday, December 21, 2009
Wreath Card Using the Martha Stewart Branch Punch
This is a beginner and budget friendly project :)

I just used the Martha Stewart branch punch to make the wreath. I added some Stickles for berries and a bow.
Sunday, December 20, 2009
Glittered Ornaments With Initials
I have decided that I would like to make an ornament for each member of the family each year. Last year I bought plain glass ornaments and used some white glitter glue and a silver pen. The results were OK, but VERY "handmade" looking if ya know what I mean ;) *LOL*
This year I decided to use the Cricut With The Christmas technique of using floor polish to make the inside of the ornaments sticky, and then adding glitter. I finished off the fronts with some scalloped circles with the letters of our initials inside! What a blast! For those of you with a Cricut, the font is Ashylyns Alphabet.
I had my husband pick his own glitter color, and he made the deciding choice on the font. That way I feel like he participated! :) As the kids get older I want to get us all involved in making ornaments together.
Our initals are fun, they spell things like arts, and rats! *LOL* :) Yes, I'm a dork, but I got a real kick out of that.

Wednesday, December 16, 2009
Eeyore Cross Stitch
I started this way back in April. I finished it in June and then put it in a large plastic container where I store gifts. Just recently I got it back out, bought it a nice frame, and wrapped it for my best friend, who obviously loves Eeyore. The picture is horrid, but you get the idea :)


Tuesday, December 15, 2009
The Tags Put to Good Use
Recently I showed some fun tags I made. Well, I put them to good use and used them to decorate presents I wrapped. I also used the 2 boxes I made previously with my Ultimate Crafter's Companion. I think my gifts look really lovely this year!


Here's the boxes I made with the tags to complete them.

Here's the gifts that I wrapped as normal, and just used the tags on.

Monday, December 14, 2009
Penguin Family Card

Supply List:
Stampin Up Whisper White Card Stock
Stampin Up Basic Black Craft Ink
Stampin Up Stampn' Write Markers
Stampin Up Stamp-a-ma-jig
Stampin Up Stamp-a-ma-jig
Stampendous Cozy Penguin Trio Stamp
Stamp N Stuff Embossing Powder in Midnight Black
Embossing Heat Gun
Patterned Paper - This one is from a K & Company Holiday Stack
Cuttlebug - and Cuttlebug folder called Ice Crystals
Adhesive - I used the Glue Glider Pro w/ the Perma Tac
Adhesive - I used the Glue Glider Pro w/ the Perma Tac
Another Felt Ornament
Here's another handmade felt ornament. Yes, I know I have been showing a lot of these, but they take many hours, so that does detract from my time to do other projects :)


Friday, December 11, 2009
2 Page New Baby Layout

Wednesday, December 9, 2009
Sparkly Tags & Glitter Glue Talk

In this video I talk about a couple different kinds of glitter glue and what their different uses are. I show tags made using the Cricut cartridge Very Merry Tags, but they could still give you good ideas, even if you don't own a Cricut!
Enjoy!
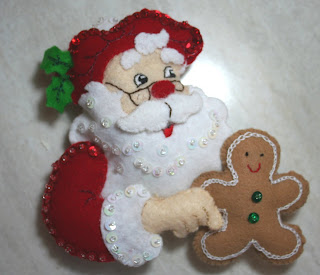
Santa Ornament
Here's another ornament in the series of 6 I'm making. These may not be the easiest or quickest to do, but the results are wonderful. Maybe next year I'll make some that I get to keep for myself!!!

Monday, December 7, 2009
Larger Scale Never Ending Card
This is just a quick video showing a never ending card I made. I made the card much larger than a usual never-ending card so I could include a bunch of cute photos. Never ending cards are not as hard as you would think. If you like this idea, check for a full tutorial on Youtube. I believe I have one listed in my favorites too! Let me know if you'd like me to actually show the cutting and putting together of one.
Saturday, December 5, 2009
Building a Memory Pregnancy Page
Well, I'm glad I got pictures of just how insanely big I was with my daughter! I look like crap of course being that pregnant, but it's pretty amazing thinking about what my body did. Even with the crummy photos I think the page turned out well :)


Friday, December 4, 2009
Handmade Elf Ornament
This is one ornament in a series of six that I am making for Christmas gifts. It's from a Bucilla Kit. You get stamped felt which you cut out, embroider, sequin, stuff, and sew together. It's a lot of work, but I think they will be appreciated and loved. I really struggle with the stem stitching on these, which is the kind that's done on parts like the eye, and here on the frosting of the gingerbread man! *LOL* I'm getting a lot of practice with that stitch on all these ornaments though, so maybe I'll get better!


Wednesday, December 2, 2009
Bliss Card Using Serenade

I just got the brand new Cricut cartridge, Serenade. I've been waiting not very patiently for months after first seeing the images previewed. This is the first project I came up with using it.
All the paper is beautiful metallics, and then just the textured cardstock base. It's all from the Die Cuts With a View Latte cardstock stack. It's a wonderful stack and I have used it a lot recently!!!
*The card is 4 and 1/4 by 5 and 1/2 when folded.
*The tree is cut at 4 inches
*The bird is cut at 1.89 inches
*The swirl is on the shift key, then flipped. I used "fit to length" on my Expression and chose 2 and 1/2 inches.
*Bliss is cut and shadowed at 1.38 inches, using Gypsy Wanderings
*The butterfly was cut using Storybook in the fancy corner feature at 1 and 1/2 inches.
Tuesday, December 1, 2009
Wild Thing Scrapbook Page

My son's baby book is turning out to be a different expreience from my daughter's book. My daughter's book has just tons of embellishments. Glitter flowers, buttons, ribbons, etc. My son's book is turning out to be a lot more simple. It also has more photos on the pages because I am using a better camera than I used to when she was born.

All these papers are from the Die Cuts With a View Safari Chic stack. I bought the stack specifically thinking of this outfit to scrap! Yes... I think that makes me a sick woman! *LOL* These letters could have been made more clear with a shadow in a solid color, but in this case I decided I wanted it to look a bit more subtle and not as shap, sort of like an animal in it's environment I guess.

I almost used my Animal Kingdom Cricut Cartridge, which has a lion and giraffe that look great, but then I remembered I had these files. I thought they were a better fit since they were so cutesy and babyish. They are beyond adorable and I have been wanting to use them, but I think they are best for babies, or for pictures of baby animals, so I figured it was best to use them now while I had the opportunity, and I'm glad I did.

The lion is a little "off". When I looked at the picture again I realized his eyes were supposed to be way lower, which made him look more sweet, but I couldn't move the eyes. I drew in the details with a Stampin Up marker. She included cuts for the mouth and feet, but they didn't cut well, I'm glad she included them though! They'd be great for wall vinyl or something!!! The freckles were already notched it, I just accented them.
Get these great files, and lots more too from HERE!!!! Notes from the Scrapbooklady is an amazing blog!!! I just know you'll love it if you haven't seen it before! :)
Sunday, November 29, 2009
Ultrasound Scrapbook Page
This is the page of my ultrasound photos the day I found out my baby girl was... a baby girl! I wanted to keep the page simple, emphasizing that we found out she was a she that day.
I'd like to note with a little laugh that I will not have a belly shot for my second pregnancy ultrasound! *LOL* Not nearly as cute of a bump that time around :)

I'd like to note with a little laugh that I will not have a belly shot for my second pregnancy ultrasound! *LOL* Not nearly as cute of a bump that time around :)

Saturday, November 28, 2009
Working on the layout and posting ideas
Sorry posting was scarce last week, it's been a real mad rush around here with family things and such. I just wanted to let everyone know that I will be working on the layout and changing some things around this weekend, so the blog might look a little scewy at times while I'm in the middle of changing things.
I will be having tabs at the top of the blog to make navigation easier and creating lists of my SVG's and videos, so you can find exactly what you're looking for. I think this is good to get done now, and will make things much easier as my blog grows. I will also be widening things so that my videos fit better on the page, and probably another little detail or two as well.
I've got plenty more fun stuff coming up. I've been working on tags with the Cricut holiday mini cart for tags. I'm working on a shopping cart SVG file too.
I just ordered the Cricut Serenade cartridge off ebay, and it should be here mid to late next week. So, stay tuned for fun projects with it. I've been anxiously awaiting that cart for a long time and just couldn't help myself.
If you have requests for upcoming SVG's, or project requests, let me know. Some of the newer Cricut cartridges I have to work with are Winter Woodland, Storybook, From My Kitchen, Ashlyn's Alphabet, all 3 winter mini carts, and Serenade on the way. So, if you'd like to see things done with one of those, by all means let me know :)
If there are things you would like tutorials on regarding the Cricut Expression, or the Gypsy, let me know that too. I'm certainly open to considering all ideas. I am also hoping to start doing some scrapbooking pages on video. It seems there are many more card videos than scrapbook pages available online, so I'd like to try and do some of my pages on video for you. I'm about to start my son's baby book, and work on my daughter's toddler book, so those are likely the pages you'll be seeing. I still have lots of my daughter's newly completed 80 page scrapbook that I will probably be showing pics of in the coming weeks as well.
Take care!
Tuesday, November 24, 2009
Really Simple Mini Book
Well, I forgot to get a picture of this before I mailed it out, but I did shoot the video. I'm just too lazy to try and get a good still shot :)
This is a REALLY basic book! It's quick and easy to do, and was designed so that it could easily be done many times for multiple relatives or friends. It's also very affordable to make, and because it's not too bulk it's easy to mail as well. You could easily elaborate and add a lot more embellishments, mat all the photos, etc.
I hope you love this easy idea!
Friday, November 20, 2009
Making a Shaker Card!

Wednesday, November 18, 2009
Simple Thank You Card

This is just a really quick card I put together for a nice thank you. Everything is from 3 Birds, except the ribbon, which was in the dollar section of Target. I really struggled with the color choice for the brads, but in the end I couldn't get the pink brads I had to match, so I went with black.
Tuesday, November 17, 2009
Li'l Ducky Layout

You can click on the photo to enlarge it.
The little duckies were all cut using the Doodlecharms Cricut Cartridge. The words were cut using a font I had in my computer. It was different working with a white background, and I don't do too many 2 page layouts, but I like the way this all went together.
Monday, November 16, 2009
Frosty Kisses Card Made With Snow Friends

"Frosty Kisses" was cut from the Winter Woodland Cricut Cartrdige.
The Snowflakes were punched out from the Martha Stewart Artic Snowflake punch.
There is a lot of sparkle to this card. The snowflakes in the background were stamped in metallic silver ink, and all the white cardstock is glittered, but it didn't show up very well in the picture, so I added a little bling during editing just for fun! *LOL*
Sunday, November 15, 2009

Wednesday, November 11, 2009
Pregnancy Scrap Page

I really love the way this page turned out. I cut "pregnancy" out using Gypsy Font on my Cricut machine. All the other embellishments were one page of stickers. The paper is from Die Cuts With a View. I love doing journaling on my computer like this, and just cutting around it. It's quick and easy, and I like it much better than my own handwriting. I have found this is my favorite way to journal.
Tuesday, November 10, 2009
Thursday, November 5, 2009
I've been given a blog award, including some great links to other blogs!

I'm passing the award onto these blogs. Check 'em out!
Crafting the Night Away
Paper Scissors Ink
Craft Junkie Too
The Homemakers Cricut
Scrapbooking Grandma
Here's my answers to all the silly questions. All one word only.
1.Where is your cell phone? Nearby
2. Your hair? Crazy
3. Your mother? Short
4. Your father? Funny
5. Your favorite food? Sushi
6. Your dream last night? Forgotten
7. Your favorite drink? Wine
8. Your dream/goal? Self-employed
9. What room are you in? Dining
10. Your hobby? Crafts
11. Your fear? Heights
12. Where do you want to be in 6 years? Self-employed
13. Where were you last night? Desk
14. Something that you aren't? Boring
15. Muffins? Blueberry
16. Wish list item? Sillouette
17. Where did you grow up? Colorado
18. Last thing you did? Craft
19. What are you wearing? Pajamas
20. Your TV? Annoying
21. Your Pets? Dogs
22. Friends? Busy
23. Your life? Crazy
24. Your mood? Sad
25. Missing Someone? Yes
26. vehicle? Sonata
27. Something your not wearing? Shoes
28. Your favorite store? Michael's
29. Your favorite color? Purple!!!!
30. When was the last time you laughed? Yesterday
31. Last time you cried? Yesterday
32. Your best friend? Leah
33. One place that I go to over and over? Mailbox
34. Facebook? Sorta
35. Favorite place to eat? Mexican
Tuesday, November 3, 2009
A Couple Pages
Here are a couple 4th of July scrapbook pages of my daughter. I was going to go purchase some 4th of July embellishments, but there doesn't seem to be many available since it isn't that time of year, so I went through my stash and found out I had plenty that would work, so I whipped up a couple more simple pages.


Click on the photos to see them enlarged if you like.


Friday, October 30, 2009
Stinkin Cute Page

Click on the photo to see it enlarged for detail.
I had a great time with this page! I had all these chipboard buttons that came in this kit I bought. I thought they weren't the type of thing I could see using a lot, and I might as well try and use them with the kit since they matched. I started playing around with them, and this is what I came up with.
I really enjoy working with the patterns of my paper to make them pop more. It's easy to make everything flow that way, and it allows me to add a lot of embellishments without making the page look too cluttered. For a begginner scrapper such as myself it's a great way to go!
Thursday, October 29, 2009
Sitting Back, and Feeling Proud
I have some new SVG's for ya'll, but I decided to post them tomorrow morning instead of today. To give myself a break from really organizing a post.
I just wanted to share a simple sense of joy with everyone today. My blog, videos, and projects may not be the best, in fact I KNOW they aren't! *LOL* Yet, I am bursting with pride and joy at the fact that I'm just "going for it!" It feels good to do what I want, and to follow in the footsteps of all the talent I admire online!

This is a pic taken by my husband last night. Today, I am pretty well snowed in, and I plan on spending the day enjoying life's simple pleasures. Playing with my little ones, and working on some handmade ornaments for family. I want to challenge each and every one of you to do something you've been putting off. Whether it's an issue of making time, or feeling like you can't do it right, whatever. Before the weekend is over, do one thing that's been on your list. Try a new technique, use a product you purchased but never opened, start a blog, whatever!!!! Do something fun that you'll enjoy.
 Entering the Gypsy design challenge was an amazing experience!!! I'm pretty positive I won't win. In fact, if I did I would think somehow something was unfair, because I know there are projects that show far more talent and attention to detail then my own, but I am still proud I put myself in the running, that I tried! I enjoyed watching my own little video diary of the experience. I will always have that memory of the frantic day I spent trying to put that project together. I challenged and pushed myself in new directions, and I'm glad!
I added to my design, just for fun, because I thought it was too plain! I couldn't think of other things to add that followed the contest rules, so I had to wait until I'd already submitted. So, I'm sharing the updated design with you. I love Halloween, and I think it's so fun to have this up! It's SO sparkly, but I don't think that really shows in the photo too well.
I just wanted to share a simple sense of joy with everyone today. My blog, videos, and projects may not be the best, in fact I KNOW they aren't! *LOL* Yet, I am bursting with pride and joy at the fact that I'm just "going for it!" It feels good to do what I want, and to follow in the footsteps of all the talent I admire online!

 Entering the Gypsy design challenge was an amazing experience!!! I'm pretty positive I won't win. In fact, if I did I would think somehow something was unfair, because I know there are projects that show far more talent and attention to detail then my own, but I am still proud I put myself in the running, that I tried! I enjoyed watching my own little video diary of the experience. I will always have that memory of the frantic day I spent trying to put that project together. I challenged and pushed myself in new directions, and I'm glad!
Wednesday, October 28, 2009
Another Super Simple Scrapbook Page and A Cute Birthday Card


Tuesday, October 27, 2009
The last of my hand embroidered baby onesies
This is the last of the onesies I hand embroidered for my sister-in-law's new baby. I'm so glad to be done :)

Check out my design challenge entry, and vote if you love it! Here's the link!

Monday, October 26, 2009
Packed Week Here at Staying Crafty
I have really fun stuff planned for this week! Videos, SVG's, scrapbook pages, etc! Some of it may spill into next week, as I will probably only post during the week and not on the weekends.
I just did the Gypsy 24 Hour Design Challenge and am SO excited!!! I made a video diary along the way that is uploading to You Tube right now for you to enjoy ASAP :)
While I'm waiting for the video to load I thought I'd at least post a pic of the completed project and a link for you to vote! Please, please... vote for me if you like my project!
http://www.cricut.com/gypsy/designchallenge/entries.aspx?did=170

Thursday, October 22, 2009
Be Happy Scrapbook Page

Click on the photo to see it enlarged.
Everything used here is from 3 Birds, HSN's exclusive line. It's just a really simple page. I found that I liked it this way because of the symmetry of the images.
I have found that I love such simple pages they are so quick that I feel accomplished quickly, and making sure and not making every single page complicated has allowed me to make lightening fast progress.
Some of my fancier pages will be featured soon.
Wednesday, October 21, 2009
Gypsy Sizing Tutorial
This is just a basic video talking about different ways to size your images using your Gypsy. You can right click and select "Watch on You Tube" if you have any problems watching it embedded on my blog.
For those that don't know what a Gypsy is, it's a product that works with a Cricut die cutting machine, basically, you can cut your own shapes and images to customize the colors and sizes of your embellishments. Visit http://www.cricut.com/ to learn all about their machines.
For those that don't know what a Gypsy is, it's a product that works with a Cricut die cutting machine, basically, you can cut your own shapes and images to customize the colors and sizes of your embellishments. Visit http://www.cricut.com/ to learn all about their machines.
Monday, October 19, 2009
Cute N Cozy Page

Everything I used on this page is from 3 Birds, HSN's exclusive line. It's just something really simple with plenty of foiling and a little bling.
Saturday, October 17, 2009
Laugh Out Loud Page

Click the photo to see it enlarged for detail.
I had fun making this page. I feel like I really found the perfect sentiments in my collection with "Laugh Out Loud" and "Leave Your Mark" I don't think I would have thought of the sentiment "Leave Your Mark" on my own, and it's pretty cute with my little girl looking like she's chewing the couch like a puppy! *LOL* I enjoy having a large variety of stickers and rub on's with different sentiments because often, like this time around, just flipping through them will find something that fits perfectly!
Sadly I had some adhesive issues and goobered up my photo. I will probably replace it, but I will do that later when I'm totally done with the book so that I don't slow down my pace!
This GORGEOUS paper is from Die Cuts With a View, the Sweet Stack (I LOVE that paper.) All the other embellishments are from 3 Birds.
Thursday, October 15, 2009
Another Baby Onesie

This is the 2nd baby onesie I've embroidered recently. I still have one left to go. I had a hard time picking the colors for this one and such. I just used 3 seperate embroidery designes and put them all on. I love the colors of the rattle, but I'm not sure how well I think it matches the bottle. Oh well, it's done and it's cute.
Wednesday, October 14, 2009
The Little Things Scrapbook Page

Click on the photo to enlarge it for detail.
I really love this photo of my daughter just enjoying herself. It is wonderful to see the world through the eyes of a child, and see that simple things truly bring the most joy to our lives. I wanted to capture that thought when making this page!
This gorgeous paper is from Die Cuts With a View, the Nana's Kid's stack. It is just so breathtaking in person. The ribbon was just some random stuff I had on hand from a previous clearance. The other 2 embellishments are from 3 Birds.
I ran the ribbon through my Xyron Create-a-sticker machine with the permanant cartridge. It took a couple tries to get the ribbon looking centered properly, but I think it turned out well. I have found that the Xyron does great for ribbon, and adheres really well to all the glittery papers I enjoy using!
Tuesday, October 13, 2009
Love Me Scrapbook Page

Embellishments and background paper by 3 Birds (from HSN) Photo mat and foiled corner are parts of a page from the Die Cuts With a View Blossoms and Butterflies stack.
This page was a real challenge for me! I know it probably doesn't look like it would be! What I struggled with was how to use the pretty paper. I ended up just cutting around the foiled design, and creating a mat, this only used up half of a 12 by 12 paper, so I have some left. I played forever with using the whole page, half of it, etc, before finally settling on this. It's funny how sometimes the most simple things throw me for a loop and leave me unable to make up my mind!
Monday, October 12, 2009
Love, Cherish, Adore Page

Click on the photo to see it enlarged for detail.
This is just a simple page I threw together. Everything on it is from Birds, HSN's exclusive line. I stocked up on a bunch of it at once because of good deals and such, and it's been easy to put it all together since a lot of their kits coordinate with other kits they've put out.
This is just 2 die cuts, one layered on top of the other, and 3 sparkly flowers attached with brads. I used a favorite tool of mine to make the holes for the brads. It's a punch by Martha Stewart that allows me to punch holes in 3 different sizes, anywhere on a page. I couldn't have gotten those brad holes in far enough with a traditional hole punch. What I really love about it is it's ease of use, and the onboard storage for the other sizes when you aren't using them. I just have a very generic cutting mat I use with it. I found a link to the tool on Martha's Crafts official site, but it's widely available, I picked mine up at Wal-mart. http://www.marthastewartcrafts.com/detail.php?p=21808&v=msc_prod_tool_punches
Friday, October 9, 2009
Halloween Goodies - Free Fonts

love Halloween, it's my husband and I's favorite holiday. I'm not sure I'll have much to scrap this year, as the kids are too young to really enjoy the festivities, and also too young for me to feel comfortable leaving them so late at night to visit haunted houses and such, but I still couldn't resist picking up a few Halloween crafty goodes for future use!
I got great epoxy stickers, and a $1 clear stamp set from Target. From my local Michael's I purchsed a really fun paper pack, and some really neat metal embellishments. I've picked up a couple other things recently as well regarding Halloween, and been tempted by many more. I am hoping to get a couple of the Martha Stewart punches that are Halloween themed. There are some really cool ones out!
Another fun thing about Halloween is the wonderful fonts! Here are some wonderful free fonts I think you'll enjoy for your projects.. all Halloween themed! http://www.dafont.com/theme.php?cat=803
Wednesday, October 7, 2009
I Want Lots of Kisses, 2 Page Layout

Click on the photo to see it enlarged!
I am very, very happy with this 2 page layout! I rarely do 2 page layouts. I usually treat each individual page as it's own totally seperate work of art. I don't worry if it matches the page next to it, or the book cover, etc. I find it all just works out as long as I make each page look great.
This beautiful paper I picked up challenged me. I loved it so much I was nervous to use it! I always struggle to use my favorite products because I'm afraid I'll mess them up! I dreaded covering it up, and I was also nervous that it would overshadow my photos and be "too much" so I decided to cut it and turn it into a two page spread. I wanted to make the most of the paper and enhance the design by using the circles as frames for my embellishments.
I had an absolute blast coordinating everything for this!!! I really went all out and used a real variety of products, buttons, ribbon, brads, flowers, and paper embellishments. The embellishments are all from K & Company and 3 Birds. So far this is my favorite part of my daughter's baby book and I'm so proud of myself for constantly pushing to try new things and make everything look different and unique!
I hope you enjoy it! Maybe you can try taking a single paper you love and basing everything around it like I did, it sure was a lot of fun to work that way!!!
Monday, October 5, 2009
Sweet Baby Girl Scrapbook Page

This is one of my absolute favorite pages! I think these photos are just precious beyond all belief, great close up shots with really sweet expressions, like the holy grail! So, I used some of my very best embellishments for this page. They are from K & Company. The clothesline is actually a wire attached by brads on the ends, and the clothes are all seperate little stickers that have tabs that go both above, and below the wire. The dimension and attention to detail in these embellishments is WONDERFUL! I couldn't be happier with their quality. I'm a big fan of their brand of embellishments! They catch my eye every time I go out for scrapbooking supplies.
I tried to keep this page simple and give it a sense of symmetry. I wanted the embellishments and the photos to stand out on their own, so I went with a simple layout and background paper as not to detract from them!
Saturday, October 3, 2009
Baby Shoes Page

Here is a sweet little page. I decided to do something a bit different and just put a single photo on this one. Doing that allowed the precious paper to really frame it. I used some chipboard and some stickers from various sources to dress it up a bit further. The stickers on the bottom I know are from K & Company.
I remember when I found this paper I just HAD to have it, I found it long before I started my daughter's baby book, but I knew that's exactly where it would go. Precious little baby shoes for a baby page! Sometimes those simple and obvious little things really turn out to be the perfect fit! I didn't want her whole book to look the same, so you're seeing a real variety with some trendy colors, some pastels, etc. However, I wanted to make sure I had some traditional things too, like this! With the pastels and obvious baby theme! I figure I won't get a chance to do these kind of pages any other time except for my kids' baby books, so I'd better make sure and do at least a few!
Friday, October 2, 2009
For You Sweet Baby Girl Card

This card was quick and easy. It was made to go with the book I just made. I think they match beautifully. Anyways, I used my Gypsy Wanderings cartridge for all the lettering. It's really a wonderful and diverse cartridge! It's easy to use too! All these letters were pre-welded, I just sized and cut them! Super easy! I did weld "baby" and "girl" together by the little tail like swirl. That's it!
The reason my bow looks so nice is that I used my Ultimate Crafter's Companion. I assure you, I stink at bows! *LOL* That thing really comes in handy!!!
Thursday, October 1, 2009
My First Project Using My Gypsy, A Baby Word Book

I had an absolute blast designign this! It's basically a small, pre-embellished scrapbook for a new mother. I designed all the pages to fit a 4 by 6 photo perfectly, and included a place on each page to record a date or small note. I am just showing my favorite page, instead of all of them. Every single one of the stickers is from HSN's exclusive line, 3 Birds. The front page patterned paper is by Die Cuts with a View, and I used Plantin' Schoolbook, and Doodlecharms Cricut Cartridges for the design. The ribbon is all pretty random stuff.
 I had some real difficulty with figuring out the binding. I ended up using ribbon. I glued the ribbon to the back of each page, then I sewed all the ribbon together. I scored the cover, and then glued it down to all the ribbon. I used Zip Dry adhesive to do all this with. I think it worked out pretty well, although it left me really wanting a cool binding machine instead!
To watch a great tutorial on making word books using the Gypsy, check out this fabulous blog! http://craftingthenightaway.blogspot.com/
This project taught me so much, and ti was a great feeling completing it! I also loved the fun I had with the googly eyes. I remembered that I had some leftover and though I'd try it, and I just LOVE the result!
Please excuse the photo. I had not yet attached the cover, so it's mis-aligned, and when I took my second series of pics after attaching it, they came out really dark and crummy, so instead of giving it a 3rd go I decided that photo was good enough! *LOL*
Wednesday, September 30, 2009
Just Like Mom Page

Well, as I am still getting the hang of this blogging thing I am making some mistakes. I did not write down the info on this paper and these embellishments! Opps! That might happen with some other things too because I have so many things already out of their packages and in other storage, but I promise to try and be more careful about that as I buy new product! I know I purchased this paper individually, not as part of a stack, and I believe it was at Michael's.
Anyways, I love the way the colors in the paper and the embellishments worked together! I just buy product I like, and then start playing with it when I'm ready, and sometimes things just happen to match really well! I will also sometimes buy coordinating kits, but most of the time the matches just sort of happen from playing around. I could not be happier with the way the page and the embellishments came together here! Sometimes I find it worth it to splurge on individual papers or more expensive embellishments because sometimes they really do give an effect I wouldn't have otherwise gotten. I think that's the case here! High quality stuff that was well worth the price!
Subscribe to:
Posts (Atom)