Monday, May 30, 2011

Graduation Card


I'm showing you the photo of the inside of the card first because I think it's actually cuter than the outside!  *LOL*  
 
This is my project for the latest challenge over at Scrapbookaholic By Abby.  See the end of the post for more info on that.  

This is a standard A2 sized card.  I printed an image from the Kich N Blues collection called Kich Graduates.  I colored her in with some Copics and some Stampin' Up markers.  I also used a white Sakura gel pen to bring out the outlines in the black areas.   

For the sentiment I stamped "Congrats to You" from SP & Company's Mini Card Creations 1.  I cut it out using a scalloped oval Nestabilities die and then used the same ink I stamped with to sponge it and give it an interesting look.  I cut a larger scalloped oval in green and gently sponged the edges of that layer with the same blue.

For the bottom I added a strip of patterned paper by DCWV that is 2 inches tall.  I did NOT put adhesive on the top or in the middle, which creates a pocket for money or a gift card.  I decorated the top with a strip of blue cardstock that I punched with the Fiskars Threading Water punch.
 
I finished off with some stitching lines done with a Stampin' Up marker.


Here's the front of the card.  The whole card front is covered with the same patterned paper as the inside pocket.

I added a grey layer that is 3 and 1/2 inches by 4 and 3/4.  To the bottom of that I added a piece of blue cardstock that is about 2 inches tall.  It's punched using the Stampin' Up Scallop Edge punch.  I stamped the sentiment "It's Your Day!" from SP & Company's Ultimate Sentiments 1 using some Craft Ink from Stampin' Up.  

The graduation cap is from the Everyday Pop Up Cards Cricut Cartridge.  That cartridge has a lot of great images that don't have anything to do with pop up cards.  I cut it at 2.25 inches and blinged it up with some various colors of Stickles.

To finish of the front I did some more stitching lines and tied a ribbon.  

Please head on over to Scrapbookaholic By Abby to see what the rest of the team came up with and enter your own project for the challenge!  
 
We have some really great prizes for this one!!!  3 people will get the Kich N Bleus Grad Collection and we also have $20 Gift Certificate from KaDoddle Bug Designs.  Fun, huh?!

Here's the basics of the rules, but be sure and review them again on when you get to Abby's blog.  

Link your ORIGINAL post with your project up to Mr. Linky (on her blog)
Mention that your project is for her challenge
Project must be entered by the deadline before Mr. Linky closes.
Project must be on the challenge topic - this time around it's graduation.
Have fun!

Friday, May 27, 2011

Hang In There Pop Up Card with a Video


I had so much fun putting this card together!  Here for the inside you can see the pop up I created with some additional details and a punched frame I made.

Here's a closeup of the balloon.


Here's what I did to the outside of the card.


I stamped on the ribbon and solved the problem of my cloud image not repeating properly when stamped.


For those who just want the supplies 

Cloud Background Stamp is by Hero Arts
Cuts on the Front are From Country Life Cricut Cartridge

For the inside I used the Everyday Pop Up Cards Cricut Cartridge
Martha Stewart Ribbon Loops Punch Around the Page Set

Here's the video with all the details & plenty of little tips and tricks along the way:


This project is the featured guest designer post over at the Cricutolics forum.  Isn't that fun?!  If you're interested in a forum to talk crafts they have several sections for you to talk in.

Thursday, May 26, 2011

Make Lemonade Card - Finally a Video Too!


Front of Card
There are a lot of fun details for this card. The inside is as nice as the outside, and I actually like it better. I used a stamp set from TPC Studio called A Slice of Life. To see me put it together go ahead and watch the video below.

Inside of card
It feels like it's been forever since I did a video. This one took me an extra long time, but I'm hoping to get back into the swing of things and shoot for one a week from now on.

Wednesday, May 25, 2011

If the Shoe Fits... Tag


It's time for me to share another fun project for the awesome challenge blog Whimsical Wednesday.  This time around the challenge is to make a tag - and you must use bling.  Isn't that FUN?!  Be sure and visit Whimsical Wednesday today to see what the other gals came up with - and to enter your own creation :)

For my project I cut a tag from the Wrap it Up cartridge at 5 inches.  The shape kind of reminded me of a shopping bag.  I added a strip of purple bling along the top.  I also added little green bling in 4 of the corner areas - and then went around with a Sakura gel pen in the color Green Star!  Such a stunning effect.

I stamped the sentiment "If the shoe fits... but it in every color" from Pink By Design's Shopaholic Set.  I just love all the fun and girlie sayings in that set.

I added some blue polka dotted ribbon from my stash near the top of the tag.

I cut 3 different color combinations of shoes from the Cricut American Alphabet cartridge on the E2.  I cut them all at 2.5 inches.  I took each one and added Diamond Stickles to the swirl on the heel.  Then I added 3 pieces of bling with my Irock to the holes in the front of the shoe. 

I added the shoes to the tag starting at the bottom and stacking them.  They just sort of nestled perfectly together.

I hope you enjoy my fun and ultra girlie project today!  Now head on over to Whimsical Wednesday to see more inspiration and share your own fabulous work :)

Monday, May 23, 2011

Birthday Decortions - Including Cake Made With the Cricut Cake Machine


So, today is my daughter's 3rd birthday.  We had her party on Saturday and it works out that my dear, sweet friend Tracy shares the same birthday and all this birthday fun fits in perfectly with her birthday blog hop.

You'll want to see all the fun and inspirational birthday themed ideas, and be sure to wish Tracy a happy birthday - so if you're doing the hop you should have arrived from Jessica's Blog.  If you have not started the hop yet you can head on over to see Tracy - the first stop on the hop and our special birthday girl :)

Today I'd like to share the decorations I made for her party.  I will focus mainly on the cake  I made using the Cricut Cake machine

Here's a photo of the supplies I used.  Everything seemed to work just fine.  The cake was good and moist and I would buy any of these products again in a heartbeat.  These were all readily available at my local grocery store.


The first thing I had to do of course was bake the cake.  I baked it in 2 round pans that were each 9 inches.  I used some triple berry jelly in the middle to put the two layers together.


The next step was frosting the cake.  I am by no means an expert at this - but I think it came out fine.  The imperfections seem so much less noticeable later after all the decorations are added.  Someday I'll learn to fondant a cake - but not today :)


The next step was preparing the gum paste.  The mix I bought needed water and A LOT of kneading.  My arms were so sore.  I was already tired after just making the gum paste - then I had to work the color into it.  Oh my goodness.  I think that was by far the hardest part.  Here are my four colors all done and ready to be cut.


To use the Cricut Cake machine you need to roll the gum paste out onto the Cricut Cake mat.  First you spread some Crisco onto the mat with a pastry brush and then you just add the gum paste and roll it out.  I TRIED FONDANT LAST TIME AND I HIGHLY RECOMMEND THE GUM PASTE FOR THIS MACHINE INSTEAD!!!!!!  The fondant had to be frozen after being rolled out on the mat and I still had a lot of trouble.  The gum paste cut like a dream.  Here is a picture of some cuts on the mat.


Here's a picture of a bunch of the shapes sitting and waiting to be applied to the cake.  I cut all my shapes first so that I could have them all at hand when I went to see how I wanted everything to fit on the cake.


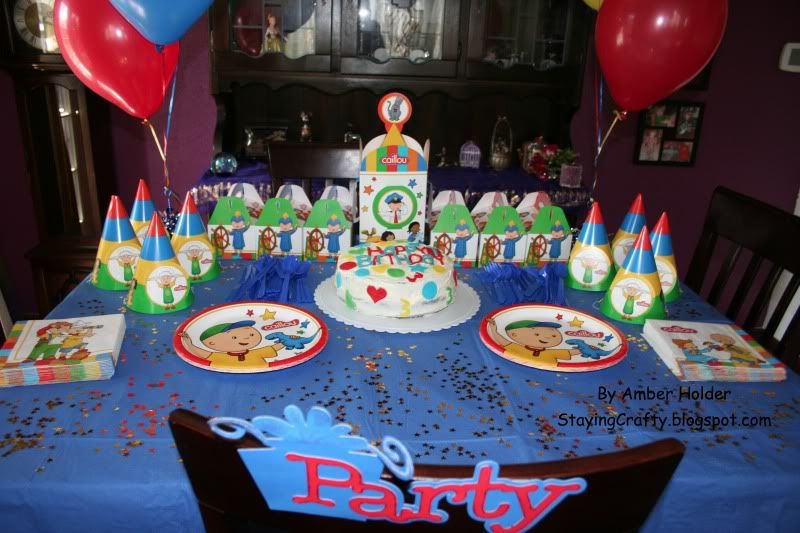
Here's the finished cake on the party table.


Here's a close up shot of the finished cake again.


This took up pretty much the whole day before the party - but my gosh did it feel good to see it all done and see my daughter's excitement over her birthday cake.  It may have a lot more imperfections than one bought from the store - but it was made with a whole lot of love, and I did truly enjoy the process (all except the mess it left in my kitchen *LOL*)

Here are a few more quick photos of things that I made.

This little decoration went on the back of her chair at the party table.  I cut it using my new E2 machine and the Cricut American Alphabet Cartridge.  Then I blinged it up with some Stickles.


Here's a large sign.  It's hard to see much detail but the presents have a bunch of glitter on them, and the letters have some bling. 


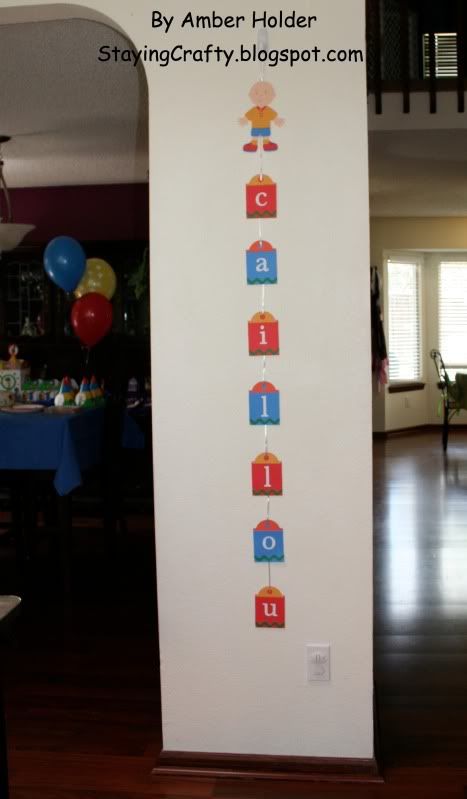
My favorite thing at the whole party was this banner I made.  I spent hours custom making the paper doll using the Cricut Everyday Paper Dolls cartridge.  I think he came out exactly how I wanted.

Here's a shot of the whole banner.

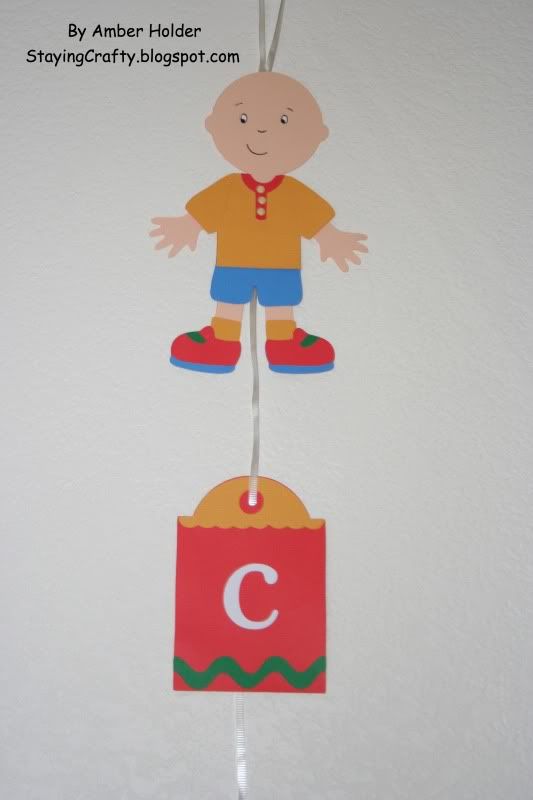
Here's a shot of the top so you can see my special doll.  He is supposed to look like my daughter's favorite TV show character - and she chose him for her party theme.


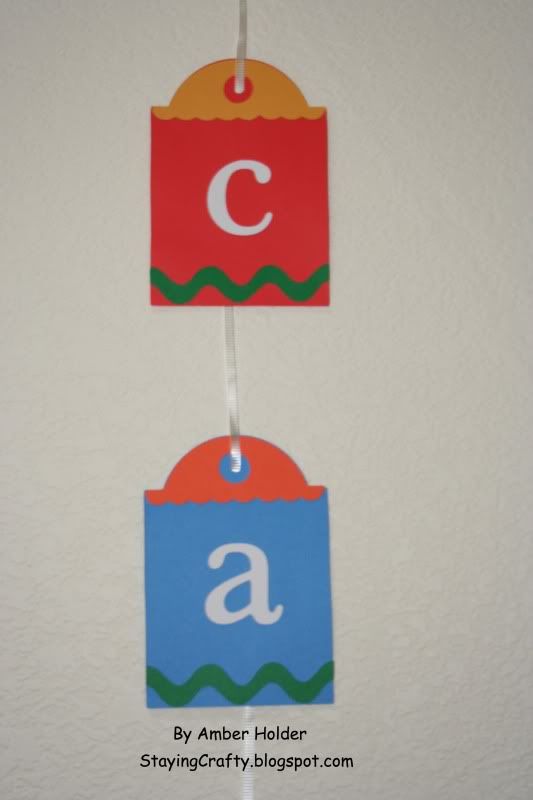
Here's a quick shot of a couple of the banner letters.  I just alternated these 2 color combos.


Thanks for stopping by my bloggy little corner of the world today!  I hope you enjoyed this little glimpse of all my party planning. I go absolutely INSANE over my children's parties.  I don't invite a ton of people or anything - but I go nuts over wanting every little detail to be just so and take great pride in making a lot of the decor myself.
Now it's time to continue the blog hopping fun and head on over to Shawn's blog for some more inspiration. 


Friday, May 20, 2011

Totally Custom Paper Doll


 I put a ton of work into this yesterday to get it just right.  My daughter is having her 3rd birthday party tomorrow and for her theme she chose her favorite TV show - which is about this little boy named Caillou.

Here is a photo of one of the party items I purchased that shows what he looks like.

I wanted to replicate his clothing and his face as much as possible.  The face was drawn on by hand (and it really shows *LOL*)

For the clothing the first thing I wanted to make sure and get right was the collar on his shirt.  I started playing with my Everday Paper Dolls Cricut Cartridge and I didn't see a shirt like that, but I did see a nightgown with the right kind of collar.


You can see the nightgown next to the finished doll.  I did a lot of hand cutting to change the sleeves and turn the gown into a shirt.  I cut the gown in red a second time, and that time I just trimmed away the collar portion.  I added 3 brads for the buttons.

The shorts were cut from the cartridge, but I did have to trim the sides to fit under the shirt.

The socks were cut by hand.

For the shoes I cut them once in blue and once in red.  I cut the bottoms off the red ones and then layered them on top of the blue ones.  For the green parts I took a scrap from a letter I had cut out earlier that day that was sort of curved and I hand cut it to make the little portions for the tops of the shoes.

I think it turned out really well.  I haven't decided exactly how to display it at the party, but when the party is over I know I will be using it in her scrapbook.

Always remember - you can do A LOT with the crafting stuff you already own.  Try and think about things in new ways.  Sure, it takes a little more time - but it can be really fun to make something truly unique.

Wednesday, May 18, 2011

Chipboard Flower Bouquet


I have a fun project to share with you today.  Awhile back I made an order from Oriental Trading and saw this chipboard flower kit on clearance for like $2.50 and figured I'd go ahead and get it.

I had a lot of fun putting this together.  The kit came with way more flowers than I ended up using.  So, I got to pick and choose which ones to use and how to layer them.  All I did was trace each flower onto the back of my paper, cut it out, and then attach the paper with Scotch Quick Dry adhesive.  I layered 2 flowers on top of each other also using Quick Dry.

View of the top of the flowers - the color is off in this photo.

To attach the chipboard to the plastic stems that came in the kit I used some Scor Tape.

All the papers I used are from Stampin' Up.  I also added some ribbon to the vase.  For the front I stamped "You're never more than a thought away" from Stampin' Up's Whimsical Words set.  I cut it out with a circle shaped Nestability, and layered it onto another Nestability shape.

Once I had all my supplies together this went pretty quickly and I'm really happy with the results.  

Thanks for stopping by today :)

Stay crafty!

Monday, May 16, 2011

Hello Kitty Box


Hello everyone!  Today the fabulous Abby is having a new challenge starting!  She is challenging everyone to make a bag or box using Hello Kitty.  If you don't have any Hello Kitty stuff don't worry - just search online for pictures like I did.

For my project today I searched on Yahoo for some Hello Kitty images.  I just printed one I found and cut it out.

I used the Wrap it Up Cricut Cartridge to cut the box at 8 inches - which is the biggest it would go on an 8 and 1/2 by 11 inch sheet of cardstock.  It is actually very small when put together.  Each side is about 2 and 1/4 inches square.  So, it's super cute and would be nice for some small candies or a piece of jewelry.

For the top of the box I tied a ribbon around the lid, then added my image on pop dots, and finished off with the adorable sentiment "Luv Ya!" from SP & Company's Artsy Heartsy stamp set.  I actually stamped it onto the top of a post it note and then cut it out, so I didn't even have to bother with adhesive.

For the sides of the box there were 2 that cut as plain squares. For those I just added 2 and 1/4 inch square pieces of patterned paper from the Cricut Celebrations stack - all the other papers are from that stack as well.  


The other sides have this fun balloon design on them.  I added a piece of patterned paper behind the balloons - otherwise the box was open and things would fall out.  I had to hand cut the center balloon so its' a little screwy.  *LOL*  The other 2 balloons cut as a layer for the box.  After the balloons were all assembled I added some dashes and dots around the frame and a little bit of green bling in the corners.

Now that you've seen my project be sure and head on over to Scrabookaholic By Abby.  You can see the rest of the Design Team's creations and also enter your project for a chance to win a fabulous Hello Kitty watch. 

Here are the rules to enter your project into the challenge!
Link your ORIGINAL post with your project up to Mr. Linky (on her blog)
Mention that your project is for her challenge
Project must be entered by the deadline before Mr. Linky closes.
Project must be on the challenge topic - this time you need to make a bag or box and use Hello Kitty.
Have fun!

Wednesday, May 11, 2011

Thanks So Much Teapot Card


You're going to want to make sure and check out Whimsical Wednesday today!  The challenge is called "Take Shape" and you're challenged to make a shaped card!  What fun, right?  There are tons of possibilities with this.  Be sure and head on over to the Whimsical Wednesday blog for fun and inspiration from the design team as well as to read the official rules and link up your own fabulous project!

For my project today I decided to make a teapot shaped card.  I found this teapot image on the Ashlyn's Alphabet Cricut Cartridge.  I sized it at 4 inches and created a shaped card.  I cut the card base in vanilla cardstock.  I cut the teapot again in some Basic Grey paper from their Kioshi 6 by 6 pad.  

I inked around the edges with some Close to Cocoa ink from Stampin' Up.  I tied a bow on the handle with some pink ribbon that has white stitching in it.  The pink gems are just some self adhesive bling from my stash.  For the sentiment I used a Nestabilies scallop oval die on some Stampin Up designer paper.  I inked the edges and then stamped the sentiment using Stampin Up's Sincere Salutations.  I attached this to the card with Pop Dots to give it a little dimension and interest.

Thanks for visiting today!

This is my second post of the day.  I also made a teacher thank you gift for Tracy - so be sure and see that before you go :)

Thanks Teacher Bookmark


Tracy over at Craft Junkie Too asked us to create end of school teacher gifts.  This is what I came up with.  I cut the bookmark from the Plantin' Schoolbook Cricut Cartridge at 7 inched wide (turn the fit to width button on your Expression and then set the dial to 7 inches.)  

The apples were cut from the Country Life Cartridge at 2.42 inches - but you could just cut them at 2.5 - I used a Gypsy.  For the apple on the left I added some Glossy Accents to make it shiny.  The apple on the right I added some Xmas Red Stickles to make it sparkly.

I used some foam Thickers to spell out "thanks."  I had to fiddle with them a lot to get the placement right, but I think it came out kind of fun and still easy enough to understand.

Along the top I tied some pretty green and white ribbon and added some self adhesive green bling from my stash around the circle opening.  

For the finishing touch I went around the edges with a red gel pen.

To be honest I'm not sure how well it would work as a real bookmark because of the depth of things like the Thickers... but I still think it's very cute.  Be sure and stop by Craft Junkie Too today to see what the other gals created!!

Tuesday, May 10, 2011

Yum Cupcake Card


Hello everyone :)

I was playing around the other day and threw together this simple cupcake card.

The cupcake is from the Sweet Treats cartridge.  The base is in Kraft cardstock, and the wrapper is a paper from Echo Park's Be Mine collection.  I added some Diamond Stickles to the sprinkles.

I used some fun and sparkly Thickers to spell out "Yum" and I used the little star symbols on either side just for decoration.  

I rounded the top 2 corners on a 1/2 inch setting on my Corner Chomper and then went around and made little dots with my Coffee Ice Stickles.

Very simple - and very sparkly!  I hope you'll check back tomorrow as I have 2 fun projects to share.  Stay crafty!

Monday, May 9, 2011

My New Dining Room

Click on the photo to see it larger.
Hello again everyone.  I realize that home decor isn't my usual topic - but it's been a huge part of my days lately.  I have always dreamed of having a nice dining room and that dream is finally a reality.  I painted this accent wall all by myself.

We are on a pretty tight budget and working with things we already owned with a few inexpensive additions.  The only things I just purchased for this room are the picture frames and the paint.
 
 
I love these frames!  I got them at Target for $10 a piece.  So, for only $30 I was able to display 12 4 by 6 photos.  I could easily hang them in a different configuration later if I switch things around & it will be pretty easy to change out pictures if I want to since they are standard sized photos.


Normally I don't like too much "stuff" in places because I think it can look cluttered and it's a pain to dust.  However, in this room I decided to display many items.  I figured it keeps the room for feeling to stark and cold with all the dark furniture - plus they are conversation pieces, and as an added bonus it's also the room the kids aren't allowed in so things are less likely to break.

The hutch itself belonged to my in-laws.  They left it in their basement unused for many years.  When we rented the home from them we fished it out of the basement and started using it - and it came with us to our new home.  In and on the hutch are a variety of treasures.  I have china from one of my grandmothers, and silver from the other.  Crystal my husband purchased cheaply during his trip to Prague.  A couple things I've had since I was a child, some special gifts, and various fun finds from flea markets and other shopping trips.  

The clock in the room belonged to my grandmother.  All the working parts are missing so it is just for display.  To be honest I don't intend to get it fixed.  I'm not much for the noise of a traditional clock.

The table and chairs were DIRT cheap and we bought them several years back for only $200 new.  I do love the look of them, but of course they are very scratched up and such since they are cheaply made.  I am hoping to either purchase or sew some chair covers and table cloths in different colors to change with the seasons, but I can't get to it right now.

Thanks for visiting today!  I have a really cute card scheduled for Wednesday for sure - and if I get lucky I'll try and work on one to post for tomorrow.

Friday, May 6, 2011

What I've Been Up To - And Could Use Your Suggestions


Hello all my crafty friends :)  I have been a busy little bee painting A LOT.  I have painted 3 accent walls in various rooms as well as our bedroom and master bath.  I only have a little left to do and the whole house will be painted by us - at least one wall in every room.  Yay!!!

So, you are looking at a picture of my newly purple master bathroom.  I LOVE it!!!  The candles I just bought at Target and they are those fake LED ones - which is great b/c they will last and not present a fire issue or make a mess.  
 
I have a very large mirror we took out of the other bathroom that I want to hang on that back wall and I could use your suggestions.  I bought some spray frost and I have some vinyl so I figured I'd decorate the mirror a little.  I'm not sure what to put on it.  Something relaxing.  Maybe an image and a word.  Any suggestions for me?  The mirror is pretty big.  It doesn't have a frame - it will be flat against the wall.
 
I also want to hang something on the wall directly across from the mirror.  I kind of thought round would be nice since it's across from a round window - but I don't want to do another mirror.  Any ideas there?

I'll share more pics of the other rooms later. Right now the walls are painted - but I have things to hang and such to complete the nice, finished look.  I know what I want to do everywhere but this one little area by my tub.  I'm just stumped.  
 
I am also SUPER proud of all the spring cleaning I've done.  I've gotten rid of several loads of things and even my junk drawers are sparkling.  Yay!!!  I've been at all this for over a month.

I sure miss everyone - but it feels good to be getting so much done :)  I will be glad to sit on my butt in my craft room and film some videos when I finish this up.  Seems life keeps getting in the way.

Tuesday, May 3, 2011

Birthday Wishes


This little card measures 3 and 1/2 inches square and is made out of Kraft cardstock.

The stitching lines were done using a couple colors of Gelly Roll Pens called Pink Star and Green Star.  They are so pretty and full of sparkle.

The little wavy piece was just freehand cut from a piece of Basic Grey paper from their Kioshi 6 by 6 pad.

The flower is from K & Company.

I used some green self adhesive bling.

"Birthday Wishes" is spelled out using letter stickers from the Echo Park Little Girl Collection.

The little pink embellishments on either side of "wishes" are Dew Drops.

I had fun putting together this fast little card.  I am really trying to use up some of my stash items and go easy on the Cricut and stamps in favor of using up embellishments instead.  Plus... it's QUICK!