Monday, January 31, 2011

Using Cool Gypsy Tricks to Make a Paper Pendant - Video Tutorial


Hello everyone.  Today I have a video tutorial for you :)

I made this paper pendant using the Chomas Creations gel pen holder.  If you want to see a video of me putting the gel pen holder in my machine, and switching colors, etc. please SEE THIS POST.

In today's video I will be teaching you some techniques with the Gypsy.  The pendant I made is one image.  I created multiple layers, lining them on top of each other perfectly, and hid certain contours to create the multiple colors.  I also show you quickly how to re-name layers, preview what's going to cut, etc.  I just walk you step by step through the entire process of making this cut file.  I am in LOVE with my Gypsy and I use it all the time.  Hopefully you find the video helpful :)


Thursday, January 27, 2011

Birthday Fun Card


I wanted to play along in the My Pink Stamper Birthday Challenge.

I used my Gypsy to weld 2 ovals together to make a shaped card.  The balloons are from Once Upon a Princess.  I did a little inking, added googly eyes, and just a touch of Diamond Stickles.

I used a strip of DCWV patterned paper for some fun color.  Then I went around the edges of the card with a pink marker alternating dashes and dots.  For the finishing touch I stamped the sentiment "Birthday Fun" from My Pink Stamper's Simply Sweet Occasions set.
This was just a quick card I slapped together.  I think it would be fun for a little girl.

Thanks for stopping by :)


Wednesday, January 26, 2011

Singing in the Rain


I wanted to do a fun card that reminded me of spring. 

I used the SP & Company stamp set Rain Boots for the sentiment and also the boots.  The set comes with all kinds of cute little items that you can use to create your own patterned boots, but this time around I chose to use a patterned paper instead.  The paper I used for the boots is from Hot Off the Press.
I mounted the boots onto a 2 and 1/2 inch square piece of purple cardstock, and then onto a 3 inch square of brown cardstock.  

The patterned paper along the bottom is from Die Cuts With a View and is punched with a Martha Steward Border Punch.  I put a strip of purple under the border to help it pop more than being against the vanilla cardstock of the card base.

The ribbon is from Stampin' Up.  I used Stampin' Up markers to make the little trail behind the bee and the stitching lines around the top of the card.  

The little final touches of the flower and the bee were really easy.  They are both little pre-made embellishments from K & Company. 


Monday, January 24, 2011

Miss Priss Layout

You can click on the photo to see it enlarged.
Hello everyone.  I am finally scrapbooking again.  I am about 6 months behind now.  I was doing SO well, and then I stopped in July to prep for a move.  I didn't get started again until now.  *LOL*  Oopsie.

I don't share too many of my layouts here. I am usually a pretty quick and simple scrapper.  Here is one I decided to go ahead and share.  The pretty foil paper is from Hot Off the Press.  I cut "miss priss" from the Paisley Cricut Cartridge - I did use Marshmallow Glimmer Mist on it, but it turned out very subtle.  I wrote some journaling using a Chomas Creations gel pen - even though I got them to go with my Cricut gel pen holder, they work fine on their own as well.  I also added some flowers and gems from my stash.

I am so proud that in the photos my daughter is wearing some hair bows I made for her.  She got pretty excited about them, and of course that made me feel wonderful.  It's the little things, right :)

Saturday, January 22, 2011

Wedding Gift Set for a Bride

These are a couple of items I made for a friend to celebrate her getting married!  I crocheted a little white clutch purse out of yarn that had sparkle in it - it almost looked like thin tinsel wrapped around the yarn.  Very cool, and it's soft too.  I also used some pink satin ribbon.  I made the same purse pattern for a holiday gift a bit ago, but the color scheme was totally different.  To see that version - check out this post

I also made a simple little bracelet with some faux pearls I purchased.  I am starting to think I should make more jewelry. I'm finding that I enjoy it.

Just thought I may as well share these projects really quickly. I know they aren't my usual papercrafting projects - but I do like to dabble in other things now and again.  :)

Friday, January 21, 2011

Super Simple Bug Luv Tags


These were so fun to whip up. I am planning on using them to draw prizes at a cardmaking party I'm having in mid-Feb.  

I wanted them to be cute, but I also wanted them to be super quick and also flat so that putting them all in a bowl they wouldn't stick together or catch on each other.

Enter the solution, my Chomas Creations gel pen holder.  If you want to see a video I made of a card using it to see how it works you can check out this post.

For these particular tags I did 2 pages in my Gypsy.  One for all the writing, and one for the cutting of the tags.  The font is from A Child's Year, the bug head is from Store Front - but there are other cartridges with bug heads, and the tag is from Plantin' Schoolbook.

Making tags with this gel pen holder is a snap!  Can you imagine how much harder it would have been to cut and glue all these teeny tiny little pieces!  I always have trouble cutting this bug head very small because of the eyes and the antenna - using the gel pen holder that's no longer a concern.

Hope you enjoy today's simple project!  When the time comes I will be sharing lots of more pics of party favors and such from the event I'm having. 

Thursday, January 20, 2011

Blog Hop Projects & A Challenge for YOU! Win goodies :)


Welcome to the Love is in the Air Blog Hop.  Hosted be ME and featuring the fabulous stamps by Samantha Peyton of SP & Company.   This is the very first stop on the hop, so if you're ready to get started - you're in the right place :)

Hello everyone!  I am SO excited today.  There is a prize at EVERY stop on the hop - and the grand prize could be chosen from any of the blogs - which is any 2 SP & Company sets of your choice!


Today we are inspiring you with projects that have a love theme.  Valentine's, wedding, or anniversary type projects.  SP & Company has some new stamps out perfect for those types of occasions.


Be sure and hit all 7 stops, leaving comments to be entered to win prizes along the way.  After you gather all your inspiration come right back here and enter the challenge at the end of this post for yet ANOTHER chance to win! 


So, that's the hop basics - onto my projects!  I went ahead and made 2 for you today.


This first one is a mailbox from the Target $1 spot that I embellished with a whole bunch of SP & Company stamps.


The sets I used for the front are:
Lovely Labels - which I added Fruit Punch Stickles to
I Love Love - for the word Love 
Mix and Match Sentiments : Basics - to spell "This Valentine's Day"


The sets I used for the side are:
I Love Love - for the word on the flag and also the XOXOXO
Hearty Hearts Backgrounds - for the heart pattern on both sides of the paper
I also attached some cute pink ribbon to make the sides look a little more polished.


I also made a simple tag for you today using my Cricut along with my SP & Company Stamps.

I used the Sweethearts Cartridge

The frog is from page 42 - and is cut at 3.5 inches

 
The tag is from page 74 - and is cut at 5.5 inches

To embellish my froggie I used the Cuttlebug Folder Tiny Bubbles

I added some googly eyes, Gold Stickles for the crown, and drew a line to accent his mouth

I added a light blue strip of paper punched with Stampin' Up's Scallop Border Punch

I found the PERFECT sentiment for this little frog "Kiss Kiss" it's from Ultimate Sentiments I

So, whether you love to use your Cricut, or are more into stamping - or enjoy both like me you can do fabulous projects with SP & Company stamps :)

I am giving away Ultimate Sentiments I

All you have to do to be entered to win is tell me which of the two projects I shared today you like best.  It is best if you also leave a way for me to get a hold of you if you win.  Comments will be allowed on the 20th and 21st.  Winners for all prizes will be announced on Sunday, the 22nd. 

By commenting on this post you will also have an entry for the grand prize, which is any 2 SP & Company stamp sets of your choice!  That will be chosen at random from any of the blogs in today's hop!

Right below the blog line up is information on a challenge - but you will want to go gather inspiration and enter for your prizes at all the other blogs first - so here is the lineup.

Amber - Staying Crafty - you are here now, 
and can come back to complete the challenge later 


Next you are going to go visit Momo - Made By Momo


In case you want to see the rest of lineup here are the other gals that will come after Momo.  You won't want to miss anyone :)


So, after all that fun and inspiration maybe you're feeling creative and would like to make a project of your own! 

I am issuing a challenge to you!  There are 2 parts to it.

Create a project that has some type of love theme, wedding, anniversary, Valentine's, etc.

It also has to have something to do with wrapping a gift, or holding something like Valentine cards or candy.  You can make a bag, a box, a tag, etc.  You can alter an existing item or make something from scratch. There are a lot of possibilities here!  No cards or scrapbook pages.


Here are the rules:
This must be a new project made for the challenge
If you are posting this from your blog say it was made for the challenge and link back to this blog
If you do not have a blog that is fine, use Photo Bucket, Flickr, or another hosting site
Follow the challenge guidelines for your project


When you have followed the above guidelines you can enter your project below for a chance to win...
You will have about 1 week to enter your project. The link collection tells you how much time is left before it closes.  I will draw the winner the next day, at random.  Have fun and good luck! I can't wait to see your fabulous creations :)


Wednesday, January 19, 2011

You Deserve A Day Sprinkled With Fun!


I made this card for a couple challenges, and I just went nuts with the embossing!  *LOL*

The two challenges I am entering this in are:
Fantabulous Cricut - Challenge Me Monday - Sweet Shop
The challenge was to incorporate something sweet in your project.

My Creative Time - Imagine Nation Monday Challenge - Sweet/ Valentine
Besides the theme you must use an Imagine if you own one.  Since I don't own one I didn't use one.  Emma sweetly allows those of us who don't have one to still participate :) 
I used a standard sized card base in a vanilla color - this one opens from the top.  I embossed the top portion of the card with the Swiss Dots Cuttlebug folder.  The ice cream cone was cut from Sweet Treats at 3.5 inches.  
I embossed it with 3 different Cuttlebug folders.  Oriental Weave for the cone, Spots and Dots for the pink ice cream, and D'vine Swirl for the chocolate topping - although that part didn't photograph well it is visible in person.  I covered the chocolate topping with Glossy Accents to make it shiny.  Before it started to dry I added these little dew drops for sprinkles.
For the bottom portion of the card I used some pretty stitched satin ribbon.  I cut a tag from A Child's Year at 1 inch. Then I stamped a sentiment from a Hero Arts set called Cupcakes.   I added a little pink glittered brad.   I rounded the 2 bottom corners on a 1/2 inch setting with my Corner Chomper.  The last touch was some light pink stitching along the bottom of the card.
Yummy!  I am trying to participate in more challenges this year - I think these particular ones are making me hungry :)


U R Sweet


This was such a simple little card to put together.  I love how simple and fun it is.

I started off by stamping the label from Lovely Labels by SP & Company.  I stamped it in light pink ink onto cream colored cardstock.  I cut out the stamped label, then I added a little popsicle embellishment from a K & Company sticker set called Citronella. 

After I adhered the label to the card I added some Diamond Stickles to the stamped portions for a little extra something.  It worked well since the popsicle had touches of glitter already as well.

For the sentiment along the bottom I used Lullaby Blush Foam Thickers.  This is my first set of Thickers and I had fun working with them.  I thought this font was particularly girlie and fun to suite the card :)

Tuesday, January 18, 2011

BFF Style Purse


I wanted to put together this cute little purse for a challenge over at My Pink Stamper.

This was really pretty easy to put together.  It is a purse from the Forever Young cartridge.  I used paper from Me and My Big Ideas.  I thought this pattern was just perfect for a purse.  I cut it at 4 and 1/4 inches.  The little tag I created was cut at 1 inch. I stamped BFF from My Pink Stamper's Family and Friends set in black craft ink.  

For little finishing touches I punched holes to add a ribbon handle.  I used a tiny black brad to attach the tag, and I used a very large black brad just to add something else a little fun to the purse - it goes just above the tab that holds the purse closed. 

This was one of those projects that was super quick and easy.  I think it would make a fun gift bag for a tiny little gift - like maybe a piece of jewelry or some candy.

Thanks for visiting! 

Monday, January 17, 2011

You're The Best Card


I had so much fun making this card.  I just played and played until I got the look I wanted.  I find this card to be extra special because several things I used on it were gifts from friends.
The explanation is fairly long, so I will also put a quick supply list first before I get into that.

Martha Stewart Button Punch
3 Dew Drops
Stampin' Up Ribbon
2 Brads
2 Stickers
Paper Peircer
Copic Markers
Stamp-n-Write Markers

Card Inside
Copic Marker for the brown part
Stamp-n-write Marker for the sprinkles
Diamond Stickles

I used the Hero Arts stamp set called Sew Stylish to create the girl.  I stamped her on white with brown ink - but I used a q tip to wipe off the ink on her lips so that I could use a pink stamp-n-write marker on them to give them that little extra bit of pop.  I colored her skin and hair with Copics.  Her outfit was created by stamping her again onto patterned paper by DCWV and cutting out the shoes and the outfit.  The hairbow was more tricky.  It would have stamped in the solid brown color that she was stamped in.  So, I had to use the bow on the stamp as a general guideline and cut my own.  Then I outlined it, and drew the circle in the center with a marker.

I mounted her onto a cream colored piece of cardstock and stamped stitching from the SP & Company Stitchery Doo set on all 4 sides of that peice.

The button is just matching paper punched with a Martha Stewart button punch.  I added a bit of Marshmallow Glimmer Mist - but it doesn't show up too much, very subtle on the pattern.  I threaded the button with cardstock.

For the sentiment I stamped it from Ultimate Sentiments I from SP & Company.  Then I cut it out.

The ruler is also from the Sew Stylish Hero Arts set.  I stamped it onto peach paper and cut it out.  Then I cut my purple card layer at 3 and 3/4 by 5.  I put some ribbon on it before laying it down.  The ribbon is from Stampin Up.  I attached the ruler over the top of it, and the ribbon is ruffled so now the ruler had ruffles around it.

After laying all the previously mentioned pieces on the card I did some finishing touches.  The two tabs with brads in them are just stickers.  I also added Dew Drops - I think that is what they are called but I may be mistaken - a friend gave them to me in a goodie bag at the recent Swarm I attended.

The last thing I did to the outside was use a paper piercer around the edges. 


The inside is simple.  I laid patterned paper to cover the entire card inside - this covered up the brads and paper piercing holes nicely.  Then I added a cream colored cardstock measuring 4 inches by 5 and 1/4 inches.  

I stamped the donut from Hero Arts, Have a Donut set.  I colored the base of it brown with a Copic marker.  Then I colored all the sprinkles pink with a Stamp N Write marker.  I cut it out and glued it to my card base.  Then I added Diamond Stickles, and they bled the pink ink in the sprinkles to tint the Stickles light pink.  I really loved that effect - even though I didn't plan it. I did have to swirl the Stickles around a little more to get even color.  Then I stamped the sentiment from the same set.

All finished!  This card was a labor of love.  I spent hours just playing around with it - I really had no idea of half the details I wanted.  *LOL*  I tried some other various ways to lay it out, different embellishments, etc.  I would just hold things up and decide if I liked the look or not.

Thanks for stopping by my crafty little corner of the world today :)

Sunday, January 16, 2011

Saturday's Swarm

 
I had a blast with some local friends at an Archiver's store on Sat.  We had lunch too, and someone took pics - even though I was really lazy and didn't do it I still have one to share.  I'm the one wearing the Cricut green colored jacket - cute, huh?  I hope to be adding some bling and vinyl to it soon to make it even more fun.

I didn't get a whole lot done - but I pretty much expected as much.  I packed light and worked on covering a chipboard album.  I got the whole album covered - so now I have to decorate it and make it pretty.

I had fun giving out my goodie buckets.  I also received some nice goodies from the other gals that attended.  I rocked the cute fruit necklace that I made.  

Just wanted to share a quick pic :)


Friday, January 14, 2011

Happy Birthday Banner Card


Happy Friday everyone!  I am super duper excited for the weekend :)  I have a crop to attend tomorrow with the friends that I made the Valentine buckets for.  I'll try and include photos if I remember to bring my camera (I know, bad scrapbooker.)

I designed this card for Scrapmaster's Paradise - so if you want the full directions and supply list just head on over to this post

Thursday, January 13, 2011

Love is in the Air Blog Hop - Coming Soon!


Hello everyone!

I would like to announce that I am hosting my very first blog hop.  The hop will be on Thursday, January 20th

The hop will go live at:
7:00 AM Pacific Time
8:00 AM Mountain Time
9:00 AM Central Time
10:00 Eastern Time

You will have the 20th and 21st to leave your comments along the hop trail.  Winners will be drawn and announced on the 22nd. 

There will be 7 designers working with SP & Company stamps to help them create love themed projects - perfect for Valentine, wedding, and anniversary projects.  Each stop on the hop will have their own prize to give away, 6 stamp sets and 1 gel pen holder for the Cricut.  The grand prize will be randomly chosen from one of the blogs and is any 2 SP & Company stamp sets of your choice.

On the day of the hop there will also be a challenge right here on Staying Crafty to make your own love themed project.  I will save the rest of the details of the challenge until hop day - you will have 1 week to make your own creation and get it entered.  A randomly chosen participant will win a prize!

The hop will be so much fun, lots of creativity and all the great prizes!  What a fantastic way to prepare for Valentine's Day and feel inspired.  We can't wait to share with you, and then see what you create for the challenge!

The talented designers that will be part of the hop are
Amber - Staying Crafty
Momo - Made By Momo
Linda - Scrapcat Cards
Tracy - Craft Junkie Too
Stephanie - Sea Steph's Creations
Amy - Chomas Creations
Samantha - Scrapmaster's Paradise

I am honored to be hosting this for such a wonderful group of ladies!  Prizes have been donated by Amber, Amy, and Samantha.  

Wednesday, January 12, 2011

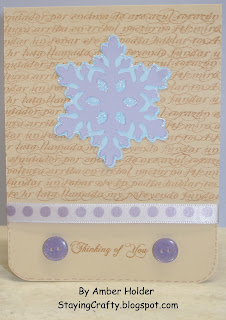
Thinking of You Snowflake Card


This is my 2nd post of the day.  Earlier I posted Valentine's buckets - so don't miss them, I think they're cute :)

I designed this for Tracy over at Craft Junkie Too.  She was hoping to have a small group of designers playing along on her blog with challenges and such this year - however she got some GREAT NEWS and is now designing for Robyn - My Pink Stamper herself.  So, those plans of hers are now put on hold.  Tracy is a wonderful gal and she really deserves this.  I love her dearly!  Congrats Tracy :)  Everyone be sure and visit her blog today, as there are other gals that did a design for her - the theme was winter.  

I wanted to get some use out of my Winter Lace cartridge, so I decided to work with a snowflake.  I cut it out at 2.5 inches with a blue layer for the back and a lavender layer for the front.  I added some Diamond Stickles around the edges and in the center holes for a little sparkle.  The card is a standard 4 and 1/4 by 5 and 1/2.  

All along the top portion of the card I stamped using SP & Company's Scripty Scripts set.  Then I added some polka dotted ribbon.  On the bottom of the card I stamped Thinking of You using SP & Company's Ultimate Sentiments I.  I put 2 glittery purple buttons around it.  I rounded the bottom corners on a 1/2 inch setting, and then added some stitching lines.

There is finally some snow here in CO.  It's been an unusually warm season for us.  I am happy to see  a little of the pretty sparkly stuff when I look out my window - I love hearing my 2 year old squeal "Snow Mommy!"  :) 

Have a crafty day!

Valentine's Goody Buckets w Mini Cards & Tags


I wanted to put together some fun little goodies for some friends.  I hit the Target $1 spot and found these adorable buckets.  I also purchased cute Valentine's pencils, little erasers shaped like butterflies and flowers, and some candy.  I really wanted to dress these up and present them nicely.  I started off by putting the pencils and little erasers in bags and tying them with curling ribbon - the stuff you use for wrapping packages.
 
 
Next I made little Valentine cards to give everyone!  I couldn't wait to play with my new SP & Company stamps and have some fun.  I made little 3 by 3 cards.   Using the Candy Hearts set I stamped the hearts in dark pink ink on light pink cardstock - and chose the sentiment U R Sweet.  The set comes with all different saying you can put inside the heart.  I cut them out and then used some Marshmallow Glimmer Mist to give them a bit of sparkle and interest.  I attached them to the cards and stamped "friend" next to them to spell out "U R Sweet Friend" which I thought was cute.  I stamped the background along the bottom with the Hearty Hearts Backgrounds set.  Then I added some cute green rick rack.  For the final touch I did some dashes and lines all around the tops of the cards.
 
 
When I assembled the buckets I felt like they needed a little extra something, so I decided to make tags too.  I decided to use these cute little monkey embellishments from K & Company - aren't they stinkin' adorable?!  I cut tags from the Plantin Schoolbook Cricut cartridge to put the monkeys on.  I stamped "hugs" from the Candy Hearts set in the bottom right corner in red ink.  Then I stamped 3 little hearts in pink next to it.  I got the little hearts from the Rain Boots set.  I finished off by going around the edges first doing lines in pink, leaving gaps in between - and then going back to add red dots in between all the pink lines. 

I am really tickled with the way these buckets came together.  I think they are sweet & fun.   I did put some love and effort into them.  Yet, it was still a manageable project to do for a small group.  I can't imagine doing this for a larger group - like 20, but for 8 it was a great little project.  I hope this gives you some fun ideas.  I just love Valentine projects :)

Monday, January 10, 2011

Wedding Card


I'm including two photos because this was hard to photograph!  The first one I think the details are clear - but the color is way off - so I've included a 2nd photo to show you the actual color of the pink more accurately.

I made this wedding card using the Chomas Creations gel pen holder in my Cricut.  I designed everything in my Gypsy so that I could draw these designs, and then cut them out.  I have a video of making another card with the gel pens that will show you how to do that - to see that card and video go to this post. 

  I used the glitter gel pens for this design - I just can't get enough of them!!!  I used a pink for the background - which is from the Storybook Cartridge.  It is a 4 and 1/2 inch square.  The wedding couple is from the Wedding Solutions cartridge - it seemed like a perfect image to use the gel pens for!  I drew them with the silver gel pen at 3.82 inches.  I know this is a weird size, but it's easy to do things like that with a Gypsy.  After drawing them I cut them out using the shadow feature.

The card base is 5 inches square when closed.  I did some simple paper piercing all around the edges to give a little detail.  To make my holes line up nicely I used the Mat Pack from Stampin' Up.  That thing ROCKS!!! It will help you line up holes like this, as well as brads or eyelets.  

For the sentiment I used My Pink Stamper's Family and Friends set.  I stamped it in silver ink and cut it out. Then I matted it onto pink cardstock and cut that out.  Super easy :)

 I shot video of this - and it turned out horribly :(  I was so disappointed.  The lighting was off and you couldn't see the Gypsy screen and the card looked so washed out.  I decided it was best to trash the video, which stinks.  So, sorry about that.  Like I said the other video I shot will give you a good tutorial on the gel pen holder and how to draw and then cut using the Gypsy. 

Have a fabulous day! :)

Friday, January 7, 2011

Winter Wishes Snowflake Card


This is a little something I whipped up to celebrate all the beautiful, sparkly snowfall.  I'm trying to be creative with what cards to send family with thank you notes and holiday pics of the kids.

I designed this especially for The Scrapmaster's Paradise blog, so if you'd like the details please head on over to this post.

Thanks for visiting :) 

Wednesday, January 5, 2011

Be Happy Mini Card


I created this fun little 3 by 3 card the other day.  3 by 3 cards are lots of fun!  You can make 8 card bases for these out of a single sheet of 12 by 12 paper.  They are usually pretty quick to make also since there is less room to add things on.  Of course they are also just gosh darn cute because they are tiny.

I started by creating a blue card base cut at 3 by 6 and scored in half to make the 3 by 3 size when folded.  For the frame around the card, and the sentiment I used a set from SP & Company called Mini Card Creations I.  It's a fun set that works perfectly with these little cards.  I cut a strip of pink paper to go in the middle of the card - it's about 1 inch wide.  Then I added a sweet little bee from the Paisely Cricut cartridge and embellished her with some Stickles in Fruit punch, Yellow, & Diamond. 

I love this little card design so much I may be making a bunch more to hand out to local friends at the next Swarm I go to.  I may have to change the colors up a bit to use what I have (this card was all scraps, another bonus about small cards) but I'm sure they will be just as cute with different colored card bases.


Monday, January 3, 2011

Super Tweet Card for MPS DT Call

 
This is my submission for My Pink Stamper's design team call.  Her challenge was to use the colors green, pink, and brown - along with one color of your choice (I chose blue) and also to use your favorite cartridge.  I wouldn't say it's easy to pick an absolute favorite, but Create a Critter is so fabulous that I chose it as my fave - at least for today, when I'm working with another cartridge tomorrow that could change!  *LOL*

Here's the card details.

It's a 6 inch square card

Tree is at 5 and 1/2 inches - Create a Critter

I embossed part of the tree with the Swiss Dots Cuttlebug Folder

I added grass along the bottom that was created with a Martha Stewart punch.

Birds are cut at 1.75 inches - Create a Critter

One birdie is regular, and the other is flipped so they could face each other

To add a little something I used googly eyes, Cotton Candy Stickles, and a bit of pink bling

I stamped the sentiment from My Pink Stamper's Punny-Licious and cut it out into a rectangle

I used my paper piercer to put little holes in it, and threaded a little blue thread through it to form a sign

I used my paper piercer to make a hole in the tree and put a brad there to hang my little sign

I hope you enjoy this card, and I hope Robyn likes it.  She is always such a joy and an inspiration to so many people - I think it's wonderful she's giving everyone a chance to submit their work for the call!


Saturday, January 1, 2011

Happy New Year, here's my Fave 2010 Projects!


This had to be my very best work.  It's a WORKING gumball machine card.  Oh yeah, you turn the little handle and you get tic tacs.  If you are newer to my blog and have not checked this out yet - you really should.  I have a 100% FREE template available to download and 2 videos of instruction walking you through it step by step.  Check out this post for that good stuff.


This card received a very special honor. Kristina Werner chose it as one of her top ten picks in a color challenge.  Wow!  That was a rock star feeling :)  The card used the Stampin' Up sets Trendy Trees and Good Neighbors.  To see the challenge winner round up click here.


This was a special card.  I was making it to send to someone who makes a TON of cards, so it had to be a good one.  I just love the way it came together.  This is a card I have a video of, and I also have a cut file you can download for free.  Feel free to check out this blog post to see the video with all the details!

I realize all these projects are cards, even though I did scrapbook pages and home decor, and other stuff.  To see all of my projects you can always check out my gallery by clicking the button toward the right hand side of my blog.  

2010 was really AMAZING for me!  We bought a home - which is a huge deal of course.  Yet, the craft moments stick out the most for me.

 
Robyn from My Pink Stamper showed a card I made her on one of her very first U Stream live shows.  Wow!  I about died.  Really, I should send her another card now that my skills have vastly improved.  *LOL*  I was just starting out and to have her say hi live like that was so crazy to me.  I can only imagine what it would feel like if I ever get to go to CHA and actually meet her.  She also sent me a card in return!


I had a very sweet gal send me a special box of goodies from CHA because I was feeling really down I didn't get to go.  I cried when I opened the package.  What a kind person!

I won some fun blog candy, and of course made a bunch of amazing new blogging friends.  I even have some special cards that have been sent to me!  I truly love to see what others create, and the kind comments on my blog and Youtbe sure bring a smile to my face.

I actually made a couple design teams!  Wow!  I get turned down... A LOT so it was beyond awesome to actually be picked.  Being chosen as the design team leader for SP & Company has been a real dream come true.  Being a housewife I don't get to have a lot of adult conversations so being able to coordinate such an amazing team and work with beautiful stamps is a bright spot in my day.  

One of the best things is that in November I met some local Cricut crazy gals, and ADMIN BECKY from Provo Craft.  If you are on the Cricut Messageboard you are probably familiar with her.  If not, then just know it was a big deal to me.  The girls are all so sweet, and we are planning more get togethers in 2011.  Actually, as of right now I'm the one doing the planning.  *LOL*  Yeah, I have spreadsheets with RSVP's and all that kind of stuff - I'm good at that type of thing.


I look forward to a fantastic 2011.  I will be hosting a big Cricut party at my house in Feb and will be sharing photos and video with ya'll.  I'm going to be doing a lot of projects, and also doing some Q & A and reader/viewer requests.  So, stay tuned!

The crafting community is AMAZING!  I hope to do more to give back this year in the form of give-a-ways, raks, and doing more charity work with my crafting.  I did cards for soldiers a couple times last year, and need to get my butt in gear and start doing that or something similar again.

Happy New Year!!!!