Showing posts with label pink by design stamps. Show all posts

Wednesday, August 21, 2013

Classy & Fabulous Washi Tape Card


This one was super quick and easy.

Its' a standard A2 sized card base.  The top 2 corners are rounded on a 1/2 inch setting on my Corner Chomper.

I made faux stitching lines all around the edges with a Copic Multiliner.

The little heart is left over from the Glittered Hearts Card I made a little bit ago.  I just covered it in Versamark and Midnight Black Embossing Powder by Stampendous.

The sentiment is from Pink By Design's set Shopaholic.  It's embossed with the same powder.

The metal strip is from Mark Richards and they are called Nailheads.

Along the bottom I just used 2 different kinds of washi tape and laid them out in strips across the card.

I like that this one is pretty flat, it would be good for mailing.

Thanks for your visit :)

Amber

Friday, April 26, 2013

Have a Sunny Day Breakfast Card


I used my Silhouette Cameo to cut these shapes.

The plate, bacon, and eggs were from cut file #16353  I did make the plate 2 layers by altering the size and cutting 2 instead of 1.

The coffee cup was from set #33995  It comes with 3 different cups, which I love for the variety.

I dressed up all my cuts with plenty of inking in different colors (which of course barely shows in the photo.)  I used the Peachy Keen set Dolly Dumplins for the adorable faces.

The sentiment is from Pink By Design's set Country Living.

The patterned paper is from the Echo Park 6 by 6 pad Summer Days.
The ribbon is by Offray.
I drew the stitching lines and dots with a Stampin' Up marker.
I think this will be a fun just because card to make someone smile :)
Have a very crafty day friends!
Amber

Tuesday, March 12, 2013

Some Bunny Is Thinking of You


I thought this would be a good any occasion card.

The clouds are from Hero Arts.

The bunnies are from Lawn Fawn's Happy Easter.  Although it's hard to photograph they have Stickles on their tails and faces and a tiny bit of subtle shading in a pale blue. 
The sentiment "Some Bunny is Thinking of You" is from Pink by Design's Hoppy Easter.
The adorable papers are from the Doodlebug Hello Spring 6 by 6 pad.  The carrot papers were too much contrast with the green so I generously sponged them with some green ink to soften them up and make them work as part of my rolling hill scene.  I just cut all the hills by hand.
Stitching done with a white gel pen.

Thanks for visiting friends!

Wednesday, January 30, 2013

Baby Blessings Card


Here's a card I put together for a new baby.

The background was stamped using a Hero Arts stamp called Clouds.  I used Stampin' Up's Bashful Blue Ink.

The grass is from a Martha Stewart border punch.

The banner was hand cut and curled.  It was stamped using a sentiment from Pink By Design's Baby Love.  The ink is Stampin' Up's Pretty Ink Pink.

The die cutting was done using the Cricut cartridge Baby Steps.  There was supposed to be a bird perched on the clothesline as well, but I trimmed it off by hand.  The papers are from the Doodlebug Design 6 by 6 paper pad called Hello Spring.  I used Fruit Punch and Lavender Stickles.  The twine is from My Mind's Eye.  The mini clothes pins were purchased locally I don't know the brand.  I also used a couple Dew Drops in the flower centers.

I had to attach the whole die cut image with foam adhesive because of the clothes pins.  It was hard to get the small areas like the flower stems!

Thanks for visiting my crafty friends :)  I hope you get a chance to do something creative today.

Tuesday, January 3, 2012

Baby Boy Card


I started off with a kraft colored card base.  I rounded all the corners at a 1/2 inch setting on my Corner Chomper.

I added a layer of paper from Echo Park's Little Boy collection.  It was cut to 4 by 5 and 1/4 and I also rounded the corners at a 1/2 inch setting.

Once the two layers were together I grabbed a Not Quite Navy marker from Stampin' Up and did some stitching lines around the edges of the card.

For the center I grabbed a tag from the Same Echo Park paper line.  I used a stamp from Pink By Design's Baby love set and stamped it in Real Red ink from Stampin' Up.  I felt like it needed a little something so I found this swirly green clip and added it too.  Then I pop dotted the tag onto the card.

For the banner along the bottom I used a Stamp from SP & Company's Ultimate Sentiments 1.  I used Stampin' Up's Pumpkin Pie ink and some green bling from my stash.  I hand cut the banner and then used the marker I had handy to help me curl the paper.  I used 2 layers of pop dots under the part I wanted to stay up.

Monday, December 12, 2011

Baby It's Cold Outside


For this card I used:

Cricut Cartridge Winter Frolic.

Peachy Keen stamp set Wide Eyed Kids.

Pink by Design stamp from Christmas Wishes.  Stamped in Versamark and embossed with white embossing powder.

Felt Snowflake from Stampin' Up.
 
White gel pen by Sakura Gelly Roll.
Mirrored gems are from the Irock.

Stickles in Silver (on Skates) and Icicle - on Pom Pom.  Before adding the Icicle Stickles to the hat I added some Ranger Liquid Pearls in White Opal to cover the green paper since I wanted it to be white on top.

I used some Stampin' Up markers to add a little detail to the hair and some color for the mouth.

Tuesday, October 18, 2011

Pumpkin Trio Card


So quick and easy!

Standard A2 sized card base in black.

The purple layer is a cheapie paper I got form the $1 spot at Target last year.  It's cut to 4 by 5 and 1/4 inches.

Before attaching that purple layer I wrapped some Shabby Crinkled Ribbon from Prairie Bird Boutique around it and tied it in a bow.  This color is from the Little Boo set. 

Under the ribbon I added s trip of green spiderweb paper by Recollections that had been punched with the Stampin' Up Scallop Edge border punch.

At the bottom of the card I stamped "Have a Spook-tacular Day" from the Pink By Design set A Haunting We Will Go.  I embossed it using some black embossing powder so that it shows up enough on the patterned paper, plus it just looks cool like that :)

For the image on the card I took 3 pumpkin embellishments from a Jolee's Boutique pack and added them to some green spiderweb paper - same as on the bottom.  Then I added that layer to a black piece of cardstock.  The black layer is about 1 and 1/8 by 3 and 1/4, but I just eyeballed it when I was cutting.

I finished off by going around the edges with some Starry Night Stickles.

Monday, October 17, 2011

Altered Wine Bottles


These were a total blast to put together!

These bottles are all empty, so I got to recycle something, but you could also use full wine bottles and actually serve them at a party.

On all 3 bottles I used Shabby Crinkle Ribbon from Prairie Bird Boutique.  The colors I used were from the Little Boo bundle.  

Also on all 3 bottles I used stamps from Pink By Design's A Haunting We Will Go set.  From left to right they read "You're Boo-tiful" "You're Purr-fect" and "Eek" These are all stamped onto paper that was sprayed with some Deep Plum Glimmer Mist.

The last thing that was used on all 3 bottles were some awesome keys from Martha Stewart.  They are really lightweight unlike real metal keys, but they have awesome color to them and they look pretty real to me.  They are attached with some embroidery floss.

On the first bottle I have also used a charm at the top that was made with inkjet printable Shrinky Dink material.  I do not know where the image came from as this charm was a gift from a friend.  I used a paper from a Recollections paper stack from last year and some green ribbon from Michael's.

On the second bottle I used more paper from last year's Recollections paper stack.  This one has kitty cats that are actually flocked (fuzzy to the touch.)

On the third bottle I used some paper from Target's $1 spot from last year.  I cut a spider from the Doodlecharms Cricut Cartridge at 1.75 inches.  I gave him some blinged out eyes using my Irock and placed a black ribbon string under him that looks sort of like a string he is hanging from.

So glad I got these done!


Wednesday, September 21, 2011

Happy Fall Ya'll Card


I've got another fall themed card today.

This is for the Whimsical Wednesday Challenge Fall Colors.  The prize this week is some awesome paints from Creative Inspirations so be sure to enter for your chance to win :)

The base of the card is a chocolate brown color.

I added a 4 by 5 and 1/4 inch layer of patterned paper from the Autumn Splendor DCWV stack.  It's got some really shiny gold accents.

The leaves are cut at 3.5 inches from the Creative Memories Cheerful Seasons Cricut Cartridge.  I inked around the edges of the leaves to give them a bit of depth, and added them to a kraft colored shadow.

I added some gorgeous Shabby Crinkled Ribbon from the Little Boo Collection.  It's from Prairie Bird Boutique.

For the finishing touch I hand cut a little banner in some cream colored cardstock and stamped "Happy Fall Ya'll" using a Pink By Design stamp from the Simply Everything.  I love hand making little banners for things these days.  I think I'm going a little overboard with that trend!  *LOL*

Make sure and head on over to Whimsical Wednesday to check out all the fabulous inspiration, and be sure to enter your own project for the chance to win some fabulous paint from Creative Inspirations! 

Friday, September 9, 2011

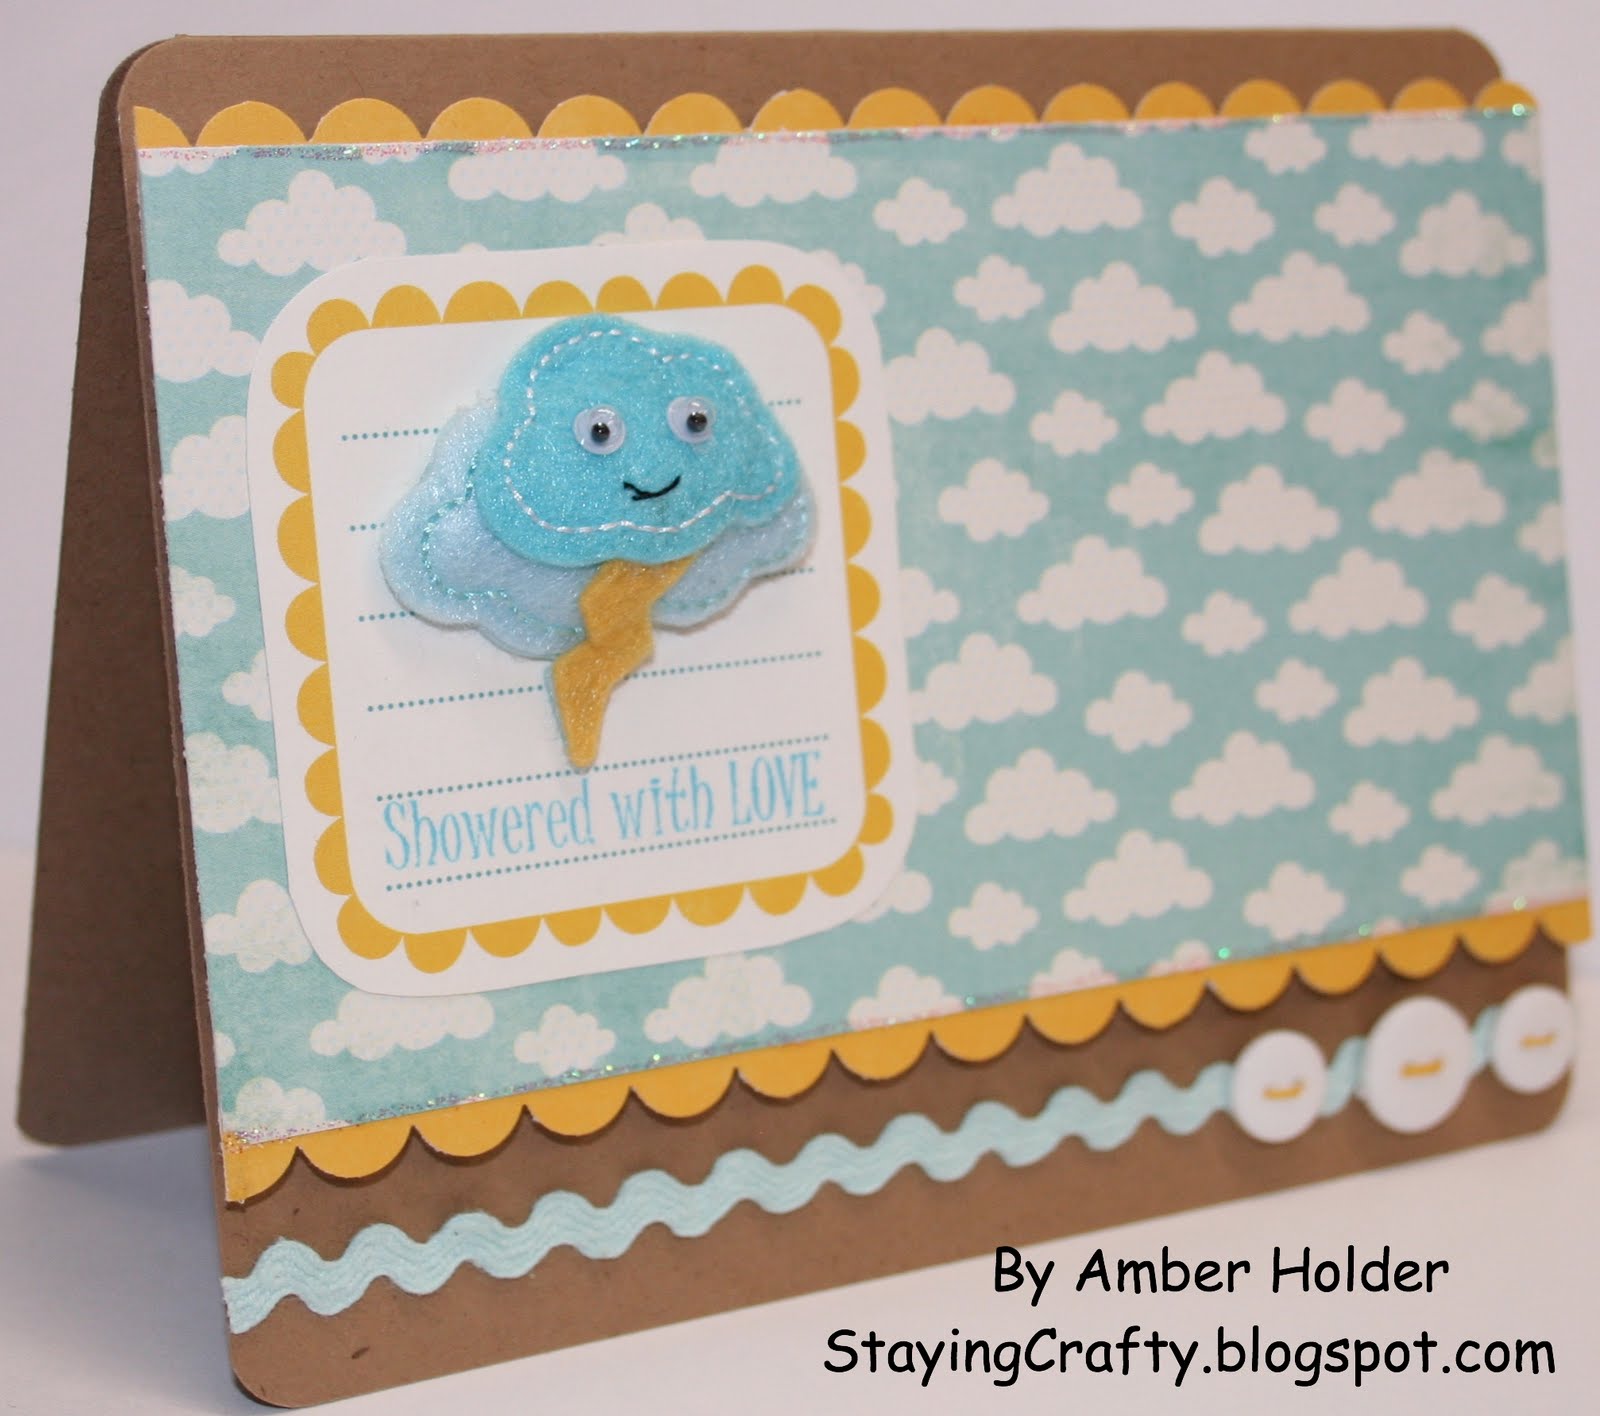
Showered With Love


Happy Friday!

I started off with a Kraft card base, and rounded the corners on a 1/4 inch setting on my Crop a Dile

The cloud paper is from the My Mind's Eye Lime Twise, Fly a Kite 6 by 6 pad.  It's cut at 3 inches by 5 and 1/2.  The top and bottom edges have a thin line of Crystal Stickles.  Behind it are some scallops punched with my EK Success Scallop Border Punch. This whole layer is up on pop dots.


The little journaling tag was cut from the Echo Park Little Boy collection.  I used a stamp that says "Showered with Love" from the Pink by Design Country Living set.  Then I added a KI Memories Puffy of a rain cloud.

Along the bottom I added some ric rac ribbon, and 3 white buttons that I threaded with thin slivers of cardstock to match the scallops I punched.

This card was very inspired by a beautiful rainy day we had this week.  It felt so good to cool off and for the air to be crisp and fresh instead of just feeling hot.  I think I kept it generic enough that it could be used for a simple thinking of you card.  Hope you like it :)

Friday, July 29, 2011

Hippity Hoppity Happy!


Just a quick project to share with you.  I made this card for my grandparents so instead of going really blingy I wanted something a little more subtle.

I'm not going to get into all the ink colors I used because I think a lot of them are retired now.

The bunny stamp is by Stamavie and it's called Peek a Bunny.  I stamped it onto watercolor paper and then used a blender pen and my ink pads to color it in.  I added a bling in her bow and sponged the edges.

The paper is from the Once Upon a Time Mat Stack by DCWV.

The ribbon is form Stampin Up.

The bottom is border punched with Stampin Up's Scallop Edge border punch.

I used a stamp from Pink By Design's Simply Everything set that says Hippity Hoppity Happy!

That's pretty much it.  It took me a little time to color the bunny but everything was really simple to put together.  I just eyeballed when I was cutting and didn't worry to much about the specific measurements.

Monday, July 25, 2011

A Cut Above the Rest


When I think of summer I think of yardwork!  *LOL*  It's actually something I dread, but I thought I'd make the idea of mowing the lawn look cute for this card.

This is for the latest challenge over at Scrapbookaholic By Abby.  The theme is anything summer.

I started off with a standard A2 sized card base in green.
I cut a white layer at 5 and 1/4 by 4 and stamped it using the Hero Arts Clouds background stamp.

I used my Creative Memories Cheerful Seasons Cricut Cartridge to cut this little lawnmower at 3.5 inches.  To make it cute I did some faux stitching and some dots using my Sakura gel pen.  I also added a couple of mirrored IRock gems to the wheels.

I created a fun little banner that is just hand cut and I stamped "A cut above the rest!" using Pink by Design's Simply Everything set.  I curled the banner and then used pop dots in the center, but glue on the ends so that it stayed very curled looking on the card.  I added a little bee in front of it, hoping to make it look like the bee is pulling the banner.

I finished off with some more gel pen stitching around the edges of the card.

Make sure and head on over to Abby's Blog today to check out the rest of the DT projects!  You can also enter your own project for the chance to win some awesome Sakura gel pens.  They really are wonderful to work with and can add a lot of great detail to your projects so it's a pretty sweet prize :)

Thursday, June 23, 2011

You Make Me Smile Card


This is the sort of card I made just because.  Something bright and cheerful to make someone's day :)

Both of the patterned papers I used are from Echo Park's 6 by 6 pad from their Summer Days Collection.  

For the polka dot layer in the center I cut it at 2.5 inches square.  I was really careful about where I cut the polka dots though, because I knew I wanted to place the sun over the orange polka dot.

The sun is a felt embellishment from the KI Memories line of Puffies, this is from the Happy Day set.  I really need to just sit down and make my own.  I hand sew felt things all the time!  *LOL*

I went around and created a border using some light blue ric rac and some purple buttons.

The yellow layer is 3 and 1/4 by 4 and 1/2.

I stamped the sentiment "You make me Smile" from Pink By Design's Simply Everything set using Versamark and white embossing powder.

The strip along the bottom was punched with the Fiskars Threading Water punch.

All corners on the card base and yellow layer were rounded at a 1/4 inch setting using my Crop-a-Dile.
Also, just a side note... I ordered my Echo Park paper from this place Pumpkin Spice along with some stamps and I was really happy with how fast they arrived, the prices, and how much they charged me for shipping.   I didn't order anything 12 by 12, so I'm sure shipping would be more, but I just had a good shopping experience and thought I'd mention it.  I know I always try and shop from places I've seen people recommend.  I've heard good things about them before from other crafty peeps as well.

Thanks for visiting me :)  I hope maybe this card brought a little sunshine to your day, especially if the weather isn't nice where you are.


Friday, May 27, 2011

Hang In There Pop Up Card with a Video


I had so much fun putting this card together!  Here for the inside you can see the pop up I created with some additional details and a punched frame I made.

Here's a closeup of the balloon.


Here's what I did to the outside of the card.


I stamped on the ribbon and solved the problem of my cloud image not repeating properly when stamped.


For those who just want the supplies 

Cloud Background Stamp is by Hero Arts
Cuts on the Front are From Country Life Cricut Cartridge

For the inside I used the Everyday Pop Up Cards Cricut Cartridge
Martha Stewart Ribbon Loops Punch Around the Page Set

Here's the video with all the details & plenty of little tips and tricks along the way:


This project is the featured guest designer post over at the Cricutolics forum.  Isn't that fun?!  If you're interested in a forum to talk crafts they have several sections for you to talk in.

Wednesday, May 25, 2011

If the Shoe Fits... Tag


It's time for me to share another fun project for the awesome challenge blog Whimsical Wednesday.  This time around the challenge is to make a tag - and you must use bling.  Isn't that FUN?!  Be sure and visit Whimsical Wednesday today to see what the other gals came up with - and to enter your own creation :)

For my project I cut a tag from the Wrap it Up cartridge at 5 inches.  The shape kind of reminded me of a shopping bag.  I added a strip of purple bling along the top.  I also added little green bling in 4 of the corner areas - and then went around with a Sakura gel pen in the color Green Star!  Such a stunning effect.

I stamped the sentiment "If the shoe fits... but it in every color" from Pink By Design's Shopaholic Set.  I just love all the fun and girlie sayings in that set.

I added some blue polka dotted ribbon from my stash near the top of the tag.

I cut 3 different color combinations of shoes from the Cricut American Alphabet cartridge on the E2.  I cut them all at 2.5 inches.  I took each one and added Diamond Stickles to the swirl on the heel.  Then I added 3 pieces of bling with my Irock to the holes in the front of the shoe. 

I added the shoes to the tag starting at the bottom and stacking them.  They just sort of nestled perfectly together.

I hope you enjoy my fun and ultra girlie project today!  Now head on over to Whimsical Wednesday to see more inspiration and share your own fabulous work :)

Wednesday, April 27, 2011

Mom You Color My World


I created this card at 4 and 1/4 inches square using Kraft cardstock.

I cut several strips of Creative Memories patterned paper in various colors.  Each strip is about 1/2 inch wide by 3 and 3/4 long.

I went around the edges of the strips with a white gel pen and did some fake stitching.

"mom" is spelled out using some foam Thickers.

"You Color My World" is a Pink By Design Stamp from Simply Everything.

Thursday, March 31, 2011

Scrappy Friends Card


I made 8 of these fun little cards for some local scrappy friends of mine :)  

The main image is from Lettering Delights - the Craft Queen Graphic Set

"Happiness is..." was stamped from Pink By Design's set called Country Living.

The sentiment along the bottom was spelled out using a couple SP & Company sets.  The "a" is from Fashionista Alphabet.  The words "Fantabulous" and "Friend" are from Mix 'n Match Friends.

I just used various patterned papers from my stash, a Stampin' Up marker to do some doodling, and some embellishments from the $1 bin like a couple flat backed purple pearls and a button - which I threaded with slivers of cardstock.

The border punched used on the side is EK Success's Open Scallop.

Monday, March 14, 2011

Something on a Stick Day


I am so excited to share this fun project with you!  It is my first project as a designer for Scrapbookaholic by Abby.  She challenged us to pick a random holiday for this month, and there is a great list of unusual holidays on this page for reference.  I chose Something on a Stick day which is celebrated March 28th each year.  What better for that idea than a corn dog, right?!  

I wanted to create a fun shaped card - so I used my Gypsy.  The shape is from Just Because Cards, but I did mess with it to get the size I wanted.  I took the aspect ratio link off so that I could skew it any way I wanted.  With the actual size button on it is 4 inches wide by 5.45 high.  I welded 2 of them together using a rectangle to make the shaped card using Kraft colored cardstock.

For the patterned paper layer I used Echo Park paper and cut that same shape at 3.39 wide and 4.78 high with the actual size button on.

Sorry if that portion is confusing to those that don't manipulate the images a lot, but remember you can use a shaped card already on a cartridge and get a similar look if you want :)

The corn dog is from the Carousel Lite cartridge.  I thought it was so adorable I was pretty excited to use it.  I cut it out at 3.5 inches.  I cut it twice.  Once in Kraft color, and once in burnt orange.  On the burnt orange piece I cut off the stick portion so that the Kraft colored stick would show through.  I glued both of these pieces to a white cardstock, and hand cut around it to create an extra wide shadow.  Then I added some yellow and red Stickles to mimic Ketchup and Mustard.  I wish real condiments were so glittery and fun!  *LOL* 

The banner is from the Wedding solutions cartridge and is cut at 1.25 inches. I took a stamp from Pink By Design's Simply Everything set and placed it on my block in a curved way to mimic the banner.  After stamping I did some stitching on both the banner and the border of the card. 

I want to encourage you to join in the fun!  Abby would love for anyone and everyone to participate in the challenge for a change to win a wonderful Cosmo Cricket 12 by 12 pack that they so generously donated.  

Here are the rules to enter your project into the challenge!
Link your ORIGINAL post with your project up to Mr. Linky (on her blog)
Mention that your project is for her challenge
Project must be entered by the deadline before Mr. Linky closes - this time it's March 26th
Project must be on the challenge topic.
Have fun!
You can read the rules over on her blog as well when you go to link up :)

So... head on over to Scrapbookaholic By Abby to see all the other designers' fab projects - and also to enter your project for your chance to win!


Tuesday, March 1, 2011

Love You Cherry Much Soda Can Card


I had the BEST time making this card!  The whole inspiration for the card was my new paper stack.  I ordered the My Favorite Things Stack from Erin Lee Creative.  It is SO cute :)  When I saw the adorable little cans of soda with cherries on them I was inspired to make this card.

The card is a standard A2 size, that opens from the top.  The soda can is from the Simply Charmed Cricut cartridge.  The original design includes a straw coming out of the top of it, and a smiling face on the can.  I trimmed the straw off with a pair of scissors after cutting it, and I used the hide contour feature to avoid cutting the face.  The can was cut at 4.5 inches.  

To get the cherries for the front of the can I used the Preserves Cricut cartridge.  I used the hide contour feature to make these cherries a simple cut with no notches marked to add layers to.  They are cut at 1.25 inches.  

I layered the can onto a piece of vanilla cardstock that measures 2.25 by 3.25 inches.  I added some stitching lines with a Stampin' Up marker, and then put scalloped borders on each side.  The borders were punched with the Stampin' Up Scallop Border Punch.

For the bottom of the card I cut a vanilla layer at 1 and 1/2 inches tall by 4 and 1/4 wide.  I took a sentiment from Pink By Design's Country Living set for the sentiment.  I used some small post it notes to help me do some masking so that the word "cherry" would be a different color than the rest of the sentiment.  I used SP & Company's Rain Boots stamp set to stamp the little cherries on either side of the sentiment.  I added some more stitching lines with my marker.

I showcased the adorable inspiration paper from Erin Lee Creative by using my Scallop Border Punch again and attaching a strip to my card.  I added some ribbon over the top of it.  Even though it is just one row of those adorable little cans I think it pops nicely.
I had a blast with this card, and it was fun to use several products made by crafters for crafters :)  Be sure and check out Erin's new paper!  I'm so glad I ordered some.  I'll be featuring more projects with it soon b/c I have a ton of ideas for it.


Friday, February 11, 2011

Fun & Girlie Set


I am so pleased with this little set. So girlie and fun, and also including plenty of PURPLE! Purple is my favorite color, and also the favorite color of my dear friend Jen over at Purple Scrapbooker. Today I had the special honor of being a guest designer on her blog – and that is what I designed this project for.
 
I know you want all the fabulous details, so be sure and check out this post on her blog.

Thanks Jen for asking me to do this, and for being a great gal! One of my favorite things about blogging is getting to know other crafty peeps.