Wednesday, March 27, 2013

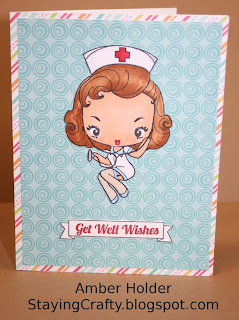
Get Well Wishes


I've really been on a kick with my Copics lately.  Too much fun!  Although I desperately want some colors so I can try blonde hair too.  Until then all my characters will be brunette.  *LOL*


The adorable little character is by The Greeting Farm her name is Cheeky Nurse.  She colored with my Copics and there is a tiny bit of Stickles on her eyelids.  To get the red mouth I inked her up normally.  Then I used a baby wipe to remove the dark ink from her lips.   I used a Stampin' Up marker over them to give them their lovely red color and stamped.

The banner outline and sentiment are from SP & Company's Happy Banners set. 

The papers are from the Echo Park 6 by 6 pad Summer Days. 

Thanks for visiting!

Tuesday, March 26, 2013

Follow Your Heart It Knows The Way


This card all started with the butterfly.  

She's from an Inkadinado cling set called Butterflies.  I stamped her in some Memento Tuxedo Black and colored her with my Copics.  Then I cut her out and spent a long time carefully covering most of her with Crystal Stickles, and then finishing off with Black Diamond Stickles around the edges and such.  That was very tricky to do without smearing everything, but the effect was totally worth it.  

I let her dry for about an hour, and then finished the drying process with my heat tool so I could move on, and also because i was hoping it would curl the paper - as luck would have it, the paper curled beautifully

The trail behind her is a stamp from The Paper Studio called Flourish.  Stamped in Versamark and then embossed with Stampendous embossing powder in the color Star Dust, it's clear powder with lots of silver glitter mixed in.

The sentiment is from Stampin' Up's set Whimsical Words and is stamped in Memento Tuxedo Black.

The little mirrored gems are from Irock.

Thanks for visiting!

Amber

Monday, March 25, 2013

You're My Sunshine


Just a clean and simple feeling card, but it was a surprising amount of work!  *LOL*


The sentiment is from SP & Company's Rain Boots.  I stamped it in Memento's Tuxedo Black and then added a little Irock gem to do the i.  

The cool chevron is from their set Chevron Chase.  This was the tricky part.  The stamp is a decent size and I wanted small sections so I could do this rainbow effect. I cut a couple masks and started trying to do this, and I was having tons of trouble.  Even though it's a clear stamp when it was inked up I was having a hard time seeing through the extra inked lines and I kept stamping very close, but not close enough to avoid parts of my lines getting cut off by the masks.  With each line so close together it's tricky stuff.

So, I decided to be REALLY brave and very carefully cut the stamp so that I could work with 4 rows at a time.  It worked!  When I cut it I went VERY slowly because I was cutting each little jagged spot.

I used the Stampin' Up ink colors: Real Red, Only Orange, Yo Yo Yello, Glorious Green, Brilliant Blue, and Perfect Plum.

Thanks for visiting!

Amber


Sunday, March 24, 2013

Hello Easel Card


This is just a simple easel card in a standard 4 and 1/4 by 5 and 1/2 size card front.

The adorable image is from The Greeting Farm and she's from the Cheeky Cherry Collection.  Her name is Cheeky Chat, isn't she cute?!  I colored her using my Copics and then added some Stickles to her hair barettes, shoes, eyeshadow, and the heart on the phone.  Then I added Glossy Accents to the phone.


I took this other shot of the card to try to show off the Glossy Accents details a little bit more.


The super cute papers are from the My Mind's Eye Lime Twist Happy Go Lucky 6 by 6 pad.  I have been hoarding this paper with the hello chat bubbles and I knew this was the perfect card to use it for.

For the sentiment I used a chat bubble from SP & Company's Turtle-y Awesome set.  The sentiment is from the Hero Art's Mi Casa set and is stamped in SU's Rich Razzleberry.

I made it for the challenge over at The Greeting Farm Blog.  This is for their Farm Fresh Friday Easel Card Challenge.

I am also linking up over at Docerela Stamps for their Pastel Colors Challenge.

Thanks for looking!

Friday, March 22, 2013

Sewn Jar Shaker Easter Cards


Today I made some shaker cards using my sewing machine!


I designed this card starting with the jar.  It's from Lawn Fawn's Summertime Charm set.  I'm going to take a little time to write out all my steps.

The back layer of white was stamped on white cardstock and then I filled it with lots of jellybeans.  The jellybean stamp is from Lawn Fawn's Happy Easter set.  I stamped it using Stampin' Up inks Almost Amethyst, Pixie Pink, Gable Green, Bashful Blue, and Barely Banana.  I did not fussy cut it at this point.  I cut out a large rectangle around it.

I stamped the jar onto some acetate using some Staz On. For each shaker I stamped the jar twice and did a very rough cut around it.  You want some space for moving it while you sew so don't fussy cut yet!

I used a single small glue dot to adhere the 2 layers of transparency together.  Then I took it to the sewing machine and used white thread to sew the sides and the bottom closed.  I did NOT sew across the top yet.  After stitching I filled the jar with some little seed beads and some faux snow.  Once it was filled I went back to the sewing machine and stitched the top to complete the shaker effect.

I stamped the jar lid in black Staz On onto some silver cardstock.  Then I fussy cut it and adhered it over the acetate.  

I adhered the completed shaker over the stamped white layer with jelly beans.  I used some ATG tape along the lid area because it's hidden, then I used a mini glue dot at the bottom of the jar to keep it from flopping around.  It really isn't noticeable.  At this point I fussy cut the jar just cutting the white and clear layers all at once, leave a small border to make sure you don't cut through your stitches.  The jar is adhered with pop dots.

OK, that was the hard part :)

The pink (or green in the boy version) layer is 1 3/4 by 2 1/2.  I did some faux stitching with a white gel pen.   I used the Happy Easter Lawn Fawn set for the sentiment and image, although it didn't stamp cleanly so I went over it with a white gel pen and it looks a little rough.  If I did these again I would do white embossing instead.  I adhered this layer with pop dots.

The jellybean paper is from the Doodlebug Design 6 by 6 pad Hello Spring.  It is cut to 3 by 4 inches.

The purple (or orange) layer is cut to 3 1/2 by 4 1/2 inches and dressed up with more faux stitching with a white gel pen.

The card base was done in vanilla and is an odd size.  It's 4 by 5 inches.

Sorry for the long explanation, but I wanted to explain in case anyone wanted to make one.

I will be entering these into a challenge over at Lawnscaping Challenge.  This is for challenge Challenge #54  Stitching.  I used both real and faux stitching on my card so I've really got the bases covered.

Thursday, March 21, 2013

Cupcake Acetate Card


This card's top layer is acetate, and the background you see is the inside of the card.  You can see it a little better from the side view below.


I'll start off by explaining the inside of the card.  I used a background stamp from Hero Arts and BasicGrey called Carbonated Background.  I stamped it in Versamark and then used black embossing powder.  This left me with some beautiful, shiny black dots.  Then I took 5 different Copics and filled all the dots in with color.


For the acetate layer I used the Hero Arts set Cupcakes.  I stamped a cupcake on white cardstock in Memento Tuxedo Black ink, then colored it with my Copics.  I cut it out, and then added some Dazzling Diamonds Glitter from Stampin' Up.  I didn't like the back showing because of the bleed through of the Copics, so I cut another cupcake from plain cardstock and adhered it on the other side of the acetate.  This way you see a clean, white cupcake shape instead.

The sentiment was stamped from the same set.  I just used some foam tape to adhere it with a little pop and some dollar bling in the corners to visually anchor it a bit.

I thought about adding a place to write inside, but unless the card was clamped fully shut it would show and ruin the effect.  The back of the card has a clean white base that I can write a nice long message and sign and I think that will be perfect instead.

I am entering this over at A Blog Named Hero for their Challenge # 22: Free Style.

Thanks for visiting all my crafty peeps!

Amber

Wednesday, March 20, 2013

Shiny Robot Card


I just love this one!  Seriously I couldn't be happier with it and wouldn't change a thing if I did it over.  I feel like I'm on a kick with more fun boy ideas lately than usual.

So, the focal point is definitely the robot.  He is from an Oriental Trading set that's on clearance right now.  The stamps aren't the best quality ever, but I got a HUGE sheet for a reasonable price with lots of fun images. 

I started off by stamping him on some really good quality cardstock.  I went over the splotchy parts with my Copic Multiliners to make it look as though it stamped nice and crisp.

I colored him using a few red Copics and a couple grey Copics. 

I cut him out very carefully. Then I used my multiliner again to touch up any bits of white edges showing.  That helps make it look like the cutting was totally flawless.

The part that I really love is that I TOTALLY covered him in a thick layer of Glossy Accents and he is so shiny and thick.  He feels like an epoxy sticker.  He's up on pop dots.

The sentiment is from the same set just cut out, popped up, and lightly inked with red.

The embossing was done using the Cuttlebug folder called Clockworks.  I inked the edges with some black and left them really messy, sort of like spilled oil.  It brought out the embossing a bit and defined the edges nicely.  The edges are all rounded on a 1/2 inch setting.  The cute screw brads are from Michael's.

I hope you love it!  I know myself and many of my crafty friends always need more ideas for boy and/or masculine projects.

Have a very crafty day!

Amber

Tuesday, March 19, 2013

Sand Box Layout


This layout is simple and was very quick to put together.

One thing I'd like to mention right away is that the color in this photo is off.  The adorable fish paper has a much more rich aqua type color than the photo shows, but the details photographed well so I decided to leave well enough alone.

The fun paper is from the Doodlebug Boys Only collection and is called Skater Stripe (which describes the opposite side accurately.)

The photos are just 4 by 6's.

For the title I used my Cricut and my Gypsy.  I pulled up the Plantin Schoolbook font in my Gypsy and used the shadow just to make it a tad thicker, then I welded the letters in each word together.  When it was cut out I used my Fiskars texture plate called Waves to add a fun element of texture.  I went over the embossed areas in More Mustard ink from Stampin' Up.

The crab and sandcastle are both from the Create a Critter cartridge.  The crab is embossed with the D'vine Swirl folder and the sand castle is embossed with the Swiss Dots folder.  

This is my kind of scrapbooking!  It was quick and simple to put together, but I still feel like it looks personalized and the elements I added fit the photos.

Have a crafty day my friends!


Monday, March 18, 2013

Coffee Card


I'm not sure what I think of this one.  I don't really love it, I don't really hate it either.  It does have a LOT more sparkle in person.

So I started with some gray cardstock for the base.  I embossed it using the Cuttlebug Argyle folder.  It wasn't big enough to completely cover the card front, and that actually worked out nicely because it left me a flat area to do some faux stitching with my white gel pen.

The layered shapes are both Nestabilities.  Lacey circles, and then just regular circles.

The image is from the Hero Arts set Have a Donut.  I stamped it in Memento ink and then colored it using Stampin' Up markers.  For a finishing touch I used a bunch of Diamond Stickles on it.  I covered everywhere there was brown ink from stamping, so the entire area with coffee, the steam, the outline, and all the little lines in the cozy.

The ribbon along the bottom is from Stampin' Up and is Bashful Blue.  I just pleated it using generous amounts of ATG adhesive as needed.

I made this for a color challenge over at the Hero Arts blog.

Thanks for visiting!

Amber

Friday, March 15, 2013

Make a Wish Tag


Here's a simple birthday tag I put together.

The tag base is kraft cardstock cut in my Silhouette Cameo, although the shape is simple so it could be done with a paper trimmer and a hole punch.

The ribbon is Sycamore Street 1/4 inch ribbon in Pool Party from Stampin' Up.

Faux stitching was done with a white gel pen.

The jar was stamped from Lawn Fawn's Summertime Charm onto some vellum in Memento Tuxedo Black. 

To embellish my jar I colored the lid with Copics and then added Silver Stickles.

Behind the jar are a bunch of little pieces of confetti. The Irock gems are on top of the jar.

To attach my vellum I used ATG under the lid.  I also used a Scotch Quick Dry liquid glue on all of the confetti pieces.  I purposely let some ooze out to help attach the vellum without having lines of glue.

The little sentiment is from My Pink Stamper's Family & Friends set and was stamped in Pink Passion ink from Stampin' Up.

My husband inquired as to what the person was wishing on.  He had a point, I didn't use candles after all.  I told him it was a magic wishing jar.  *LOL*  Maybe it's fairy dust or something, but whatever it is it's magical and you wish with it so my sentiment is totally appropriate ;)

Have a fantastic and very crafty day!

Thursday, March 14, 2013

Washi Tape Hello Card


The card base is a grey cardstock.

I started with 3 strips of washi tape that I flagged the ends of.  They are all from Doodlebug in their Swiss Dot Pattern.  The colors are called Swimming Pool, Beetle Black, and Bubblegum.

After I adhered the strips I created some black faux stitching lines around them with my Basic Black Stampin' Up marker.

The top 2 corners are rounded at 1/2 inch.

The stamps are from Stampin' Up's Elementary Elegance set. 

The black bling has been in my stash a long time and I don't know the brand.

The mirrored gems are all from Irock.  I just scattered them around until I liked the look.

Have a crafty day!

Tuesday, March 12, 2013

Some Bunny Is Thinking of You


I thought this would be a good any occasion card.

The clouds are from Hero Arts.

The bunnies are from Lawn Fawn's Happy Easter.  Although it's hard to photograph they have Stickles on their tails and faces and a tiny bit of subtle shading in a pale blue. 
The sentiment "Some Bunny is Thinking of You" is from Pink by Design's Hoppy Easter.
The adorable papers are from the Doodlebug Hello Spring 6 by 6 pad.  The carrot papers were too much contrast with the green so I generously sponged them with some green ink to soften them up and make them work as part of my rolling hill scene.  I just cut all the hills by hand.
Stitching done with a white gel pen.

Thanks for visiting friends!

Friday, March 8, 2013

Out of This World Card


Here's a perfect card for a boy's birthday.

The fold of card is called a side step.

The patterned star paper on the left panel is from the Bo Bunny Blast Off 6 by 6 pad.

The sentiment reads "Hope your birthday is out of this world!" and it's from Stampin' Up's Blast Off set.

All the cuts were made using the Silhouette.  

I'm going to provide all the info on the images I purchased from the Silhouette online store so you can find them.

Alien in rocket ship: Design ID #26133

Both planets and stars: Design ID #26131

Alien on the bottom: Design ID #14323

 I decided I really wanted to embellish the rocket ship and make it special.  I attached a couple dark blue pieces of bling to the top.

For the window with the alien I used a Window Charm from Close to My Heart.  It was a little smaller than the window I cut so I decided to use some Turquoise Stickles around it to create a little frame.

I also used the Stickles colors Yellow, Orange Peel, and Xmas Red.


Wednesday, March 6, 2013

Berry Sweet Layout


Hello friends.  I've got another layout to share today.

I started off with an adorable strawberry covered paper from the DCWV Snack Stack.  I cut a circle out of the center using my Silhouette and then I layered it onto some green cardstock.

I used a white gel pen to draw stitching lines around the inner edge of the circle.

The title was cut using a title I purchased from the Silhouette online store.  It took awhile to put together, but I think it was worth it.  After I assembled it I decided to add some white gel pen dots to the letters.

The label underneath was also from the Silhouette store.  I used some red brads from my stash and some Stampin' Up markers for decoration and journaling.

After I cropped the photo into a square I matted it and then added little green gems to the corners for an accent.
 
The photo is layered on top of a strip of paper from the Recollections stack All Girl.  I went around the edges of that layer with a Stampin' Up marker for more faux stitching.

Sorry I've been out of touch again.  Contrary to what you might think I've been doing TONS of crafting.  I am really catching up on my scrapbooking.  I've scrapbooked lots of newer photos, but some older ones have been sitting for a long time.   I've gotten really motivated and I'm almost done with them now.  It's been a lot of work but I can't wait to slip them into their albums and enjoy them.

Can I make an honest confession?  Scrapbooking feels like the most work and the biggest burden of any craft I do!  That's not to say I don't enjoy it, but I feel very obligated to do it.  I just feel I simply MUST scrapbook.  Maybe I'm weird, but I feel it's so important to do this for my kids.

The good news is that I end up having fun making most of my layouts and I LOVE the feeling of completion.  The kids just LOVE their albums and love to tell the stories from them over and over again.  So, even when I feel a little creatively stifled and obligated when I stare at a huge stack of photos I feel must be scrapped it's all worth it to me in the end.