Monday, February 27, 2012

Sewing Machine Cover


I needed a nice cover for my sewing machine.  It didn't come with a cover and I've been using a drawstring purse bag to protect it, but it's way too big and not very cute.

I found instructions on how to make a sewing machine cover with a pocket in the book One Yard Wonders.  It wasn't difficult at all and it went quickly.

Here's a side view.

I'm really enjoying sewing these days.  My creative mojo for new ideas seems to be harder to come by lately so it's nice to have a project where I just pick a fabric and follow instructions!

Thanks for stopping by!


Thursday, February 23, 2012

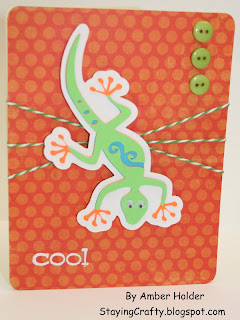
Gecko Card


I thought this would be fun for a boy.  It would work well as a birthday card, but since the sentiment is generic it could be used for other things, like a congrats on an accomplishment.  I've left the inside blank so I can decide it's use later.

The little gecko was cut from the Cricut American Alphabet cartridge on my E2 at 3.5 inches.  Quick note here, I would NOT attempt to cut it any smaller than that.  His little feet are very delicate to remove from the mat.  I added some little tiny googly eyes to him and put him up on some pop dots.

The twine is Peapod from The Twinery.

The buttons were from the Michael's $1 section.

The stamp is from Unity's Mix Up of Cuteness set.  I stamped it in Versamark and embossed using some white embossing powder.

The paper is from My Mind's Eye Lime Twist Fly A Kite 6 by 6 pad.  

I rounded the corners on a 1/4 inch setting using my Corner Chomper.

Quick and easy!  Thanks a bunch for stopping by :)


Wednesday, February 22, 2012

Party This Way Card


I used Stampin' Up's set called Party This Way.  For the sign I used Only Orange ink.  It's up on Pop Dots and I used Crystal Stickles around the edges.

The balloons are stamped in Rich Razzleberry, Taken With Teal, and Real Red.  The strings are twine from The Twinery in Stone.

The card base is just Kraft.  I rounded the top 2 corners on a 1/2 inch setting using my Corner Chomper.  Then I went around the edges to do faux stitching using my Sakura gel pen. 

Friday, February 10, 2012

I Sewed Some Makeup Bags


I think these came out really well!

What's nice about a project like this is that since the bags are a rectangle you can just use sheets of paper to make a pattern.  I made 3 different sizes to make this gift set.


I purchased most things at Joanns.  The fabric and the zippers at least.  I didn't get a photo of the insides but they are just plain brown.  What's nice about these bags is that the way they are sewn the edges look beautiful inside just like they do outside.  I learned how to make them look nice on both sides by watching this tutorial. 

The only things I would note is that for this type of fabric I found I couldn't sew the zipper too close or it wouldn't open and shut easily.  Also, this fabric frayed easily while working with it so I couldn't really rip out a seam and fix a mistake.  I made a bag the same way out of cotton before and it was MUCH easier.  

Here's a closer look at the little zipper pulls I made before I attached them to the bags.  I just used some beads I had laying around in my jewelry supplies and I think they made an awesome finishing touch.


After spending many hours getting these bags done I really wanted to present them nicely so I made a custom gift box.  Before assembling the box I stamped all over the lid with a Fiskars set called Winter Wishes using Stampin' Up ink in Tempting Turquoise and Chocolate Chip.  I also made a gift tag using my Nestabilities Labels One dies.  The back layer is embossed with the Cuttlebug folder Divine Swirls.  Here's the completed box they went in all tied up with pretty grosgrain ribbon.


So, there ya have it.  A custom gift set of makeup bags.  I'm very pleased with how they came out and think they made a perfect gift.  I may make more in different colors for other friends in the future.  I'm trying to do more sewing :)

Thanks so much for stopping by!

I'm linking these up to the following parties:


Craft Junkie Too Friend


Wednesday, February 8, 2012

Cutie Pie Card


I decided to use the adorable image called Cheeky Cherry Pie from The Greeting Farm.  I stamped her in some Rich Cocoa Memento ink, all but her lips.  To get just her lips to stamp red what I did was ink up the whole stamp in the brown, and then I used a damp paper towel corner to very carefully remove the brown from her lips.  After the lips were clean I quickly rubbed on some Real Red using a Stampin' Up maker.  I just had to have red lips on her.  I colored her in using a variety of copics.  For a finishing touch I added some Diamond Stickles to her eyelids and apron ruffles.

I used my Nestabilities to cut her out and layer her onto some scallops.  I used my paper piercer to push holes in the scallops.  I pop dotted this up onto my card base.

For the card base I rounded the top 2 corners on a 1/2 inch setting.  I went around the edges with faux stitching lines using a Chocolate Chip Stampin' Up marker.

Along the bottom of the card you see a piece of patterned paper from the Echo Park Little Girl Collection and a sticker from the same collection.  I went around the edges of the paper with some Icicle Stickles.

The scallops along the bottom are actually part of the inside of the card.  I just trimmed a little off the bottom of the card front before decorating it.  I used the EK Success Open Scallop punch.  This is a cool effect because the scallops show on the outside of the card, and also help make the inside cute.  I added the same marker stitching lines to the inside of the card.

Thanks for stopping by!

Tuesday, February 7, 2012

Dinosaur Layout


I wanted to play with my Copics so I colored up this awesome dinosaur from the Dinoroar set by Stampin Up.  I hand cut him and glued him to a piece of cream cardstock that was cut into an oval with my Nestabilities.  I sponged it with Close to Cocoa ink.  I layered that onto a piece of kraft that was cut with a scalloped oval Nestabilities.  This was pop dotted up onto a layer of cardstock that was embossed using the Oriental Weave Cuttlebug folder.  The dinosaur border was an EK Success punch.  I stamped a sentiment from the same Dinorar set using Chocolate Chip Ink - it reads "Roar! (that means happy birthday in dinosaur)"  I added a bit of brown grosgrain ribbon. The corners are all rounded on a 1/2 inch setting.

All the cute stickers are from Little Yellow Bicycle.  I also used some Stampin Up rub ons to create a border of circles on my kraft cardstock before journaling with my Chocolate Chip marker.

The photo mats are sized to work with 5 by 3 inch photos and leave a nice yellow border.  I will round the corners of the photos when I get them printed as well.  I had the photos on my computer in front of me when doing the layout, but I need to send them for printing.

Monday, February 6, 2012

Follow Your Heart Maze Card


How fun is it that this card has a little maze on it that you can actually play?!

The maze is available from Stampin' Up.

The stamp set is designed to coordinate with the maze and is called Totally A-maze-ing.

I stamped the pink background using Pixie Pink ink.  Then I went in with a Real Red marker and added some stitching lines and doodle dots.  I filled the little heart in the center with Fruit Punch colored Stickles.

I layered the maze onto a piece of white cardstock that's 3 inches square with corners rounded on a 1/2 inch setting using my Corner Chomper.  The stitching lines were drawn with a Real Red marker.

The card base patterned paper was given to me by a friend.  I have no idea what brand it is.

The banner along the bottom was simply hand cut.  I stamped the sentiment from the same Totally A-maze-ing set using Real Red.  The glittered chipboard heart is from DCWV and has been in my stash from a kit I purchased a long time ago.

I'm feeling the love in the air for Valentine's Day :)

Thanks for stopping by!

I am also sharing this today for...

Friday, February 3, 2012

Tigger Layout


My scrapbook pages are usually very quick.  That's the only way I get them done.  I'm a good year or more behind at this point since I like to do TONS of pages so it's time to get my butt in gear and really scrap as often as possible.  I was excited to scrap this ADORABLE photo of my son flat on the floor passed out.  I'm not crazy about the overall dark feel that the photo has with black coming in from both sides so I made sure the page itself was bright and vibrant.

Here's a quick layout I did.

The polka dot paper is from Echo Park's Little Boy collection.

The orange paper is from the SEI Zoo Pals stack and is punched with the Stampin' Up Scallop Edge Border Punch.

The green paper is from a DCWV Stack - can't think of the name.

The Tigger embellishment is by EK Success.

The photo is cropped to 4 inches square and then I rounded the corners on a 1/4 inch setting.  The photo mat is also rounded.

The tag is cut from a sheet of the Echo Park Little Boy collection.  I added a metal embellishment from a Jo-ann Essentials pack, the theme for it is Love & Wedding.  I journaled using my Old Olive marker from Stampin' Up.

Wednesday, February 1, 2012

The Sky's The Limit Card


Ink colors used for this card all from Stampin' Up:
Marina Mist
Cherry Cobbler
Rich Razzleberry
Close to Cocoa

Stamps used:
Hero Arts Clouds Background Stamp
Stampin' Up set called Up, Up & Away

I also used Versa Mark Ink and black embossing powder on the sentiment.  

I used a Close to Cocoa Marker to do the stitching lines around the edges and also to make a cross hatch pattern on the baskets.

For a finishing touch I added some Diamond Stickles to all the white parts of the hot air balloons.

Thanks for visiting!