Friday, April 29, 2011

Always Be Yourself Sign

Click on the photo to see it enlarged for detail

I made this little sign for my craft room.

It's about 8 and 3/4 inches wide by 8 and 1/4 inch tall.  Weird size I know.  I started putting everything on a 12 by 12 sheet and then trimmed it down to size afterwards.

The paper is from the We R Memory Keepers - Tiffany's stack.

"always" is spelled out in some foam Thickers.

"be" is spelled out in plain white alpha stickers from my stash.

"yourself" is spelled out using some letter's from the Echo Park Little Girl Collection Pack.

The flower is from K & Company.

Click on the photo to see it larger.

The girl is from Sassy Studio Designs - she's a digital stamp and her name is Denim Debbie.  Isn't she just to die for cute?!  I printed her out many times to get all the layers.  Basically what I did was print her on a regular piece of printer paper first.  Then I saw where she printed on the paper, and taped the patterned paper I wanted to print on over the image of her.  The image tended to shift to a slightly different spot each time - so I was a little generous with the paper - and did each piece one at a time.  

I also printed her once on a white piece of cardstock and colored her shoes, skin & hair with Copics.  I also colored her jewelry using gel pens.  I cut out the white layer and then added all my layers.  Her shirt and purse are patterns from the Basic Grey Kioshi 6 by 6 paper pad.  I added some Irock gems as well.  Her jeans are a textured piece of cardstock to help them look and feel more like denim.

I just love this project.  So much fun to put together!  Cutting the layers does take some time - but I think it adds so much to the image.  I am just BARELY getting started with Copics and not only do I not know what I'm doing - but I have very few colors.  I figured if I started off with some skin and hair colors I could paper piece many other parts of images.  Also - it's just a different look than using all Copics and I will probably continue to use this paper piecing even after my Copic collection and skills expand.

I'm hoping to do more paper piecing, Copic coloring, and digital image stuff in the future.  Video tutorials are coming back one of these days - I promise!

Thanks so much for visiting!  I hope you feel inspired and have a fabulous Friday!

Thursday, April 28, 2011

Mom Card


Hello everyone!

Today I am posting this project for Tracy over at Craft Junkie Too.  She has challenged us to create a Mother's Day project using the word "Mother" or "Mom" in it.  Be sure and head on over to her blog to see what she and the other gals have created - and also link up your own project!

I welded a couple of scalloped circles together using my Gypsy to create the card itself out of Kraft cardstock.

I added some stitching with a white gel pen.

I added a ribbon tied in a bow on the side where the card folds.  I really liked this because the scallops don't go all the way to the edge since the card is welded.  This was a simple way to add a little pop of color, and cover that up.

The birds are from the Wall Decor & More Cricut Cartridge.

Mom is from the Martha Stewart Seasonal Cake Art Cartridge.  The original saying was "Best Mom" but I only needed the word mom.  I added a few random dots to give it a bit of interest.

Thanks for stopping by :)
Stay crafty my friends!

Wednesday, April 27, 2011

Mom You Color My World


I created this card at 4 and 1/4 inches square using Kraft cardstock.

I cut several strips of Creative Memories patterned paper in various colors.  Each strip is about 1/2 inch wide by 3 and 3/4 long.

I went around the edges of the strips with a white gel pen and did some fake stitching.

"mom" is spelled out using some foam Thickers.

"You Color My World" is a Pink By Design Stamp from Simply Everything.

Tuesday, April 26, 2011

Germ Killer Kit

Front View & 1 side
So, I have thought A LOT about germs lately!  My kids and I have been SO sick with one thing after another that it has been hard to think about anything else.  So, now that I'm finally feeling a little better and so are my kiddos I thought I'd have some fun and make an anti germ project to tell those little buggers to get on outta here for a good long while.  *LOL*  Wishful thinking perhaps, maybe the placebo effect will work.

Back View and other side
I had this cute little white mailbox with a red flag back from before Valentine's Day when the Target $1 spot was carrying them.  I figured I'd turn the little mailbox into an anti germ kit.  I intend to fill it with little things like Purel, tissues, and maybe some vitamin C and then pass it along to a friend as a tiny gift.

I covered the front and back with black paper, and added ribbon to the sides.  I covered the main part of the mailbox with green paper.  Then I added a bunch of adorable little germs from the Feeling Green set from Letting Delights.  I finished off by decorating the little flag to simply say "Germ Killer Kit" with some faux stitching around it. 

I sure think it turned out cute :)  If I end up hanging onto this for awhile I may make it part of a larger gift - like a gift basket that also has chicken soup, medicine, etc.  Honestly, sometimes the people that are the hardest to shop for end up liking practical gifts and who doesn't hate cold and flu season?

Thanks for visiting today!  I'm glad to be getting back to my regular blogging routine - and more grateful than ever for my usually healthy family.

Monday, April 25, 2011

Mother's Day Card


Hello everyone!

This card is for the 4th Scrapbookaholic By Abby Challenge - and the theme this time around is Mother's Day! 
I kept this one pretty simple.
*I started off with a standard A2 sized card using Kraft cardstock

*I stamped the front of the card using SP & Company's Scripty Scripts set

*I cut a lacy rectangle from A Child's Year Cricut Cartridge at 4.62 inches (I use a Gypsy so sometimes my sizes are weird)

*I added some stitching using a Stampin' Up marker around the lace

*I added some ribbon and a K & Company flower embellishment to my lacy rectangle before adhering it to my card.

*I finished the front by adding a silhouette of a mother and daughter, also from A Child's Year cut 1t 2.45 inches.


Here is the inside of the card.

I spelled out "Hoping you have a fabulous Mother's Day" using a couple Mix 'n Match sets from SP & Company.

The rest of the team is super talented - so make sure and check out what they created to help inspire your creation as well.

This time around the sponsor is Sakura of America and there's some of their awesome gel pens for a prize!
Here are the rules for entering your own project for the chance to win a prize:
Link your ORIGINAL post with your project up to Mr. Linky (on her blog)
Mention that your project is for her challenge
Project must be entered by the deadline before Mr. Linky closes.
Project must be on the challenge topic.
Have fun!
Head over to visit Abby, the rest of the Design Team, and to link up your own original creation!

Thursday, April 21, 2011

Stylish 16 Layout

Click on the photo to see it enlarged.
Hello everyone :)

I had so much fun putting this together.  I designed the layout with photos that are 3 by 5 in mind.   I used Echo Park papers from their Be Mine collection for everything except black and cream cardstock.

I don't have the sizes for everything and such.  Honestly, I was just playing around at my in law's house when I made this.  The ribbon on the photo mats was from the Target $1 spot.  Stylish was cut from Forever Young.  The girl was cut from Forever Young.  16 was cut from Sweet Treats, but I did trim off the tops of the shadow portions because they had a space for a candle flame.

I added some pink bling strips from my stash.  Some K & Company flowers, and a heart by Jolee's Boutique.

Wednesday, April 20, 2011

Happy Spring Sign for Whimsical Wednesday


Hello everyone!

Today is a special day because I get to share my project for Whimsical Wednesday!  The challenge this time around is called Spring Has Sprung In Our Homes - and the challenge is to create a Spring home decor item. Make sure and head on over to the Whimsical Wednesday blog because you'll want to see the design team's creations - and also enter your own creation for the chance to win a great prize.

My project is super simple.  I tend to like seasonal home decor projects that are quick and easy to put together since they usually don't last for the following year. 

Sometimes simple is good!  This way when my son ends up with it in his mouth or some other thing happens to destroy it I won't be agonizing about the hours of work I put in.  *LOL* ;)  I tend to save my special projects as gifts, like fancier cards, because I get them out of my house to safety quickly.


I used a gorgeous floral pattern from DCWV as the base for this little sign.  It measures 12 inches by 9 inches.  I strung some pink polka dotted ribbon through the top to hang the little sign. 

I used some DCWV glittered cardstock.  I LOVE using that in my Cricut.  It is super high quality and doesn't get loose glitter everywhere.  I do use a multi-cut of 2 and usually get great results.  The pink layer is 6 by 9.  The letters were cut using Ashlyns Alphabet at 2.5 inches.


I finished off with some super cute flower embellishments from K & Company!  
Quick, easy, and very Spring!  I'm planning on placing this sign on my front door.  I always enjoy something pleasant to welcome us home.


Also, sorry I've been MIA - sick kiddos have been keeping me busy :)  I hope to catch up with my bloggy friends very soon.

Monday, April 18, 2011

Winner of My Spring Embellishment Give-a-way

Just quickly popping in to announce that Random.org chose Anna who said 
"Just too sweet. Very cute.
I am a follower.
Thanks for the chance to win."
 
I am e-mailing her as soon as I finish typing this.
Thanks to everyone for the super sweet comments!

Thursday, April 14, 2011

Hanging With My Peeps Blog Hop - I have blog candy :)


Hello everyone!

I am so excited to be part of this fun hop, and to be honest a bit intimidated to be in such an AMAZING lineup of talented crafters.  If you are hopping along you should have arrived from Tammy's Blog.  If you have not started the hop yet please be sure and start at Amanda's blog!!! Amanda is not only insanely talented, but super sweet.  I know she must have something amazing in store to inspire you - so you won't want to miss it.

For my project today I decided to go ahead and work with real Peeps.  Amanda let us chose to work with real Peeps, or paper ones.  I soon discovered that these sticky little critters are rather stubborn and I had some good laughs trying to make various things work.  Really, it was probably pretty funny to watch me fumbling away at this. 

*Yummy was spelled out in Lullaby Blush Foam Thickers
*The birdhouse is from the Serenade Cricut Cartridge
*I used Cotton Candy Stickles around the swirls
*I used a Sweet Treat cup from Stampin' Up in the center of the birdhouse.  I cut my Peep to be small enough to fit inside.
*The Peep on the outside was attached using some large glue dots.  I use a Peep that was on the end so it would have a nice side view.
*I spelled out Peep on the bottom of the birdhouse using stickers from Echo Park's Little Girl Collection
*I mounted my project onto a metallic blue sheet of paper I picked up at Michael's

I hope you enjoy it :)  This sure was an adventure for me.

I have a little bit of blog candy to offer you before you hop on along on the trail.

I picked up these fun things at Michael's for one lucky winner.

*Set of 7 dimensional stickers by Recollections
*Spool of patterned ribbon by Celebrate It
*Vellum Stickers from Sticko

All of these will go to one person so that you can have a nice variety of spring embellishments for your cards or layouts.

All you have to do for your chance to win is leave a comment on this post.  You DO NOT have to be a follower.  If you want to follow me, that's awesome too - but it is not required.  It is helpful if you leave a way for me to get a hold of you if you win, but that's not required either.  If I don't have a way to contact you I will still announce it on the blog and you will have 1 week to get back to me, if you do leave contact info I will e-mail you if you win :)

After you leave me a comment for your chance to win, please head on over to see Janis and continue the hopping fun!

Here is a copy of the entire hop trail in case you run into any problems along the way.
Tammy
Amber - That's me and you're here now
Ashley

Comments are now closed for this post and the winner has been chosen.  Thanks to all who stopped by and had sweet things to say :)


Wednesday, April 13, 2011

Little Easter Project


Hello everyone :)

Today's project is for Tracy over at Craft Junkie Too.  She challenged us to use eggs on our project this time around.

I cut the fence from Life's a Party at 7.5 inches.  The grass is a layer of that cut.  I'm not sure if I should consider this a box or a bag, but whatever it is I didn't think it was sturdy enough so I added some little strips of paper to re-enforce it.  They are what you see when you look at the corners.  2 strips to help connect each section of fence to the other.

I admit I was lazy about the eggs, these are adorable felt embellishments from Michael's.  *LOL* 

I added a cute little ribbon handle and some Easter grass and I was all done. It's not very large, but it sure would be cute with some little candies inside for a variation on a more traditional Easter basket look. 

Be sure and go check out what the other girls made. :)

Monday, April 11, 2011

Glittery Fishbowl Card


Hello everyone :)

Today's project is for the brand new challenge over at Scrapbookaholic By Abby.  The theme for the next couple weeks is an animal and the color orange.  This is in honor of ASPCA's month against animal cruelty. 

I'm not entirely sure if a fish really counts as an animal, but I thought this idea was so cute that I ran with it.  

The little fish is from the Smiley Cards cartridge and is cut at 1.75 inches.  Although you can't see it in the photo very well I embossed the yellow part of the fish with the Tiny Mosaic Cuttlebug Folder.  I also drew some lines on the fins, and a few details on the lips.

I created a window using the fish tank from Create a Critter at 3 inches.  I used my Gypsy to make a rectangle that is 4 inches by 5.25 inches.  I positioned the fish tank in the middle of that piece and cut it out.  

I created a pocket with 2 sheets of acetate and I placed Martha Stewart's Turquoise colored glitter inside it.  All I did to create the pocket was cut 2 sheets at 4 by 5.25 inches.  I put Score Tape all around the edges, being really sure that all the corners were sealed and there were no gaps for the glitter to escape.  I added some glitter in the middle before sticking the 2 sheets together.

I decided not to have the window show all the way through my card.  So, I cut a white piece the same size as the other layers at 4 by 5.25.  I attached my fish to the front of it.  Then I attached the white layer to the card, and the blue layer with the glitter window inside it over the top.

The card is a standard 4 and 1/4 by 5 and 1/2 - so there i a nice little border of the pink card base showing on the front.

Now that you've seen my creation - why not go ahead and head over to Scrapbookaholic By Abby to see what the other girls came up with and enter a project of your own for a chance to win a fabulous prize :)  This time it's a $15 gift certificate to Oh My Crafts.  Plus - this time around it's also building awareness of a really great cause this month. 

The rest of the team is super talented - so make sure and check out what they created to help inspire your creation as well.
Here are the rules for entering your own project for the chance to win a prize:

Link your ORIGINAL post with your project up to Mr. Linky (on her blog)
Mention that your project is for her challenge
Project must be entered by the deadline before Mr. Linky closes.
Project must be on the challenge topic.
Have fun!
Head over to visit Abby, the rest of the Design Team, and to link up your own original creation!

Thursday, April 7, 2011

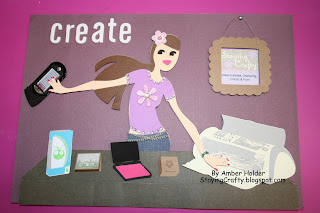
Crop Room Scene

Click on the photo to see it enlarged for detail.
This has to be one of my favorite projects ever!  It's a very detailed little crop room scene.

The girl is from the Shall We Dance Cartridge.  First, I drew lines in her hair with a marker & added a premade flower die cut to her hair.  Then I added a chipboard flower and a lot of Irock bling to her shirt.  For her pants I cut them in a paper that I think looks like denim.  I hand trimmed them to be a low rise style and added some jewelry chain to form a belt.  I just cut off the rest of her legs.

"Create" is spelled out in some Thickers stickers.

Most of the other cuts are from the Everyday Cricut cartridge.  So, unless I state otherwise that's where the rest are from.


For the Gypsy I used some Glossy Accents to make part of it shiny.  I printed an actual Gypsy screen shot that I found on Joyslife.com where she was showing the Smiley Cards cartridge.  I used an Irock piece for the button.  You can also see her fingernail polish that I drew on with a marker (although I wasn't very good at it!  *LOL*)


The actual desk is a trapezoid type shape (I think that's the right word! *LOL*)  Then there is a rectangle in the front I put on pop dots for dimension.  Here you can see a little bitty Cricut Cartridge box.  I printed out one of my favorite cards ever and mounted the photo on some cardstock to make a little mini card.  Then there's an ink pad I left very simple.  Also you see a little wooden stamp block.  I stamped that tiny flower on the back of it for the image.  The flower stamp is from Stampin' Up's Itty Bitty Bits.


Here is a Cricut Expression Machine.  The cuts were VERY tiny and hard to work with, but I think it's cute.  I used some glitter paper, white, and gray.  For the parts that were so small I couldn't get them to cut - like all the little buttons on the left.  I used some Silver Stickles in place of the cuts.  Here you can also see the little bracelet I made for my cropper.  I took some clear stretch cord and some tiny beads and basically made a real bracelet on a tiny scale to go around her hand.  It's taped in the back.  This way it has the dimension of real jewelry.


I created a little wall hanging by printing out my blog button.  Then I created a frame for it.  I cut a scalloped square from Gypsy Wanderings and then hand cut out the square in the center to make it a frame.  I poked a couple of holes in it to string jewelry wire through - and then placed this around a brad I had placed through my cardstock.

This project was fun, and I think it came out really well.  However, I will say that many of these tiny pieces were kind of difficult to cut.  I am so glad to have this piece to display in my room.  I am not very good at decorating so it will be nice to have something cute on my wall :)

Tuesday, April 5, 2011

Winner of My K & Company Embellishments


Well, Random.org chose my most recent comment for that post!  I had to glance at the screen a couple times because I wasn't sure.  *LOL*  I guess random is just that... random, but I've never seen it pick the very first or the very last one before so it was something different. 
Rhonda said...  This is a great project! I love that bunny!!!!
 
Congrats Rhonda!  I see an e-mail on your facebook badge from your blog and I will e-mail that address.  You have one week to respond back with your information.

If I'm not able to get in touch with Rhonda I will chose another winner after the week expires.

Thanks so much to everyone who left a comment :)

I can always use ideas for what to give away for blog hops that people will like but isn't too expensive. If you have some suggestions for under $15 that are lightweight for shipping feel free to leave them in the comments here for consideration.

Balloon Fun Birthday Layout

You can click on the photo to see it enlarged. 
Here's a layout I put together the other night. 

I have to laugh when I tell you just how bossy my daughter was when I was putting it together!  *LOL*  She totally wanted creative control and kept correcting my choices and rushing me along.  It was pretty funny. 

I originally put a pink 2 on the journaling area and she hated it and complained until I changed it to a white glittery one.  

Then I was trying to find a purple marker that coordinated with my purple paper and I tried one on a scratch piece and she said "No, it's not working" and then I grabbed another one and she said "Yes, use that one."  So I get the marker ready to write and I'm sitting there thinking about what to write and she says "Go ahead!"  *LOL* Little stinker! 

She's going to be 3 in May and I had scrapped some of the photos of her 2nd birthday, but these had been sitting for a long time and I finally got around to them.

The little girl image is from the Baby Steps Cricut Cartridge.  Her face is from Peachy Keen's Princess Face Assortment.  I used a couple mirrored Irock gems on her dress.  

The background paper and journaling space are from Echo Park's Little Girl collection.  The number2 on the jounaling and the title are all created with various Thickers.  

I used the Martha Stewart loops punch around the page set on my photo mat.  

All my sizes are all over the place.  I cropped the photos until I liked the way they fit - so they weren't specifically sized in advance.  I'm a very "free" scrapbooker and I don't tend to follow sketches or rules.  I just play around with things until I like the results.

Monday, April 4, 2011

Working With Cricut for a Day


This Saturday there was a Creative Memories scrapbooking event in Colorado.  Since Cricut has partnered with Creative Memories for 3 exclusive cartridges they sent out a couple reps for the event.  Some of my friends and I got to volunteer for the day and teach basic make and take classes, or demo machines.  
 
The Provo Craft reps were Chrisy and Alisa.  Christy is on the left side of the photo, and Alisa on the right :)  They were SO sweet.  How fun to get the chance to get to meet them.  The shirts we are wearing were designed by Jill - one of my local friends in the photo. If you happen to be a Cricut messageboard person you may know her as the Monogram Mom.  I am one of the gals in the front - the scary pale one!  *LOL*  
 
I spent the day demoing the machines.  I answered a lot of questions and showed people how to use all the different feature keys.  It was such a fun experience!  We weren't officially "paid" and were considered volunteers, but we did get some nice goodies that we were super excited about :) 

I will say it was interesting for me to learn what people are confused about on their machines and what they needed the most help with.  I did get to answer some Gypsy questions as well, but the majority of the day was about the great features of the Expression machine :)

I think I might do a Cricut basics video series based on what I've learned about what people need to know.  I know many of my readers are more experienced, but I figure once it's completed I can have it easily accessible on  a page as a whole series of tutorials to help someone who is new.  I may consider doing a basic Gypsy series as well - and maybe a more advanced Gypsy series if people request it.  If you have any thoughts or requests regarding those video series let me know!

Thanks Provo Craft for the amazing experience!  This is my second time meeting official Provo Craft employees and I must say all 3 that I've met have been so much FUN!!!! 

Friday, April 1, 2011

Sprinkled Gift Set - For Whimisical Wednesday Blog Hop


Hello everyone :)

Today the Whimsical Wednesday design team is being introduced!  We are having a blog hop to celebrate.  The upcoming challenges will be so much fun, so be sure to check back often so you can play along and win some awesome prizes.

For the hop today you will start at Whimsical Wednesday.  So if this is the first you're hearing of the hop head on over there to get started.  The Kraft Outlet is sponsoring today and you won't want to miss out on your chance to win a $20 gift certificate.  They are also offering a 10% discount to all the hoppers when you enter BLOGHOP at checkout.  Prairie Bird Boutique is also offering a bundle of Shabby Crinkled Ribbon for a lucky hopper.

If you're already hopping along you should have arrived from Roberta's Blog.

So, onto my project details:

Click on the photo to see it enlarged for detail.
My card is an unusual size.  It's 10 inches tall, and it's 4 and 1/4 inches wide when folded.  Basically I folded a full 8 and 1/2 by 11 sheet in half the long way, and cut an inch off the bottom.  I was going to use the full sheet, but I felt this size fit my image a little better.

The ice cream sundae was cut from the Sweet Treats cartridge at 10 inches. 
The glass is cut from a really cool paper that is sort of pealized and it's a lavendar color. I added some Diamond Stickles for an accent. 

The pink layer is embossed with the Spots and Dots Cuttlebug Folder.

The brown layer is completely covered in Glossy Accents and I added real sprinkles.

The top piece of whipped cream was embossed with the D'vine Swirls Cuttlebug folder.  There was a cherry in the original design, but I decided not to use it.

I had cut the banner along the bottom, and I made it wavy by curling it around a pencil.  The sentiment on it is stamped from a Hero Arts set called Cupcakes.


This box was cut from Tie the Knot at 8 inches.

All I did to embellish it was add little dots of Glossy Accents and put real sprinkles over them.  It did take a little time and patience, but I think it's a fun little detail that makes this project unique.

If you're ready to continue the hopping fun please head on over to Cathryn's Blog.

The April Bunny Blog Hop!


Hello everyone :)  I hope you'll join in on the fun of this fantastic blog hop!  There are some AMAZING prizes up for grabs so you won't want to miss out on your chance to win :)

I am the third stop on this hop.  If you'd like to start at the beginning please go visit Jacqueline now to see her project, and also to read about the fabulous give-aways she has in store for you.  

If you have already started the hop you should have just come from Becky's blog

 My project today is super simple!  It would be pretty easy to mass produce for a group :)

The bag was cut from Plantin Schoolbook at 7 inches.  

The bunny was cut from the Easter 2010 Seasonal Cartridge at 4.5 inches.  I ran it through the Cuttlebug folder called D'vine Swirl.

The bow on the bunny is also from the Easter 2010 cartridge, and also cut at 4.5 inches.   

I stamped "You're the Sweetest Thing" using a Close to My Heart set called Piece of Cake.  

For a quick finishing touch I added some green crinkle paper.  

I know there are a lot of fabulous prizes up for grabs today, but I have a tiny one to offer someone who stops by for a visit today :)  It's this cute little embellishment sheet from K & Company.


Isn't it darling?!  If you'd like a chance to win just leave a comment on this post.  When the hop finishes I will draw a winner.  You don't have to follow me, but if you won't be checking back to see if you won you should leave me an e-mail address so I can get a hold of you.  Of course, if you'd like to come back and visit that's awesome too.

If you're ready to keep on hoppin' please head on over to see Candace

Comments for this post are now closed.  Thanks so much for all the kind words :)