Showing posts with label stamping. Show all posts

Tuesday, June 17, 2014

Father's Day Card


I just wanted to quickly share a simple Father's Day card. 

The Snoopy stamp is by Stampabilities.

The sentiment was built using some retired SP & Company stamps.

The embossing was done with the Cuttlebug Swiss Dots folder.

Unfortunately I lost the post it note I wrote all the details on, and the card was given so I can't give you all the measurements.

Thanks for stopping by!

Amber

Wednesday, June 4, 2014

She Believed She Could So She Did


This is a very special card for someone dear to me.

Someone I love very, very much is getting a double mastectomy today.  Instead of a traditional greeting of "get well" I wanted something really encouraging and up lifting.  So I chose this fantastic sentiment "she Believed she could so she did."  I know her recovery won't be easy but I know she will get through this.

The papers are all from the Simple Stories Vintage Bliss 6 by 6 pad.

I inked around the edges of the card with Smoky Slate ink from Stampin' Up.

The yarn is actually very special, it belonged to my grandmother, and I received it in some of her belongings after she passed away.  This card seemed like a fitting occasion to use it.

The AWESOME sentiment is from Stampin' Up's Feel Goods.  I stamped it in Versamark and used white embossing powder.

The piece of patterned paper that the sentiment is stamped on is up on pop dots, and so is the piece underneath it. So this area is REALLY popped up with plenty of dimension.


I decided to decorate the inside a bit as well.

I had this yellow piece that had been used to die cut a shape previously.  I decided to use the leftover piece to make a nice design inside the card.  I just attached the yellow scrap to a white piece of cardstock and then used a paper piercer to accent the shape.

The strip along the bottom is decorated with a couple of tiny brads I purchased from Michael's.

Thanks for visiting!

Amber

Thursday, May 8, 2014

Rain or Shine


I just love cards that have a bit of a scene going on.

I saw a card with a similar layout in one of my papercrafting magazines and decided to put my spin on it.

The papers are from the Dear Lizzy Lucky Charm 6 by 6 pad and the Simple Stories Vintage Bliss 6 by 6 pad.

I used the stamp set Heart-2-Heart # 6 from Papertrey Ink for the clouds and sun.  I used Summer Sun and Bashful Blue inks from Stampin' Up.

The stamp set Rain Boots from SP & Company provided the boots and the sentiment.  The boots were stamped with Regal Rose.  I used my Copics to color over the patterned paper. It toned down the effect of the pattern a little bit and gave them a tiny bit of the illusion of depth.

The grass was made using a Martha Stewart punch.  After I punched it out I inked it with Weathered Wood distress ink.  The sentiment was stamped onto the punched grass with Versamark ink and then I used some Stampendous embossing powder.

The butterfly is an EK success sticker and I used a white Gelly Roll pen to create the line behind it.

I used a Copic Multiliner to create tiny dots all around the gray layer of the card.

Thanks for visiting!

Amber


Tuesday, May 6, 2014

A Simple Butterfly Card


This card went together very quickly and I love that I could use it for a variety of occasions since there's no sentiment on the front.

The base is a standard white A2 card.  The layer is a 3 and 3/4 by 5 inch piece up on Pop Dot's.

The swirl was stamped with the Hero Arts set Brush Strokes using Stampin' Up's Certainly Celery Ink.

I stamped the butterfly directly on top of the swirl.  It's from Maya Road's Ornate Vintage Butterflies and stamped in Stampin' Up's Orchid Opulence ink.

I cut out this entire piece and adhered it to my card layer.  Then I added a mini clothespin at the top.

I tore 3 stripes of washi tape and hand them get longer toward the bottom, aligning all of them with the same edge.

Finally I used a piece of silver glitter tape along the side of the layer.  It was pretty thick to start with so I cut it into a more narrow piece.

Normally I don't make such quick cards, but I'm very pleased with the results here.

Have a wonderful and very crafty day!

Amber

Thursday, February 13, 2014

Smile Brush Strokes Card


This card was HEAVILY inspired by a card from Papercrafts Magazine's Stamp It! Techniques, Volume 2.  You can see this card in a post here.

For the stamped images I used Hero Arts Brush Strokes and Stampin' Up ink colors So Saffron, Gable Green, Pink Passion, and Tempting Turquoise.

Instead of masking (like the original) I made this a separate panel up on pop dots.  This gave me cleaner edges than the masking technique.  I also changed the sequins to just a few in black for a more dramatic effect.  Another thing I did differently was paint on some splashes of Creatology brand glitter using a small paint brush.

I also decided to add faux stitching lines all around the card to give it a different edge.  I just used a Stampin' Up marker in black to do this.

My sentiment comes from a stamp set by Hampton Art and KI Memories called Click Click.

So, although the card is certainly a copy of sorts I put my own spin on it.  I just couldn't resist making this one as I'm excited to have recently acquired this fun stamp set and LOVED the bright colors used in this design.

Thanks for visiting!

Amber


Tuesday, February 11, 2014

You Are My Sunshine Banner Card


The card is a standard A2 size.  With a full size yellow layer on the card front.

The grey layer is 4 1/8 by 5 and 3/8.  It's embossed with a Stampin' Up Cloudy Day folder.

The sentiment is from Close to My Heart's set Treasures.  I stamped it using Stampin' Up's Summer Sun ink.  I hand cut a banner shape and sponged using the same ink color.

The twine is from The Twinery.

The little banners were all punched using Stampin' Up's banner punch that's available this Sale-A-Bration.  I used papers from the 6 by 6 pad Dear Lizzy 5th & Frolic from American Crafts.

This was quick and simple to put together.  The hardest part was attaching the twine without getting a globby mess of extra glue.

Have a wonderful and very crafty day!

Amber

Wednesday, February 5, 2014

Betsy's Blossoms Card


I used a couple of Stampin' Up sets to create this feminine card.

The main set I used was Betsy's Blossoms.  I used Stampin' Up colors Melon Mambo, Pink Passion, Pixie Pink, Pretty in Pink, and Blush Blossom.  The set comes with a lot of great floral images and I mixed and matched them in the different colors to create a little depth and some interest.

The strip across the front was cut to 1 1/2 inches wide.  The beautiful sentiment is from the Stampin' Up set Perfectly Penned.  I stamped it in Melon Mambo.  I inked around the white piece in Pixie Pink.  The whole layer is up on pop dots.

I rounded 2 of the corners on a 1/4 inch setting on my Corner Chomper.

As a finishing touch I used several gems by Irock for a bit of bling.

Thanks for visiting!

Amber

Wednesday, January 29, 2014

I Love You More Than Cupcakes


I think this card would be great for a young girl.  Yes, it's honestly a little "much" and perhaps even a bit tacky - but I like that sometimes :)  It's FUN!

The cool die cut card front comes from my Silhouette and it's design ID #38523.

I used the BasicGrey RSVP 6 by 6 papers.  I also used the same paper stack in yesterday's card for a VERY different look.  It has lots of versatility.

The cupcakes all come from the Hero Arts set Cupcakes.  I stamped them all using Rich Razzleberry Ink from Stampin' Up.  I stamped 3 times on each pattern I wanted to use and then fussy cut them all out.  After I attached all the layers I used some Stickles.  From top to bottom the colors are Fruit Punch, Cotton Candy, and Icicle.  I like that the Cotton Candy color doesn't really have the sparkle so it helps tone it down just a tad and reminds me more of frosting.

Here's the inside.


Very simple, but I think it's fun.  I loved this cupcake paper and originally wanted to use it on the outside of the card instead of the stamps, but it just wasn't working the way I wanted so I stuck a bit on the inside and am happy with the results.

Thanks for visiting me today!  Life is super crazy and to be honest I'm completely stressed, but I'm really trying to make my blogging and crafting a priority again.

Amber

Tuesday, January 28, 2014

It's Your Day Masculine Card


I decided to add a masculine card to my stash today.  I think this could work for either a birthday or a congrats card.

The patterned papers are all from BasicGrey's RSVP 6 by 6 pad.  Oddly enough I started with a couple of the papers I didn't like very well and started challenging myself to work with them.  I love the end result with them.  I thought the yellow paper in the back was a little bleh, but it works well for this.  The green strips I liked, but on the whole 6 inch sheet they looked very busy and I was puzzled on how to best use them.

The card is a standard A2 size, just top folding.  The card base is a vanilla color.  All corners throughout are rounded on a 1/4 inch setting on my Corner Chomper.

The yellow layer is 3 3/4 by 5.

The red layer is 3 by 4.

I created circle and scalloped circle shapes using my Nestabilities.

To create the green pieces I used the pattern as my guide and trimmed strips with my paper trimmer.  Then I followed the lines with my scissors.

The sentiment is from Papertrey Ink's Star Prints and is stamped with Ruby Red Stampin' Up ink.

The faux stitching was done with an Old Olive Stampin' Up marker.

The whole shape is up on pop dots, with 2 layers of pop dots near the centers of the ribbon tails to give additional dimension.

Hope you enjoyed!  I know I always love masculine ideas because they can be tricky :)

Amber

Monday, January 27, 2014

Balloons Card


For this card I used the standard A2 size, but I had it fold from the top the long way.

I rounded the top 2 corners on a 1/2 inch setting using my Corner Chomper.

The faux stitching was done with a Gelly Roll pen.

To create the balloons I started by making my own "patterned paper" of sorts.  I stamped Hero Arts Magical Background in Versamark and embossed it with some clear embossing powder.  The one I use is Recollections Detail Embossing Powder.  After I heat set it and let it cool I began to sponge on color.

 I used Stampin' Up ink colors Pink Passion, Ballet Blue (although there was green on my sponge so it came out a different color) and Perfect Plum.  I softly sponged these colors all over the paper.  When I was done I realized I wanted a much softer effect, so to soften the colors and give them a more faded appearance I went over the whole thing with Colorbox Chalk Ink in Popcorn (it's white.)  I actually applied the pad directly to the colored paper to get a good thick coat.

Now that my custom paper was done being created I went ahead and die cut the balloons from it using my Silhouette.  I used Design ID #30178.

I taped some twine to the back of the balloons, and also used a dab of Crystal Effects right at the bottom to keep the twine from shifting.  Then I used pop dots and adhered the balloons to the card base.  The twine was custom dyed in a swap so it doesn't have an official company color name.

I cut the ends of the twine.  Then I added a mini glue dot to hold them together where I wanted to add the bow.  I tied the bow separately, and then adhered it with another mini glue dot.

The sentiment is from Papertrey Ink's Mega Mixed Messages.  I used the same Versamark and clear embossing powder.  The bling was from  the Michaels bargain bin area.

Hope you love it!

Big hugs to everyone :)

Amber

Monday, January 20, 2014

Vellum Shaker Card


Here's a fun card I put together.

The patterned paper is from the Basic Grey 6 by 6 pad called RSVP.

The card is just a standard A2 sized card, so 4 and 1/4 by 5 and 1/2.

For the vellum shaker I actually cut out a cute envelope using my Cricut and the Just Because Cards cartridge.  I thought that the flaps on the back might show through and I wanted nice curved edges to show.  It turns out you can't even see the folds so I could have just folded the plain rectangle and not worried about it.  *LOL*

The vellum I used is from Papertey Ink.

The sentiment comes from Lawn Fawn's Lunar Lights.  I stamped it in Versamark and embossed it using Stampin' Up embossing powder in Silver.

The inside of the pocket is filled with a bunch of cuts I made  using my Silhouette.  Lots of little hearts and circles.  I also added some sequins.

I used a strip of washi tape along the top of the shaker to look cute, and also to adhere it.  I also used some ATG tape runner along the bottom to finish securing it.  Luckily with this vellum that adhesive isn't even noticeable.  It's also what I used to put the envelope together.

I have been seeing products and projects with acetate and vellum shakers of various kinds.  While no particular project inspired this I must say that it was heavily influenced by those ideas I've been seeing lately.

Crafty best wishes!

Amber

Friday, January 17, 2014

Snow Much Fun Layout


Here's a layout I put together.

I am trying to learn to use more grid formats of various kinds.  Not only do I like the relatively clean appearance it creates, but I seem to have a much easier time decorating small squares as they remind me more of cards.  Honestly I don't like scrapbooking nearly as much as cardmaking so I enjoyed decorating these little rectangles one at a time.  I felt a lot more in my element.

Here's the product used, then I'll give measurement info.

K & Company Staying Warm - these are the fun felt snowman and mittens

Papertrey Ink Wonderful Words: Snow - featured at the top

Fiskars Winter Wishes - for words "Brrrrr! & Bundle Up"

Versa Mark ink and Stampendous Embossing Powder in White were used on all stamped images.

Gelly Roll Pen as used for faux stitching, and to create the loop under the mittens.

Bling was purchased in $1 section at Michael's

Now for the info on measurements and layout.  The photos all started as 4 by 6.  The top 2 stayed that size.  I matted those on cardstock at 6 and 3/16 by 4 and 3/16.

The photos along the bottom are all 3 inches tall.  The side ones are 3 by 3 and the center one is 3 by 6 so that put together they are 3 by 12.  I matted these on a cardstock strip measuring 3 and 1/4 by 12.

For the rectangle pieces of cardstock I embellished they are all 2 and 3/4 by 4 and 1/4.

I had one heck of a time trying to line all these pieces up perfectly, but I think they are close enough to create the desired effect.  I'm happy with the results!

Have a crafty day!

Amber


Wednesday, January 15, 2014

Card Trio


To create this fun little set of cards I create a custom cut file using my Silhouette.  It was pretty simple.  I created a rectangle the size of a card front - so 4 and 1/4 by 5 and 1/2.  Then I drew some lines.  I cut the exact same design onto 3 sheets of 6 by 6 paper from the Bo Bunny Ambrosia paper pad.  I did this all at once by grouping my design, and then copying it twice so I could have all 3 on the mat.  After cutting I just shifted the colored pieces around like a puzzle and adhered them to cards.


For the center I used a couple Nestabilities dies.  I cut a scalloped circle in kraft cardstock and a regular circle in white.  The sentiment is from Stampin' Up's set Elementary Elegance and I used their Mellow Moss ink.

These were very quick to put together and I like that they form a cohesive set.  I intend to make a similar version of these that say "Thank You" and package all 6 together in a set to give someone.

I would like to share the file I created with you, but I need to figure out the best way to do that and simply don't have time to fiddle with it this morning.  Wish me luck in figuring that out and hopefully I will share the file - and perhaps a video when I make the thank you cards to complete the gifts.

Have a crafty day!

Amber

Tuesday, January 14, 2014

Love Ya Card


I thought this was a fun Valentine.  Not traditional at all with a more graphic feel and funky colors.

The background paper was just white cardstock that I stamped my own background onto.  The stamp I used is by SP & Company from their Vintage October Line. It's called Chevron Chase.

I cut the Polaroid frame shape out using my Silhoutte, but of course you could do it with a paper trimmer as well.  There is a layer of vellum behind the frame and it's up on pop dots.  I used the vellum to soften the design behind my balloons without completely covering it.  The effect came out even better than I'd hoped.

The heart balloons were all stamped using SP & Company's Artsy Heartsy.  I used the ink colors marina Mist from Stampin Up, Taffy from Close to My Heart, and Lovely Lilac from Stampin Up.  The outlines were all stamped separately using Memento Tuxedo Black.  After the hearts were all stamped I carefully cut them out and then covered all the hearts with Crystal Effects.  It didn't really show in the photo but the hearts are all super shiny.  I had to let them dry completely before completing the next steps.  I flipped them over and taped string to the backs of them to turn them into balloons.  The hearts are attached with some glue dots - thicker ones that add some depth.  I fed the string down in between the frame and the vellum layer.  Then I tied a tiny bow where the strings are ending.

The frame is stamped with a sentiment from that same Artsy Heartsy set and Memento Ink.

I hope you enjoyed my project today :)  I'm really trying to think outside the box and try some new things and I wanted to experiment with the Valentine's Day theme.

Have a wonderful and very crafty day!

Amber

Monday, January 13, 2014

Thanks a Bunch Card WIth a Tag


This fun little card features a pocket on the front to hold a tag.  When you pull the tag out this is what you see.


I just love that!  Who couldn't smile when reading such a sweet thing :)

The patterned paper is from the Dear Lizzy 5th and Frolic 6 by 6 pad.  I inked the edges of the main layer with some Regal Rose ink by Stampin Up.

I did all my die cutting using my Cricut.  The pocket that holds the tag was cut using a shape from Fabulous Finds and altered it in Cricut Craft room by getting rid of a window it had in the center and stretching it out.

The label shape came from Ashyln's Alphabet.  I stamped on that label using a sentiment from SP & Company's Mini Card Creations 2 and the same Regal Rose ink I did the edges with.  The gems are all from Irock and the label is up on foam adhesive.

The tag was cut using Platin Schoolbook.  I ended up welding 2 of the same tag together so that I could get a longer tag without drastically altering the shape at the top. I put a touch of twine from The Twinery along the top.  I used a Gelly Roll Pen to do some stitching lines and write "Pull Here."  The stamp is from the Inkadinkado set Friendly Advice.  I stamped it in Versamark and then used some Stampendous brand embossing powder in White.

The ribbon is Pleated Satin Ribbon from Stampin' Up.

Friday, January 10, 2014

Circle Valentine Card


Here's a little Valentine I put together.

I used my Silhouette to create a simple circle card.  It's 5 inches in diameter.  I cut a grey circle to cover the entire card front and hide the fold.  I sprayed that layer with some Marshmallow Glimmer Mist.

I cut a frame in some dark grey cardstock to give a nice clean edge to the card.

The heart was cut from plain white cardstock.  I sponged the Distress Ink colors Peacock Feathers, Seedless Preserves, and Picked Raspberry.  Then I ran the colored heart through my Cuttlebug folder Textile.  After the embossing I used a little Weathered Wood Distress Ink across the embossed parts to give a little more depth.  I added the heart to the card with a thin layer of foam tape.

The fun banner was also cut from my Silhoutte.  It's image id is #38321.  I stamped on the banner with a Martha Stewart Valentine's set using Versamark ink and then I embossed using some Stampin' Up embossing powder in silver.  I placed a thin layer of foam tape in the center of the banner, and some thick pop dots on the sides so the banner would sit a little higher than the heart.

Wah lah!  This card was actually pretty simple and went together really quickly, but I think it has a big impact.

Thanks so very much for visiting today :)

Amber


Monday, January 6, 2014

Love You Card


I thought I'd put something together that would work well for Valentine's Day.

All of the papers i used are from the Dear Lizzy 6 by 6 paper pad Lucky Charm.

The card is a standard A2 size, so 4 and 1/4 by 5 and 1/2.

The notebook layer is 3 and 3/4 by 5.

The kraft colored layer is 3 by 4 and 1/4.

The strip along the bottom is 1/2 inch wide.

The wooden element is from Studio Calico.  I stamped on it in Night of Navy Ink by Stampin' Up.  I used the SP & Company set Mini Card Creations 1.

The heart was cut with my Silhouette.  I put it up on pop dots and went around the edge with Cotton Candy Stickles.

The last embellishment was just a strip of washi tape.

This was pretty quick to put together and I love the eclectic mix of patterns.  What a fun paper pad to work with, it's got a whole lot of different things in it!

Thanks for visiting!

Amber

Tuesday, December 31, 2013

Gingerbread Card


This adorable gingerbread was stamped from SP & Company's Cutest Gingerbread man set.  I colored her with Copics.  Her cheeks have some Stickles and I used Liquid Pearls on her mouth and frosting.  I used real buttons to cover her stamped ones.

The sentiment came from the Hero Arts set called Sending Holiday Cheer.

To make the card more fun I added a couple of little rolling pins I'd gotten in a pack of holiday shaped buttons.  Then I finished off with a whole bunch of sequins

This is the very last holiday card I have to share!  So, now I can move on to more current projects :)

Thanks as always for visiting me :)

Amber

Monday, December 30, 2013

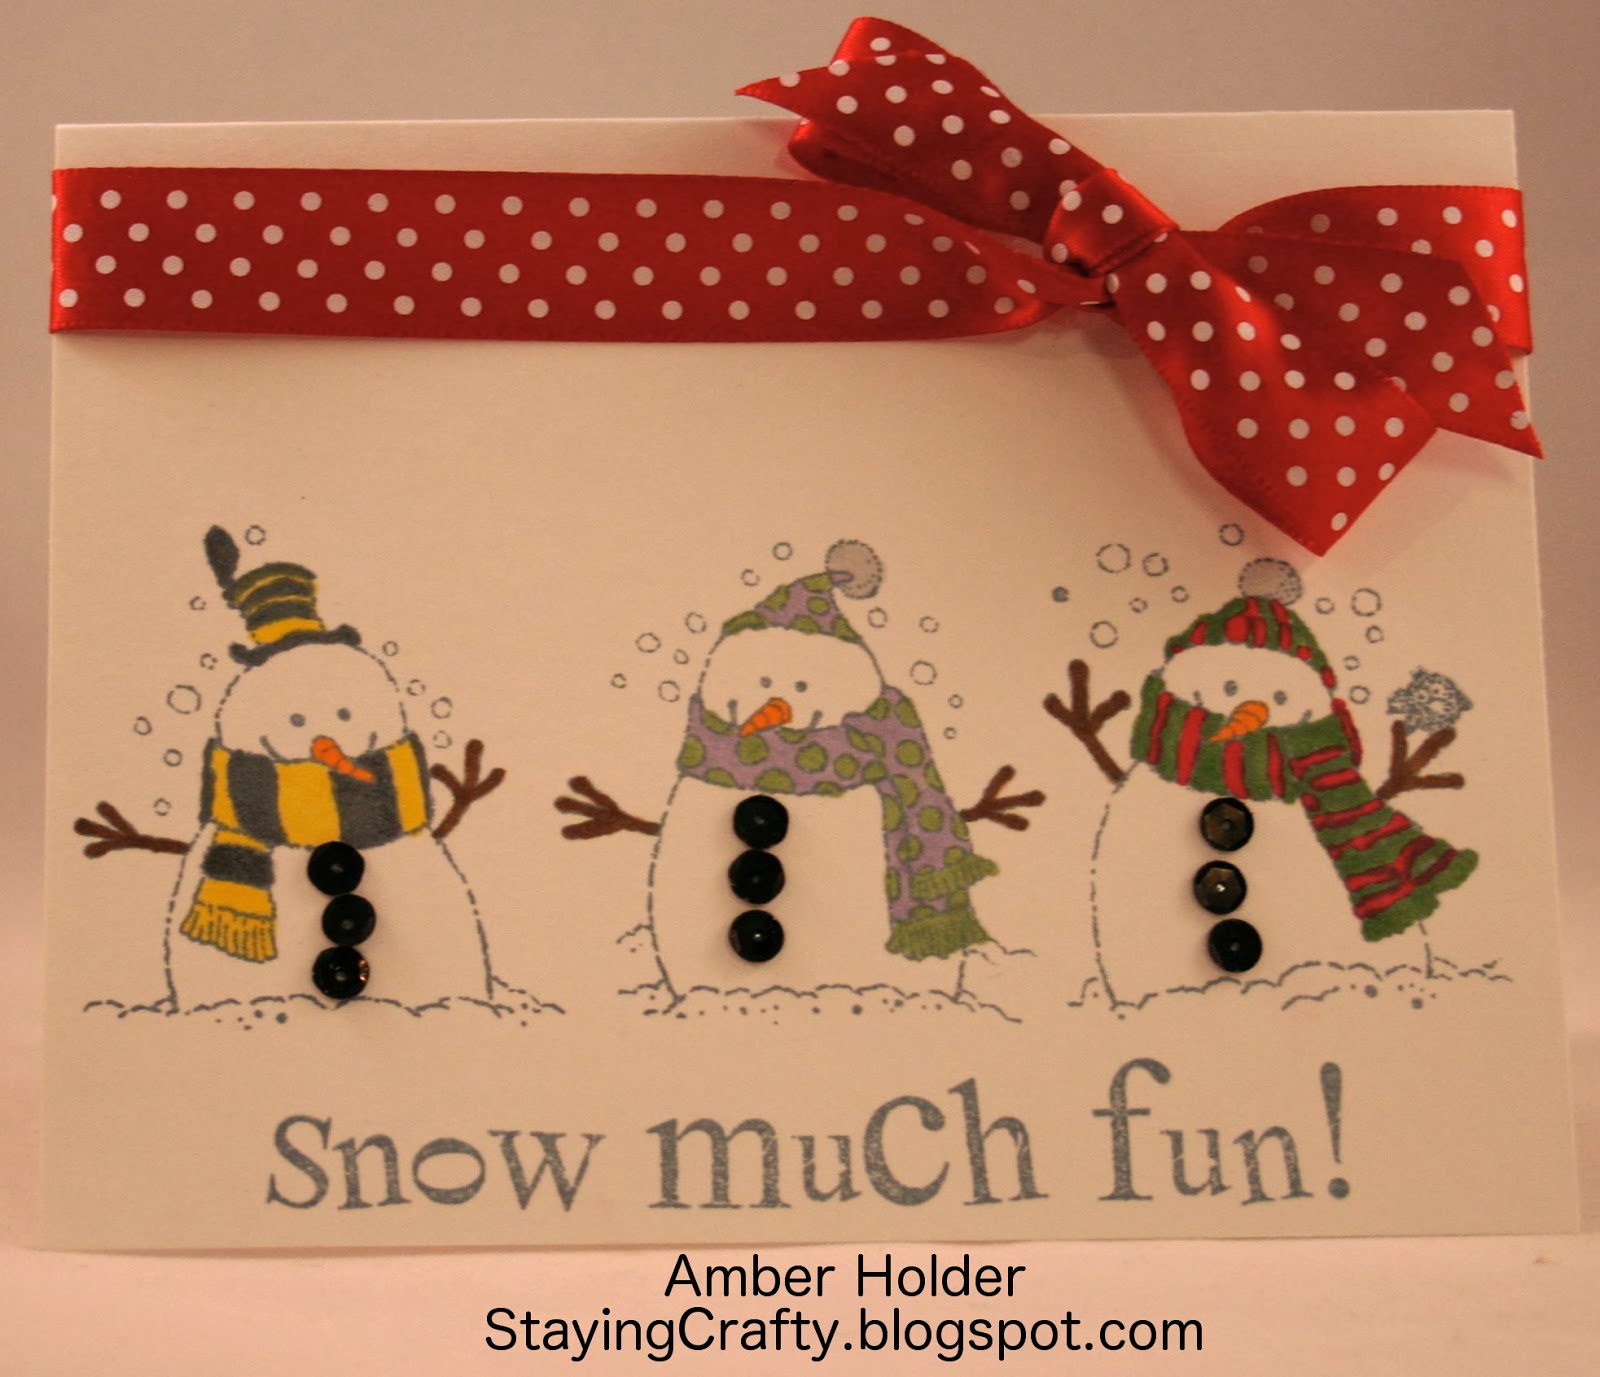
Snow Much Fun Card


I  just LOVE these adorable little snowmen.  I used the Close to My Heart set Flakey Friends.  I just love their round little bodies.  I colored them with Copics and added sequins for their buttons.

The ribbon is from Papertrey Ink.

I can't help but smile when I look at the cute little faces on these guys :)

Amber


Saturday, December 28, 2013

Swirly Snowflake Card


Here's yet another one of my holiday cards.

This one started with a cut from my Silhouette.  It's called Swirly Snowflake.  After cutting it out I embellished it with some blue and clear rhinestones.

The sentiment is from the Fiskars set Winter Wishes.

I thought it looked too plain, so I sponged the edges of the card and I liked the way it softened the look.

Simple and quick, yet still elegant.

Amber