Showing posts with label Scrapbookaholic By Abby. Show all posts

Monday, August 22, 2011

Trio of Mini Halloween Cards


Hello Everyone!

I am so excited for Halloween coming up.  My husband and I really enjoy the holiday, so I figured I'd start nice and early on some fun projects.

This fun little trio of cards is my last project as a design team member for Scrapbookaholic By Abby.  It's been SO much fun!!!  Be sure and head over there today to see the rest of the design team's fabulous creations.

The cards are all 3 by 3 black cardstock.  

I went around the edges with my Sakura Gelly Roll pen.  It writes so smoothly and really showed up well against the black.

All of my images are cut from the Cricut Cartridge called Happy Hauntings.  I cut them all at 2.5 inches, but I had to use real dial size for the bride of Frankenstein head because she was a tiny part of a larger frame.

I used three fun colors of twine from The Twinery in Lilac, Mandarin, and Stone.

The images are all attached with pop dots to give them some dimension.  I used some Stickles for Bride of Frankenstein's hair and a did some inking and embossed lines on the pumpkin (but they didn't show at all in the photograph *LOL*)

Thanks so much for stopping by!  Being on this design team has been a lot of fun :)  I've been glad to share the fun with the rest of the team, and would like the thank the lovely Abby for having me as part of it!

Monday, August 8, 2011

The Write Stuff Layout

Click on the Photo to See it Enlarged.
Today's layout is one that I whipped up for the latest challenge over at Scrapbookaholic By Abby.  It's a Back to School Challenge.  Be sure and head over there to check out what she and the other ladies made, as well as be able to link up your own creation.

I started off with a 6 by 6 inch sheet from the Echo Park Summer Days pack.  The lines sort of reminded me of lined paper for writing.

I layered it onto an burnt orange colored piece that's 6 and 1/4 square.

I added a pencil from the Simply Charmed cartridge.  I embellished it with some Sakura gel pen, some Stickles, and some googly eyes.

I spelled out "You've got the write stuff" using some flat letter stickers, my gel pen, and some Thickers.

I finished off this area with some green and pink buttons in the corners.

All of my photo mats are 3 by 5.

For the pink strip along the bottom it's about 1 and 3/4 inches wide.  I punched it using the EK Success Open Scallop border punch.

Monday, July 25, 2011

A Cut Above the Rest


When I think of summer I think of yardwork!  *LOL*  It's actually something I dread, but I thought I'd make the idea of mowing the lawn look cute for this card.

This is for the latest challenge over at Scrapbookaholic By Abby.  The theme is anything summer.

I started off with a standard A2 sized card base in green.
I cut a white layer at 5 and 1/4 by 4 and stamped it using the Hero Arts Clouds background stamp.

I used my Creative Memories Cheerful Seasons Cricut Cartridge to cut this little lawnmower at 3.5 inches.  To make it cute I did some faux stitching and some dots using my Sakura gel pen.  I also added a couple of mirrored IRock gems to the wheels.

I created a fun little banner that is just hand cut and I stamped "A cut above the rest!" using Pink by Design's Simply Everything set.  I curled the banner and then used pop dots in the center, but glue on the ends so that it stayed very curled looking on the card.  I added a little bee in front of it, hoping to make it look like the bee is pulling the banner.

I finished off with some more gel pen stitching around the edges of the card.

Make sure and head on over to Abby's Blog today to check out the rest of the DT projects!  You can also enter your own project for the chance to win some awesome Sakura gel pens.  They really are wonderful to work with and can add a lot of great detail to your projects so it's a pretty sweet prize :)

Monday, July 11, 2011

The Magic Wand Layout


This is a layout of my daughter from last Halloween.

I have created this for the latest challenge over at Scrapbookaholic By Abby.  She is challenging everyone to use bling.  I used gems and glittery letters so I have lots of bling on my project, but it's certainly one of my favorite things :)  


I started off with a 12 inch piece of purple cardstock and added a sheet of paper from a 6 by 6 pad of Basic Grey paper from their Kioshi line in the top right corner.  

I placed little bits of different colored bling gemstones in the centers of some of the flowers.  Then I started spelling out my title using some sparkly Thickers.  I added a piece of satin ribbon along the very bottom of that paper.

I added another small strip of paper from that pad below it.  I could have used a full 6 inch sheet again, but since a lot of it would have been covered by a picture I cut a strip that was about 2 and 1/2 inches wide and just a little bit got covered.  I finished spelling the title with the Thickers on this piece.

All of my photos are 4 by 6, but the one on the bottom right is partially covered by another photo and is now about 4 by 4.

I did my journaling on the small block of purple that shows from the original sheet.  I used my Gelly Roll pen from Sakura and it worked great even on the textured cardstock.

If you'd like to play along and join in on the challenge you can head on over to Abby's blog to enter your project for a chance to win an awesome prize from Kich N Blues.  

Here's the basic rules:
Link your ORIGINAL post with your project up to Mr. Linky (on her blog)
Mention that your project is for her challenge
Project must be entered by the deadline before Mr. Linky closes.
Project must be on the challenge topic.
Have fun!

Monday, June 27, 2011

Patriotic Card


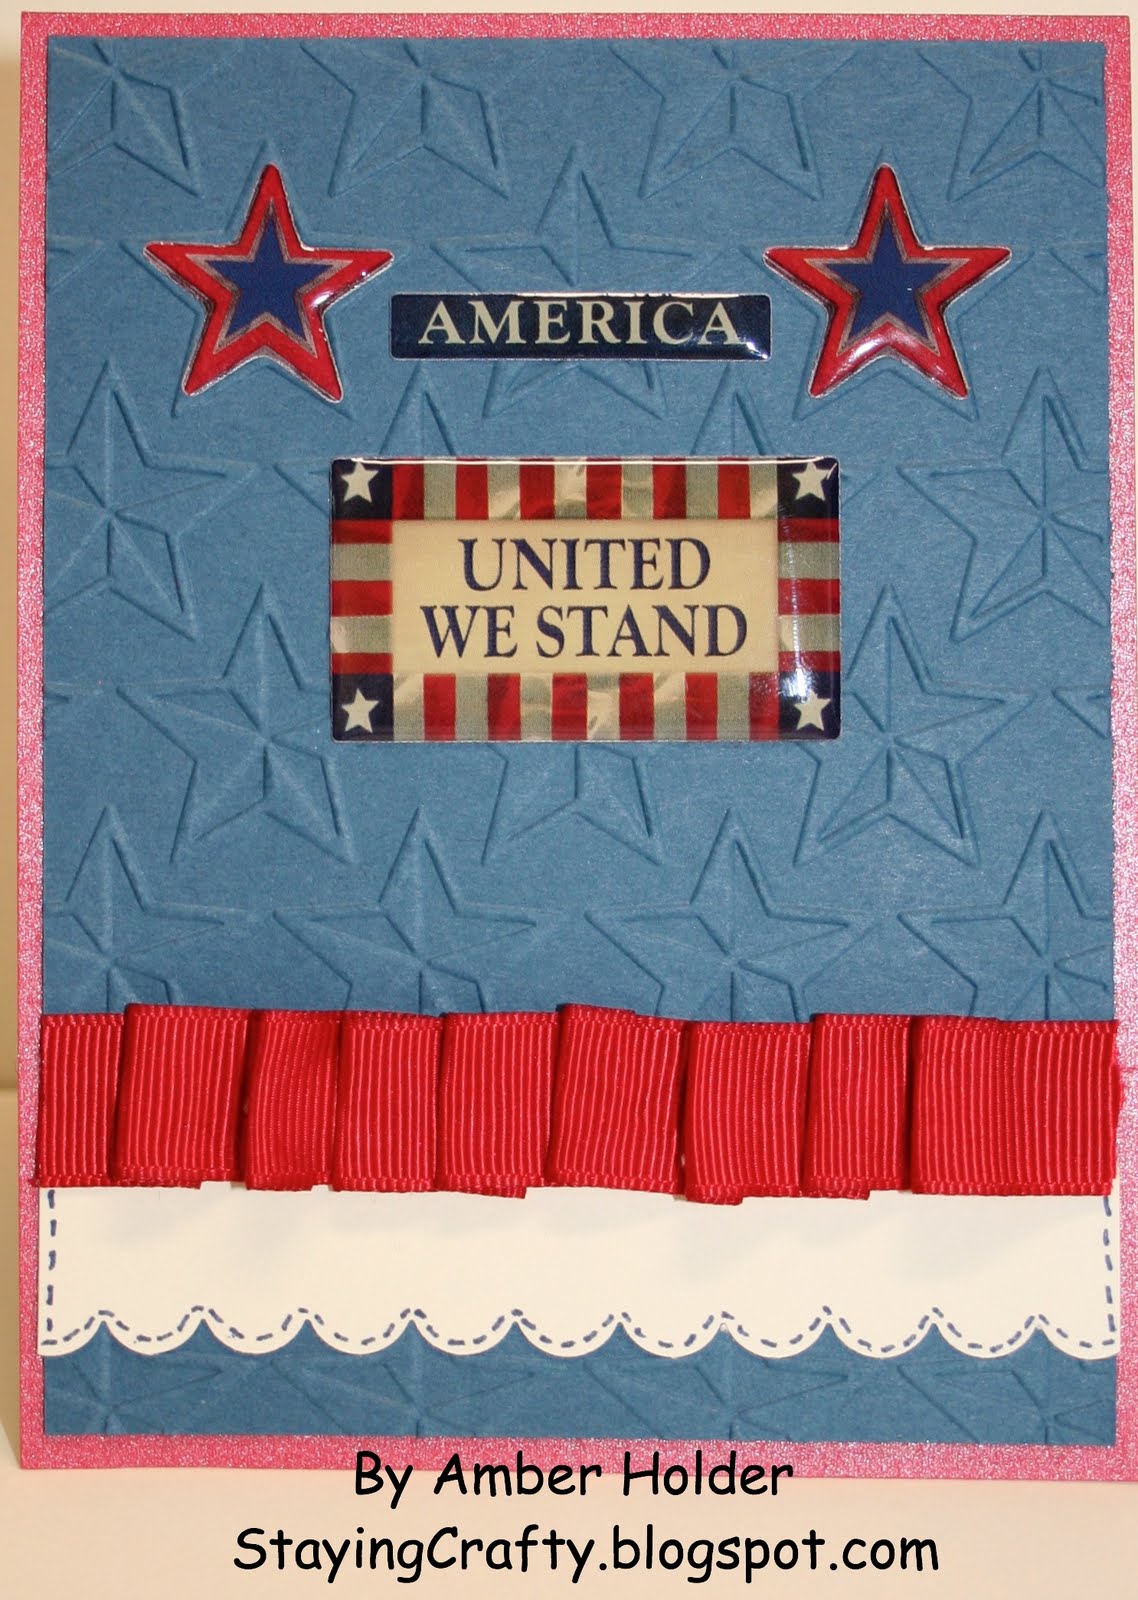
It's time for another challenge over at Scrapbookaholic By Abby and this time around it's to use red, white, and blue.  

I kept my card very simple.

The front of the card is a shimmery red cardstock.

There's a blue layer that is 4 inches by 5 and 1/4 inches embossed with the Cuttlebug Stars folder.

There is a 1 inch strip of white cardstock punched with the Stampin' Up scallop border punch & accented with blue faux stitching lines.

I pleated some red grosgrain ribbon.

The embellishments are all from K & Company.

Be sure and head on over to Abby's blog to see the creativity of the entire design team and also to enter your own project for the chance to win a fabulous prize :)

Here's the basic rules:
Link your ORIGINAL post with your project up to Mr. Linky (on her blog)
Mention that your project is for her challenge
Project must be entered by the deadline before Mr. Linky closes.
Project must be on the challenge topic - this time around it's to use the colors red, white, & blue.
Have fun!

Monday, May 30, 2011

Graduation Card


I'm showing you the photo of the inside of the card first because I think it's actually cuter than the outside!  *LOL*  
 
This is my project for the latest challenge over at Scrapbookaholic By Abby.  See the end of the post for more info on that.  

This is a standard A2 sized card.  I printed an image from the Kich N Blues collection called Kich Graduates.  I colored her in with some Copics and some Stampin' Up markers.  I also used a white Sakura gel pen to bring out the outlines in the black areas.   

For the sentiment I stamped "Congrats to You" from SP & Company's Mini Card Creations 1.  I cut it out using a scalloped oval Nestabilities die and then used the same ink I stamped with to sponge it and give it an interesting look.  I cut a larger scalloped oval in green and gently sponged the edges of that layer with the same blue.

For the bottom I added a strip of patterned paper by DCWV that is 2 inches tall.  I did NOT put adhesive on the top or in the middle, which creates a pocket for money or a gift card.  I decorated the top with a strip of blue cardstock that I punched with the Fiskars Threading Water punch.
 
I finished off with some stitching lines done with a Stampin' Up marker.


Here's the front of the card.  The whole card front is covered with the same patterned paper as the inside pocket.

I added a grey layer that is 3 and 1/2 inches by 4 and 3/4.  To the bottom of that I added a piece of blue cardstock that is about 2 inches tall.  It's punched using the Stampin' Up Scallop Edge punch.  I stamped the sentiment "It's Your Day!" from SP & Company's Ultimate Sentiments 1 using some Craft Ink from Stampin' Up.  

The graduation cap is from the Everyday Pop Up Cards Cricut Cartridge.  That cartridge has a lot of great images that don't have anything to do with pop up cards.  I cut it at 2.25 inches and blinged it up with some various colors of Stickles.

To finish of the front I did some more stitching lines and tied a ribbon.  

Please head on over to Scrapbookaholic By Abby to see what the rest of the team came up with and enter your own project for the challenge!  
 
We have some really great prizes for this one!!!  3 people will get the Kich N Bleus Grad Collection and we also have $20 Gift Certificate from KaDoddle Bug Designs.  Fun, huh?!

Here's the basics of the rules, but be sure and review them again on when you get to Abby's blog.  

Link your ORIGINAL post with your project up to Mr. Linky (on her blog)
Mention that your project is for her challenge
Project must be entered by the deadline before Mr. Linky closes.
Project must be on the challenge topic - this time around it's graduation.
Have fun!

Monday, May 16, 2011

Hello Kitty Box


Hello everyone!  Today the fabulous Abby is having a new challenge starting!  She is challenging everyone to make a bag or box using Hello Kitty.  If you don't have any Hello Kitty stuff don't worry - just search online for pictures like I did.

For my project today I searched on Yahoo for some Hello Kitty images.  I just printed one I found and cut it out.

I used the Wrap it Up Cricut Cartridge to cut the box at 8 inches - which is the biggest it would go on an 8 and 1/2 by 11 inch sheet of cardstock.  It is actually very small when put together.  Each side is about 2 and 1/4 inches square.  So, it's super cute and would be nice for some small candies or a piece of jewelry.

For the top of the box I tied a ribbon around the lid, then added my image on pop dots, and finished off with the adorable sentiment "Luv Ya!" from SP & Company's Artsy Heartsy stamp set.  I actually stamped it onto the top of a post it note and then cut it out, so I didn't even have to bother with adhesive.

For the sides of the box there were 2 that cut as plain squares. For those I just added 2 and 1/4 inch square pieces of patterned paper from the Cricut Celebrations stack - all the other papers are from that stack as well.  


The other sides have this fun balloon design on them.  I added a piece of patterned paper behind the balloons - otherwise the box was open and things would fall out.  I had to hand cut the center balloon so its' a little screwy.  *LOL*  The other 2 balloons cut as a layer for the box.  After the balloons were all assembled I added some dashes and dots around the frame and a little bit of green bling in the corners.

Now that you've seen my project be sure and head on over to Scrabookaholic By Abby.  You can see the rest of the Design Team's creations and also enter your project for a chance to win a fabulous Hello Kitty watch. 

Here are the rules to enter your project into the challenge!
Link your ORIGINAL post with your project up to Mr. Linky (on her blog)
Mention that your project is for her challenge
Project must be entered by the deadline before Mr. Linky closes.
Project must be on the challenge topic - this time you need to make a bag or box and use Hello Kitty.
Have fun!

Monday, April 25, 2011

Mother's Day Card


Hello everyone!

This card is for the 4th Scrapbookaholic By Abby Challenge - and the theme this time around is Mother's Day! 
I kept this one pretty simple.
*I started off with a standard A2 sized card using Kraft cardstock

*I stamped the front of the card using SP & Company's Scripty Scripts set

*I cut a lacy rectangle from A Child's Year Cricut Cartridge at 4.62 inches (I use a Gypsy so sometimes my sizes are weird)

*I added some stitching using a Stampin' Up marker around the lace

*I added some ribbon and a K & Company flower embellishment to my lacy rectangle before adhering it to my card.

*I finished the front by adding a silhouette of a mother and daughter, also from A Child's Year cut 1t 2.45 inches.


Here is the inside of the card.

I spelled out "Hoping you have a fabulous Mother's Day" using a couple Mix 'n Match sets from SP & Company.

The rest of the team is super talented - so make sure and check out what they created to help inspire your creation as well.

This time around the sponsor is Sakura of America and there's some of their awesome gel pens for a prize!
Here are the rules for entering your own project for the chance to win a prize:
Link your ORIGINAL post with your project up to Mr. Linky (on her blog)
Mention that your project is for her challenge
Project must be entered by the deadline before Mr. Linky closes.
Project must be on the challenge topic.
Have fun!
Head over to visit Abby, the rest of the Design Team, and to link up your own original creation!

Monday, April 11, 2011

Glittery Fishbowl Card


Hello everyone :)

Today's project is for the brand new challenge over at Scrapbookaholic By Abby.  The theme for the next couple weeks is an animal and the color orange.  This is in honor of ASPCA's month against animal cruelty. 

I'm not entirely sure if a fish really counts as an animal, but I thought this idea was so cute that I ran with it.  

The little fish is from the Smiley Cards cartridge and is cut at 1.75 inches.  Although you can't see it in the photo very well I embossed the yellow part of the fish with the Tiny Mosaic Cuttlebug Folder.  I also drew some lines on the fins, and a few details on the lips.

I created a window using the fish tank from Create a Critter at 3 inches.  I used my Gypsy to make a rectangle that is 4 inches by 5.25 inches.  I positioned the fish tank in the middle of that piece and cut it out.  

I created a pocket with 2 sheets of acetate and I placed Martha Stewart's Turquoise colored glitter inside it.  All I did to create the pocket was cut 2 sheets at 4 by 5.25 inches.  I put Score Tape all around the edges, being really sure that all the corners were sealed and there were no gaps for the glitter to escape.  I added some glitter in the middle before sticking the 2 sheets together.

I decided not to have the window show all the way through my card.  So, I cut a white piece the same size as the other layers at 4 by 5.25.  I attached my fish to the front of it.  Then I attached the white layer to the card, and the blue layer with the glitter window inside it over the top.

The card is a standard 4 and 1/4 by 5 and 1/2 - so there i a nice little border of the pink card base showing on the front.

Now that you've seen my creation - why not go ahead and head over to Scrapbookaholic By Abby to see what the other girls came up with and enter a project of your own for a chance to win a fabulous prize :)  This time it's a $15 gift certificate to Oh My Crafts.  Plus - this time around it's also building awareness of a really great cause this month. 

The rest of the team is super talented - so make sure and check out what they created to help inspire your creation as well.
Here are the rules for entering your own project for the chance to win a prize:

Link your ORIGINAL post with your project up to Mr. Linky (on her blog)
Mention that your project is for her challenge
Project must be entered by the deadline before Mr. Linky closes.
Project must be on the challenge topic.
Have fun!
Head over to visit Abby, the rest of the Design Team, and to link up your own original creation!

Monday, March 14, 2011

Something on a Stick Day


I am so excited to share this fun project with you!  It is my first project as a designer for Scrapbookaholic by Abby.  She challenged us to pick a random holiday for this month, and there is a great list of unusual holidays on this page for reference.  I chose Something on a Stick day which is celebrated March 28th each year.  What better for that idea than a corn dog, right?!  

I wanted to create a fun shaped card - so I used my Gypsy.  The shape is from Just Because Cards, but I did mess with it to get the size I wanted.  I took the aspect ratio link off so that I could skew it any way I wanted.  With the actual size button on it is 4 inches wide by 5.45 high.  I welded 2 of them together using a rectangle to make the shaped card using Kraft colored cardstock.

For the patterned paper layer I used Echo Park paper and cut that same shape at 3.39 wide and 4.78 high with the actual size button on.

Sorry if that portion is confusing to those that don't manipulate the images a lot, but remember you can use a shaped card already on a cartridge and get a similar look if you want :)

The corn dog is from the Carousel Lite cartridge.  I thought it was so adorable I was pretty excited to use it.  I cut it out at 3.5 inches.  I cut it twice.  Once in Kraft color, and once in burnt orange.  On the burnt orange piece I cut off the stick portion so that the Kraft colored stick would show through.  I glued both of these pieces to a white cardstock, and hand cut around it to create an extra wide shadow.  Then I added some yellow and red Stickles to mimic Ketchup and Mustard.  I wish real condiments were so glittery and fun!  *LOL* 

The banner is from the Wedding solutions cartridge and is cut at 1.25 inches. I took a stamp from Pink By Design's Simply Everything set and placed it on my block in a curved way to mimic the banner.  After stamping I did some stitching on both the banner and the border of the card. 

I want to encourage you to join in the fun!  Abby would love for anyone and everyone to participate in the challenge for a change to win a wonderful Cosmo Cricket 12 by 12 pack that they so generously donated.  

Here are the rules to enter your project into the challenge!
Link your ORIGINAL post with your project up to Mr. Linky (on her blog)
Mention that your project is for her challenge
Project must be entered by the deadline before Mr. Linky closes - this time it's March 26th
Project must be on the challenge topic.
Have fun!
You can read the rules over on her blog as well when you go to link up :)

So... head on over to Scrapbookaholic By Abby to see all the other designers' fab projects - and also to enter your project for your chance to win!


Monday, March 7, 2011

I feel like celebrating - I've got some fun news :)


Today is an exciting day for me because I get to make a special announcement!  I have been chosen to be a member of the Scrapbookaholic By Abby design team!  I will be having fun doing projects a couple times a month based on different challenges that Abby comes up with, and you'll be able to play along and join in the fun :)

Today Abby is introducing the entire design team!  There's a ton of talented ladies to bring you lots of inspiration.  I hope you'll go visit Abby now to see the whole line up.

Today I have used a fabulous digi from Kich N Bleus.  It's from their Celebrate Collection.  Be sure and stop by their store page if you're interested in viewing the designs for purchase, and you can check out their blog for fun and inspiration.  

The card is the standard 4 and 1/4 by 5 and 1/2 inch size.  The top is embossed with the Tiny Bubbles Cuttlebug Folder.  I used some stitched ribbon that came from the dollar section of Target.  I added a border along the bottom that was punched with the Fiskars Threading Water punch.  The border is about 1 and 1/8 inch tall, and stretches 4 and 1/4 inches across the card front.

I printed the image, trimmed it down to 3 by 4 and 1/4, and colored it in using mostly Stampin' Write makers from Stampin Up and a few Copics.  I matted it on some green cardstock that measures 3 adn 1/4 by 4 and 1/2.  I attached this with some pop dots to raise it up from the card base.

Thanks for visiting!  I hope you like my simple celebration themed card :)  Enjoy meeting Abby's new design team!  I can't wait to get to know them better myself.