Showing posts with label greeting farm. Show all posts

Friday, August 30, 2013

Aloha Card


I ended up with a weird color tone in this photo.  Still haven't ordered my light box so I'm having lighting issues a lot.  Oh well.

The adorable image is from The Greeting Farm and she's Cheeky Beach.  I colored her with Copics and added some Stickles to her hair flower.  I used Fruit Punch and Yellow.  The beach ball is covered in Glossy Accents.

The sentiment is from Mr Cricut Crazy's Summertime fun set.  I used Grapefruit embossing powder by Zing - it's so bright and fun :)

The twine is from The Twinery and I used a little white button from the $1 section of Micheal's.

The paper is from Echo Park's Summer Days 6 by 6 pad.

Thanks for stopping in!

Amber

Tuesday, August 20, 2013

Cheeky Geeky Card


Here's a little card I put together.

The image featured in the center is Cheeky Geeky by The Greeting Farm.  I just think she is the cutest thing.  I colored her using my Copics.  She is up on one thin layer of foam tape for just a touch of dimension and pop.

Oh, and I'll quickly mention the technique I use to stamp her lips.  I ink up the whole stamp with my Tuxedo Black Memento, then I just wipe away the ink from her lips and quickly use a Stampin' Up marker to color them.  Then I stamp and I get everything in black, except the lips have a great pop of color.  I do this for all my Cheeky Cherry collection images.

The papers are from My Mind's Eye Lime Twist Fly a Kite 6 by 6 pad.

I used a Chocolate Chip Stampin' Up Marker to do the faux stitching.

I used a Stampin' Up Scallop Border punch in a couple places.

The orange gems were custom done by me :)  I just took regular clear Irock gems, and after I attached them to my card I colored them with an orange Copic.  Pretty cool, huh?  I think I will have to start doing this a lot more often.  I would test one first though, I tried red and it did not look as nice so I'm glad I did a test run.

The ribbon is from Papertrey Ink and it's their Pure Poppy Saddle Stitch.

Thanks so much for visiting!

Amber

Wednesday, March 27, 2013

Get Well Wishes


I've really been on a kick with my Copics lately.  Too much fun!  Although I desperately want some colors so I can try blonde hair too.  Until then all my characters will be brunette.  *LOL*


The adorable little character is by The Greeting Farm her name is Cheeky Nurse.  She colored with my Copics and there is a tiny bit of Stickles on her eyelids.  To get the red mouth I inked her up normally.  Then I used a baby wipe to remove the dark ink from her lips.   I used a Stampin' Up marker over them to give them their lovely red color and stamped.

The banner outline and sentiment are from SP & Company's Happy Banners set. 

The papers are from the Echo Park 6 by 6 pad Summer Days. 

Thanks for visiting!

Sunday, March 24, 2013

Hello Easel Card


This is just a simple easel card in a standard 4 and 1/4 by 5 and 1/2 size card front.

The adorable image is from The Greeting Farm and she's from the Cheeky Cherry Collection.  Her name is Cheeky Chat, isn't she cute?!  I colored her using my Copics and then added some Stickles to her hair barettes, shoes, eyeshadow, and the heart on the phone.  Then I added Glossy Accents to the phone.


I took this other shot of the card to try to show off the Glossy Accents details a little bit more.


The super cute papers are from the My Mind's Eye Lime Twist Happy Go Lucky 6 by 6 pad.  I have been hoarding this paper with the hello chat bubbles and I knew this was the perfect card to use it for.

For the sentiment I used a chat bubble from SP & Company's Turtle-y Awesome set.  The sentiment is from the Hero Art's Mi Casa set and is stamped in SU's Rich Razzleberry.

I made it for the challenge over at The Greeting Farm Blog.  This is for their Farm Fresh Friday Easel Card Challenge.

I am also linking up over at Docerela Stamps for their Pastel Colors Challenge.

Thanks for looking!

Wednesday, February 8, 2012

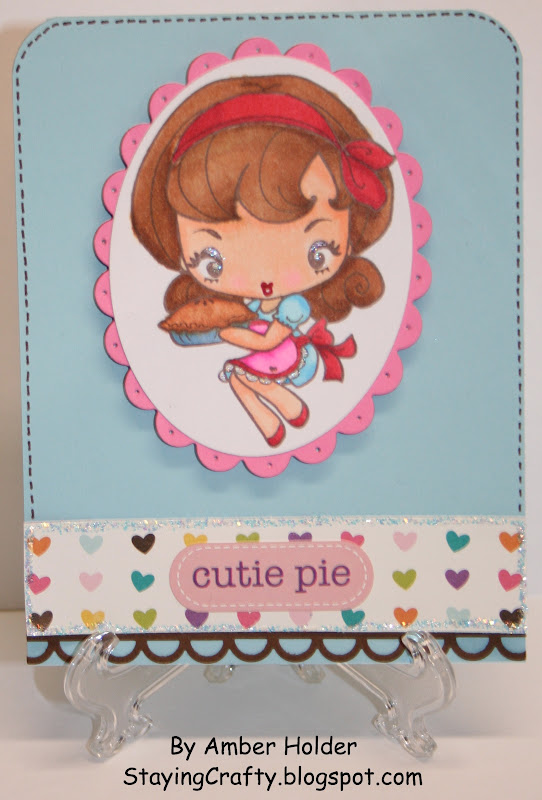
Cutie Pie Card


I decided to use the adorable image called Cheeky Cherry Pie from The Greeting Farm.  I stamped her in some Rich Cocoa Memento ink, all but her lips.  To get just her lips to stamp red what I did was ink up the whole stamp in the brown, and then I used a damp paper towel corner to very carefully remove the brown from her lips.  After the lips were clean I quickly rubbed on some Real Red using a Stampin' Up maker.  I just had to have red lips on her.  I colored her in using a variety of copics.  For a finishing touch I added some Diamond Stickles to her eyelids and apron ruffles.

I used my Nestabilities to cut her out and layer her onto some scallops.  I used my paper piercer to push holes in the scallops.  I pop dotted this up onto my card base.

For the card base I rounded the top 2 corners on a 1/2 inch setting.  I went around the edges with faux stitching lines using a Chocolate Chip Stampin' Up marker.

Along the bottom of the card you see a piece of patterned paper from the Echo Park Little Girl Collection and a sticker from the same collection.  I went around the edges of the paper with some Icicle Stickles.

The scallops along the bottom are actually part of the inside of the card.  I just trimmed a little off the bottom of the card front before decorating it.  I used the EK Success Open Scallop punch.  This is a cool effect because the scallops show on the outside of the card, and also help make the inside cute.  I added the same marker stitching lines to the inside of the card.

Thanks for stopping by!

Wednesday, November 16, 2011

You're Too Kind Glamorous Card


I wanted something glamorous and sparkly to say a very special thank you to a dear friend of mine.
Here's the supplies I used.
Patterned paper from Echo Park's Be Mine Collection.

Corner Chomper on a 1/2 inch setting.
Diamond Stickles.
Black Diamond Stickles.

I Rock bling.

Eyelet Lace border punch from Stampin' Up.
Sentiment from Stampin' Up's Whimsical Words.  Its on die cuts from Nestabilities Labels 1. 

Image from The Greeting Farm, she is called Cheeky Glamour.

Copic Markers.
Oval and Scalloped Oval Nestabilities.

I spent a long time coloring and cutting my image, and then added some Diamond Stickles to the centers of her eyes, her eyeshadow, her boa, and the heart on her mirror.  I wanted it to look like she was sitting on the punched border piece, so I cut the oval Nestabilities a bit to make that look work.

It's got a lot of sparkle in person. 

Yay for playing with my new Copics.  I only had really cheap white paper on hand, so I don't think that helped with attempting to blend - but since I have no idea what I'm doing anyways I doubt it mattered much ;)  *LOL*