Showing posts with label Cricut. Show all posts

Monday, January 13, 2014

Thanks a Bunch Card WIth a Tag


This fun little card features a pocket on the front to hold a tag.  When you pull the tag out this is what you see.


I just love that!  Who couldn't smile when reading such a sweet thing :)

The patterned paper is from the Dear Lizzy 5th and Frolic 6 by 6 pad.  I inked the edges of the main layer with some Regal Rose ink by Stampin Up.

I did all my die cutting using my Cricut.  The pocket that holds the tag was cut using a shape from Fabulous Finds and altered it in Cricut Craft room by getting rid of a window it had in the center and stretching it out.

The label shape came from Ashyln's Alphabet.  I stamped on that label using a sentiment from SP & Company's Mini Card Creations 2 and the same Regal Rose ink I did the edges with.  The gems are all from Irock and the label is up on foam adhesive.

The tag was cut using Platin Schoolbook.  I ended up welding 2 of the same tag together so that I could get a longer tag without drastically altering the shape at the top. I put a touch of twine from The Twinery along the top.  I used a Gelly Roll Pen to do some stitching lines and write "Pull Here."  The stamp is from the Inkadinkado set Friendly Advice.  I stamped it in Versamark and then used some Stampendous brand embossing powder in White.

The ribbon is Pleated Satin Ribbon from Stampin' Up.

Sunday, December 29, 2013

Happy Holidays Card


I used the Cricut Cartridge Jolly Holidays for this one.

I added some Stickles and Liquid Pearls to jazz things up a bit.

I added faux stitching around the edge of the card with a Stampin' Up marker.

I don't use sentiments made from die cuts very often, and normally opt for stamps instead.  It was fun to make the sentiment such a large part of the card.

Amber

Thursday, December 26, 2013

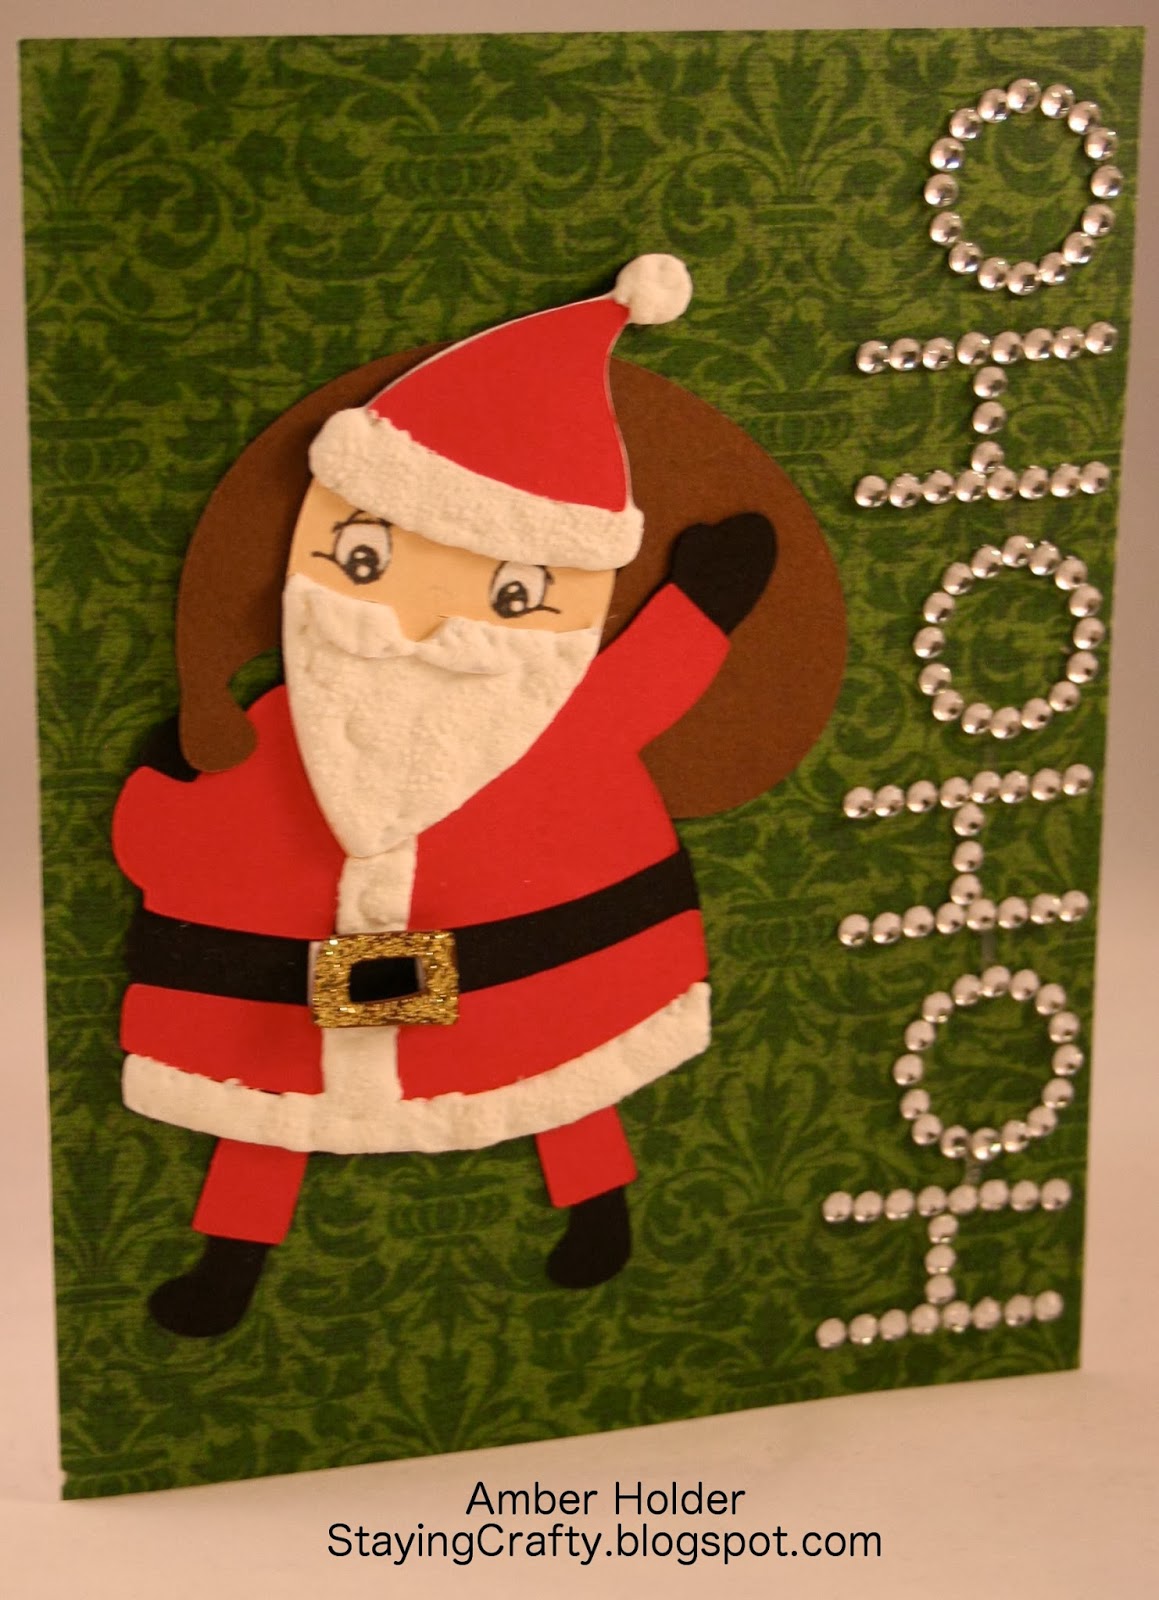
Santa Card


Here's another one of the Christmas cards I made this year.

The santa was cut from the Winter Frolic Cricut Cartridge.  I stamped his eyes from Peachy Keen's Wide Eyed Kids.  To embellish him I used some Liquid Applique to make the white parts of his outfit, and his beard fluffy and neat looking.  I also used a some pop dots to pop up his belt buckle, which I covered in gold Stickles.

The Ho Ho Ho sentiment was a bling I purchased at Michael's awhile back.

The paper came from a DCWV Holiday Stack.

Thanks for visiting!

I will be sharing more cards over the next few days.  Sorry I didn't get them up before Christmas, and I don't have all the sizes and details for each, but I'd still love to share with everyone :)

Amber

Monday, December 23, 2013

Snowman Card


I had a lot of fun putting this together.

For the background I created lots of dimension.  I used snowflake stamps from a Fiskars set called Winter Wishes.  I started off with plain white cardstock.  I stamped a layer of snowflakes in Versamark and then embossed them with clear powder.  Then I brayered I very light blue over the whole sheet.  Then I stamped the snowflake in Versamark again and used clear embossing poweder.  Then I went over the whole thing with a medium blue.  For the final layer of color I just stamped some more snowflakes in dark blue.  So, there are 3 colors of snowflakes.  White, light blue, and dark blue.

The ribbon was from the Target $1 spot a few years ago.

The adorable snowman was cut from the Winter Frolic Cricut Cartridge.  I added a cute face from Peachy Keen's Wide Eyed Kids.

I used a couple of colors of Stickles for a little glitter on his accessories.

Thanks for visiting!

I'll share some more Christmas cards in the coming days.

Here's why I haven't been posting...

We're remodeling the kitchen.  The work just started a couple weeks ago, but we were running all over planning and picking things out before that and it's been crazy.  My husband is doing it all himself, plumbing, electrical, etc.  He has to do this on nights and weekends when he's not working so I'll be without a kitchen for a long time!  We are making do with a temporary kitchen set up and lots of plug in appliances, but I don't have an oven, a sink, etc in that area.  I wash dishes in the utility sink in the basement.  I use the microwave and crock pot a lot, and we are making do.  Crazy stuff!

Here's my old kitchen before the demolition.


Here's a recent shot with most of the things already out.  My husband is replacing the sub floor because of some old water damage that happened before we owned the place.


So, as you can imagine, life is a bit chaotic right now!  I have been crafting and will start posting more photos again.  My husband is almost done with the sub floor, and then I won't have a huge hole above the basement dumping wood chips and dust all over (my craft room is in the basement so that definitely has an impact right now.

I'm really excited for our beautiful new kitchen.  Lots and lots of new things!  Pretty much everything except the dishwasher (which we just bought 3 years ago when we moved in) will be replaced.  However, it will be a long time before it's all done.  So I've got to have patience.  Lots and lots of patience :)  I admit it's hard not having a fully functional kitchen, but we are making do without eating out.  It's just hard!

I do hope to be getting back into my blogging habit as of today.  Wish me luck!

Amber

Thursday, September 19, 2013

Our Decorations Halloween Layout


Here's a simple layout I whipped up to show off the Halloween decorations my kids made last year.

The patterned papers are from the DCWV stack Midnight Spell.

The black square is 10 and 1/2 inches.

I cut 2 patterned paper purple squares. 1 at 6 inches, and the other at 4 inches.

The title was cut using A Child's Year Cricut Cartridge.  The other die cuts are from the Mini Monsters Cricut cartridge.  I thought they went perfectly with the photos.  I added a ribbon to the top of the spider and some Starry Night Stickles to her hourglass.  I added a bit of green Stickles to the leaf on the pumpkin.

That's it!

Thanks for dropping by :)

Amber

Wednesday, September 18, 2013

Wickedly Witchy Card


Here's a Halloween card I put together.

The cuts were made using my Cricut and the cartridge A Frightful Affair.  I actually don't own this cartridge.  Right now Cricut is letting you cut from it for free in their Craft Room Software - for this week only.  So I took advantage of that.

I waned my witch to have a little pizazz and style so I added polka dots of purple glitter to her hat and boots using Starry Night colored Stickles.  Her cauldron is all blinged up with Black Diamond Stickles.  For her brew I used some metallic sequins from My Craft Spot.

For the creepy creature's arms in the window I used Lime Green Stickles.  Looking at it afterwards I think maybe I went a little too bling crazy - but it is a tiny portion of a cut so it would have been hard to use an embossing folder on it and I wanted some kind of detail because I thought it looked too plain before.

The sticker is from American Greetings.

The paper is from DCWV's Midnight Spell stack.

Thanks so much for visiting!

Amber


Thursday, September 12, 2013

Deer Card


To be honest I can't decide if I like this or not.  I don't hate it, but I'm not in love with it either.

Here's how I put it together.

The papers are from the Simple Stories Vintage Bliss 6 by 6 pad.  I wanted to use that cool wood design so I made it the main background.  The edges are rounded on a 1/4 inch setting on my Corner Chomper.

The brads are just from my stash.

The crocheted flowers are actually very special.  My Grandmother hand made them.  When she died I got a bunch of her things, and these were among them.

The fancy shape is from the Ashylyns Alphabet Cricut Cartridge.  The edges are inked with Always Artichoke by Stampin' Up.

The deer is from the Cindy Loo Cricut Cartridge.  I added Glossy Accents to the feet, eye, and nose for a bit of shine and additional detail.  She's up on a layer of pop dots.

There's my project for the day.  Pretty simple and quick.

Amber

Wednesday, July 17, 2013

Ketchup and Fries Card


Here's a little 4 and 1/2 inch square card I whipped up.

The blue layer is 4 by 4.

The cream layer is 3 3/4 by 3 and 3/4  and it was embossed with the Cuttlebug folder Traffic Jam.

The green heart was cut from the Plantin' Schoolbook Cricut Cartridge.  I added some faux stitching with a black marker.

The ketchup and fries were cut from the Fast Food Cricut Cartridge.

Honestly I don't remember which cartridge the plus sign was from, but I added some Yellow Stickles to it.

For the sentiment I hand cut a banner shape and stamped the sentiment from My Pink Stamper's Friend-Tastic set in Brilliant Blue ink from Stampin Up.

I just love putting food in my paper craft projects - I don't know why but I think it's just SO cute :)

Thanks for stopping by!

Amber

Tuesday, March 19, 2013

Sand Box Layout


This layout is simple and was very quick to put together.

One thing I'd like to mention right away is that the color in this photo is off.  The adorable fish paper has a much more rich aqua type color than the photo shows, but the details photographed well so I decided to leave well enough alone.

The fun paper is from the Doodlebug Boys Only collection and is called Skater Stripe (which describes the opposite side accurately.)

The photos are just 4 by 6's.

For the title I used my Cricut and my Gypsy.  I pulled up the Plantin Schoolbook font in my Gypsy and used the shadow just to make it a tad thicker, then I welded the letters in each word together.  When it was cut out I used my Fiskars texture plate called Waves to add a fun element of texture.  I went over the embossed areas in More Mustard ink from Stampin' Up.

The crab and sandcastle are both from the Create a Critter cartridge.  The crab is embossed with the D'vine Swirl folder and the sand castle is embossed with the Swiss Dots folder.  

This is my kind of scrapbooking!  It was quick and simple to put together, but I still feel like it looks personalized and the elements I added fit the photos.

Have a crafty day my friends!


Tuesday, February 26, 2013

Pony Ride Layout


Here's a layout I put together showing my daughter on her first pony ride.

The title letters were cut using my Silhouette Cameo and I glittered the letters using some loose glitter from Martha Stewart in the color Brownstone.

The back 2 layers of kraft and light green were both spritzed using some Glimmer Mist in Tattered Leather.  The green layer has all rounded corners and I used my sewing machine to stitch some orange zig zags on the top and bottom of it.

The fun patterned paper is from Simple Stories and their Harvest Lane line.  There are a couple of small brads on the edge to the right, and on the edge of the paper to the left I rounded the corners.

The border strip was punched using a Martha Stewart border punch.  I also added some brown grosgrain ribbon.

The adorable little horse was cut from the Country Life Cricut cartridge.

The photo mat was created extra long to allow room for journaling.  I used a white get pen to draw dots and dash lines all around it as well as do my journaling.

I'm pretty pleased with this.  The photo isn't the greatest because the sun was in her eyes and she was squinting.  I was also disappointed not to have a better photo of the sweet little pony, but I made the best of it and included the cute horsey embellishment so at least there was one full horse on the page.  
When I have photos I don't like too well, but still want to use I tend to put more effort into custom embellishments than when I'm working with photos I really love.  That way I can really enjoy all the pages I create for one reason or another.

Wednesday, January 30, 2013

Baby Blessings Card


Here's a card I put together for a new baby.

The background was stamped using a Hero Arts stamp called Clouds.  I used Stampin' Up's Bashful Blue Ink.

The grass is from a Martha Stewart border punch.

The banner was hand cut and curled.  It was stamped using a sentiment from Pink By Design's Baby Love.  The ink is Stampin' Up's Pretty Ink Pink.

The die cutting was done using the Cricut cartridge Baby Steps.  There was supposed to be a bird perched on the clothesline as well, but I trimmed it off by hand.  The papers are from the Doodlebug Design 6 by 6 paper pad called Hello Spring.  I used Fruit Punch and Lavender Stickles.  The twine is from My Mind's Eye.  The mini clothes pins were purchased locally I don't know the brand.  I also used a couple Dew Drops in the flower centers.

I had to attach the whole die cut image with foam adhesive because of the clothes pins.  It was hard to get the small areas like the flower stems!

Thanks for visiting my crafty friends :)  I hope you get a chance to do something creative today.

Thursday, February 23, 2012

Gecko Card


I thought this would be fun for a boy.  It would work well as a birthday card, but since the sentiment is generic it could be used for other things, like a congrats on an accomplishment.  I've left the inside blank so I can decide it's use later.

The little gecko was cut from the Cricut American Alphabet cartridge on my E2 at 3.5 inches.  Quick note here, I would NOT attempt to cut it any smaller than that.  His little feet are very delicate to remove from the mat.  I added some little tiny googly eyes to him and put him up on some pop dots.

The twine is Peapod from The Twinery.

The buttons were from the Michael's $1 section.

The stamp is from Unity's Mix Up of Cuteness set.  I stamped it in Versamark and embossed using some white embossing powder.

The paper is from My Mind's Eye Lime Twist Fly A Kite 6 by 6 pad.  

I rounded the corners on a 1/4 inch setting using my Corner Chomper.

Quick and easy!  Thanks a bunch for stopping by :)


Thursday, January 19, 2012

Patterned Hearts Card


All the patterns used are from the My Mind's Eye Lime Twist Happy Go Lucky 6 by 6 pad.

I cut 3 hearts in each pattern from the Plantin Schoolbook Cricut cartridge.

I wanted to make them as even as possible so I used some strips of paper adhered with removable adhesive around the edges to help keep things as even as I could.  It's still not perfect, but far better than I think I would have done without some guidelines.

After I had all the hearts in place I started drawing the lines with my Sakura Gelly Roll pen.  I wanted to create a kind of frame.  When I was done drawing the lines I didn't like the way the corners looked, so I added some pink dew drops.

The sentiment on the bottom is from SP & Company's set I Love Love.  I stamped it in Versa Mark and then embossed it using white embossing powder.

I rounded the top 2 corners on a 1/2 inch setting on my corner chomper.  

As a finishing touch I decided to add Diamond Stickles to the pink hearts.

Wednesday, January 18, 2012

Thank You Teacup Card


Hello Everyone!

Today I have a sweet little thank you card.

The base is Kraft cardstock and it measures 4 by 4 when folded.  The top 2 corners are rounded on a 1/2 inch setting using my Corner Chomper.

The stitching lines were done with a Sakura Gelly Roll pen, truly it's my very favorite gel pen.
 
All the patterned papers used were from the My Mind's Eye Lime Twist Happy Go Lucky 6 by 6 pad.

The teacup was cut using the Winter Frolic Cricut cartridge.  I custom created the scalloped part by using my Stampin' Up scallop border punch and then cutting little slits in the top so I could make the curve to match the teacup.  I was inspired by this Stampin' Up stamp set to use polka dots and then scallops:
 
 
  Sometimes I find inspiration that way, when I like a product but am not sure I will get it I search for ways to get a similar look with things I already have. The stamp set is called Tea Shoppe and it's in the Occasions Mini catalog that runs until April 30th if you happen to like it and want to get it.  I'm not a demo, just passing along the info.

I used the same border punch along the bottom.

The stamp is from a set called Short and Sweet from Stampin Up.  The ink color used was Mellow Moss.
 
I think this will make a nice card for a friend :)
Thanks for stopping by!

The button is from the $1 section of Michael's and the ribbon was in my stash.  I threaded the button with embroidery floss.

Wednesday, December 14, 2011

Little Gift Box


This thing is tiny.  It could hold a little gift like jewelry.

I used the Wrap it Up Cricut Cartridge to cut it out.

To make the snowflake stand out I used some Stickles in Waterfall.  I LOVE the look of colored Stickles on white paper like that to create another color without having to add another layer of paper.

For the sides I started off using a border punch by Martha Stewart called Doily Lace on some shimmery blue cardstock.  Then I wrapped it around the box.

I used some pink ribbon that has a cool crinkled texture over the blue cardstock.

On top of that I added some lavender ribbon with little snowflakes on it.

I'm really happy with how this came out and it was pretty quick to put together.  The downside is after I did all this to the box I realized I made it pretty stinkin hard to open!  *LOL*  I will manage to slip a gift inside it, but it may get ruined the second the person opens it.  

Hugs to all! I miss everyone!  I haven't been checking out my favorite blogs lately and I'd love to catch up with ya'll soon :) 

Monday, December 12, 2011

Baby It's Cold Outside


For this card I used:

Cricut Cartridge Winter Frolic.

Peachy Keen stamp set Wide Eyed Kids.

Pink by Design stamp from Christmas Wishes.  Stamped in Versamark and embossed with white embossing powder.

Felt Snowflake from Stampin' Up.
 
White gel pen by Sakura Gelly Roll.
Mirrored gems are from the Irock.

Stickles in Silver (on Skates) and Icicle - on Pom Pom.  Before adding the Icicle Stickles to the hat I added some Ranger Liquid Pearls in White Opal to cover the green paper since I wanted it to be white on top.

I used some Stampin' Up markers to add a little detail to the hair and some color for the mouth.

Monday, December 5, 2011

Snowflake Boxes


These little snowflake boxes were made to hold some small glass ornaments.

I used plain white cardstock that was 8 and 1/2 by 11 inches.

I used my Cricut and the Wrap it Up cartridge.  I used the fit to page feature and it told me it could cut the boxes at 8 inches, so that's the size I used.  Each side is around 2 and 1/4 inches.

Before I assembled the boxes I started off with stamping.  I grabbed my Stampin' Up Bordering Blue ink.  I used the SP & Company set called Falling Snow to put snowflakes on all sides of the box, EXCEPT the lid.  For this particular box the lid and bottom looked exactly the same, so I pretty much got to decide which one to use as the top.

After the snowflakes were all stamped I started using my ink blending tool to rub ink all over the box.  I did the lid too for that part.  Even though I used the same ink color as I did to stamp the snowflakes it worked perfectly because the blending creates a much lighter effect than direct stamping.

After the stamping and blending was done I created score lines and folded the boxes.  I did a bit more inking on the parts where the box folds to give a bit more definition.

I finished off the tops of the boxes with a couple layers of felt snowflakes and a little bit of Icicle colored Stickles.

Wednesday, October 19, 2011

Super Simple Scrappin'


Although I enjoy fussing over every detail with my cards I rarely do that on my scrapbook layouts.  Not sure why exactly.  Partly because the photos are the real star, partly because in a huge album of layouts I wonder how much one embellishment will stand out, partly because I get all frazzled and feel like I'll never have time to scrap all my photos if I spend too long on one layout.  *LOL*

So, today I present a super simple layout.  All the papers are from the DCWV Autumn Splendor stack that came out last year.

On the top of the layout I have strips that are 2 inches wide.  The paper has all kinds of words on it like "pumpkin picking" and "family outing" with lots of glitter.

Below that I have another strip that is 2 inches wide.  It's a brown gingham type paper.  I placed my title on it.  The title was cut from the Ashylyns Alphabet Cricut cartridge at 1.8 inches.  It's cut out of a polka dot paper.  The polka dots are teeny tiny, so they show up well on die cuts.

On the very bottom of the layout I have a strip that is 1 and 1/4 inches wide.  Yellow with some soft white flowers.

The main paper reminds me of growing grains or something.  I intend to lay 4 photos horizontally that measure 4 by 6.  They will cover both pages edge to edge to look like a continuous strip, to fit right in with the other long strips going across the pages.  When the photos are laid down there will be a bit of the "grain" paper showing on both the top and the bottom of the photos.

So easy, no stress!  By choosing all the papers from one stack and only die cutting a title I was able to whip this whole thing up from start to finish in about 15 minutes with no pre-planning whatsoever.  We are planning on going to a farm next weekend for fall festivities and I felt inspired to prepare a simple layout.

Friday, September 23, 2011

Dance Lessons Layout


Happy Friday!

Just popping in to share this layout.

The title was cut from Shall We Dance at 3.5 inches  I used some Marshmallow Glimmer Mist for  a touch of sparkle.

The journaling shape was cut from Once Upon a Princess.  The smaller one is 3 inches.  The larger one behind it is 3.3 inches, BUT I messed with the width in my Gypsy to make it look like a shadow and I don't know the exact final size.  I used some Ranger Liquid Pearls in Petal Pink to create tiny little pearls all around the edges.

The adorable little dancer was cut from One Upon a Princess at 7 inches.  I had lots of fun embellishing her.  I used a Peachy Keen Princess face.  I chalked her cheeks.  I took the bows that were supposed to be for her hair and added them to her leotard.  I used some Magenta Stickles on her bows and tutu, and also used them to free hand design a little heart.  Her tights are sparkling with Marshmallow Glimmer Mist.

Friday, September 16, 2011

Coffee Card w/ A Video


I wanted to play with the Cricut Lite cartridge Love You a Latte.  I stuck with mostly brown and vanilla shades with just a couple pops of pink for a fun and feminine touch.

Here's a quick supply list.

Cut from Love You a Latte at 3.5 inches

Inks:
Stampin' Up Creamy Caramel
Stampin' Up Close to Cocoa
ColorBox Fluid Chalk in Chesnut Roan

Stamps:
SP & Company Scripty Scripts
Stampin' Up Dot Dot Dot
The Paper Studio Coffee Cafe

Other:
EK Success Border Punch Open Scallop
Nestabilities in Circle and Lacey Circle
Twine from The Twinery in Cappuccino

To see me put the card together step by step with a few tips along the way check out the video below.


Thanks so much for visiting!  Happy Friday :)  I hope everyone has a fantastic weekend.