Tuesday, July 23, 2013

Colorful Birthday Card


The standard A2 card base is a grey from Papertrey Ink.

For the colorful layer I started with a plain white piece of cardstock cut to 4 by 5 and 1/4.  I sponged sections of color using the Stampin' Up inks Pixie Pink, Lavender Lace, and Tempting Turquoise.  After all the colors were applied I used the Tweed Pattern stamp from Hero Arts and some Memento Tuxedo black ink to finish the effect.  

I used the Spellbinders Labels 1 set to cut a shape to rest my cupcake on.  The shape is on one layer of thin foam tape, and the cupcake is on another layer.  The cupcake is from the Hero Arts set Cupcakes.  I colored it with Copics and added some Cotton Candy Stickles to the frosting.  That color of Stickles isn't super sparkly like most of the colors are,  it kind of reminds me of a dusting of sugar - very cool for food :)

I hand cut a little banner for the sentiment.  The sentiment is also from the Hero Arts Cupcake set.  I stamped it in Versa Mark and embossed it with some Zing powder in Grapefruit.  The button was from Papertrey ink and the twine was black and white, but hand died to have purple mixed with the black (friends and I made various colors for a swap.)  The banner is on a layer of pop dots.

I think this card would be great for a teenage girl, or even a younger girl may enjoy the bright colors.

Thanks for visiting friends!

Amber

Wednesday, July 17, 2013

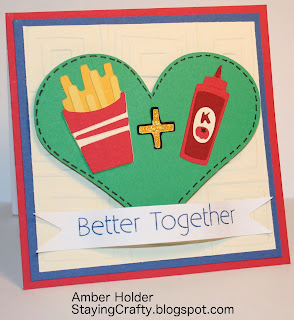
Ketchup and Fries Card


Here's a little 4 and 1/2 inch square card I whipped up.

The blue layer is 4 by 4.

The cream layer is 3 3/4 by 3 and 3/4  and it was embossed with the Cuttlebug folder Traffic Jam.

The green heart was cut from the Plantin' Schoolbook Cricut Cartridge.  I added some faux stitching with a black marker.

The ketchup and fries were cut from the Fast Food Cricut Cartridge.

Honestly I don't remember which cartridge the plus sign was from, but I added some Yellow Stickles to it.

For the sentiment I hand cut a banner shape and stamped the sentiment from My Pink Stamper's Friend-Tastic set in Brilliant Blue ink from Stampin Up.

I just love putting food in my paper craft projects - I don't know why but I think it's just SO cute :)

Thanks for stopping by!

Amber

Monday, July 15, 2013

Sparkly Rose Card


I have been wanting to play with different techniques for glittery images with color.

This was my first attempt and it has TONS of sparkle in person.

I started off by finding a drawing of a rose I liked on the internet.  I printed the drawing and then traced it onto a transparency sheet with a fine tip black Sharpie.

Then I flipped it over and used a couple sharpies to color the rose.  After it was all colored I used some Crystal Effects glue from Stampin' Up to apply the glitter to the back.  I had to do this in small sections so the glue would be wet enough to hold the glitter.

I left this to dry for a long time.  After it was really nice and dry I cut it out using my scissors.  I was surprised at how easily my scissors cut through the layers of glue and glitter, but it was nice and easy.

Once it was cut out I mounted it onto some black cardstock. I just used the same Crystal Effects glue.  I applied it in large dots all over the back of the rose and placed it on the cardstock.  Then I put some weight on it and left it to dry.

I layered it onto some green cardstock for a pop of color.  Then I layered it onto a purple card front.  

I stamped a sentiment from Papertrey Ink's Happy For You in Memento Tuxedo Black Ink.

For a finishing touch I added some fun bling in pink and green.

Crafty hugs!

Amber

Thanks so much for visiting and for all the sweet comments and e-mails.  I'm still very ill, but I'm trying several things in hopes to feel better.  I am trying to craft and blog visit as I'm able but I am very limited physically.

Friday, July 5, 2013

Wedding Card


Here's a wedding card I put together.

I started off with a simple vanilla card base.  I embossed the card front using the Cuttlebug folder Scrollwork.  It's such an elegant frame.

The die cuts are from Papertrey ink and it's their Man and Wife die set.  I added some Frosted Lace Stickles to the wedding dress.  They aren't very "glittery" but leave an awesome effect for certain things such as this.  The bouquet has Diamond Stickles on it.

There is a strip of vellum wrapped around the card front.  I stamped a sentiment from Papertrey Ink's Happy For You set.  I love this sentiment because the font is SO pretty and I can use it for such a variety of occasions.

The finishing touch are some pink gems from my stash.

I'm very happy with how this turned out.  It's got some elegance and a touch of sparkle but not too much going on to be distracting and overwhelming.

Thanks for visiting :)

Amber

Wednesday, July 3, 2013

Sewing Themed Pop Up Card


I wanted the inside of this card to look like a room.

I tried to make the top of the card look like crown molding, so I added some score lines to a cream piece of cardstock.  I think the effect is great, but of course it didn't photograph worth a hoot.

The desk and sewing machine are both Silhouette studio cut files.  I had to draw the thread on the sewing machine myself because the cut was just too tiny and didn't look right.  

I wanted to place to write my message to fit into the "room" theme like the crown molding and such so I used a couple Spellbinders dies and hope it looks like a rug on the floor.

I was really careful with my patterned paper choices to try and look like a wall and floor design.  The papers are from the Bo Bunny Garden Girl 6 by 6 pad.

Here's the outside of the card.


I really wanted to stick with the sewing theme.  I chose a patterned paper from the same pad that reminded me of a quilt.  It has all these great squares with designs in them just like a quilt.

I used my sewing machine to do some real stitching in brown thread.

I used the same Spellbinders dies as the inside of the card, and then popped them up for a touch of dimension.  I did some faux stitching with a white gel pen and stamped a Hero Arts sentiment from their set, Simple Things.

I think this would be a fun housewarming card, or just to give to another crafty friend.

Thanks for visiting!

Amber

Monday, July 1, 2013

Hello Lovely


To be honest I think I over did it on this card by adding too many elements, but I'm still going to give it to someone.  If I made it again I'd simplify.

I wanted to play around with my washi tape so I created the little panel to look a bit like patterned cardstock.  It's just the same design in 2 different colors.  The panel is popped up for a bit of dimension.

The medallion stamp is from Papertrey Ink's Mehndi Medallion Mini set.  The detail it has is really breathtaking.  I added a bunch of Irock gems to various spots in the medallion.  It adds lots of sparkle.

The ribbon is from Papertrey ink.  I put it around the card base, and then again around the popped up washi panel in the same spot to give the look of a clean line even though with the layering it's obvious the ribbon is not all one piece.

The sentiment is from Papertrey Ink's Happy for You set.  I just love the font and thought it went well with the elegant medallion.

A few more I rock gems in the bottom left and I was all done.

There's my little creation for today.  I think this sentiment is a good just because card for a friend.  It's nice to say something a little different once in awhile instead of always using the same phrases.

Amber